Spray Equipment and Calibration (AE73, Revised March 2018)
Availability: Web only
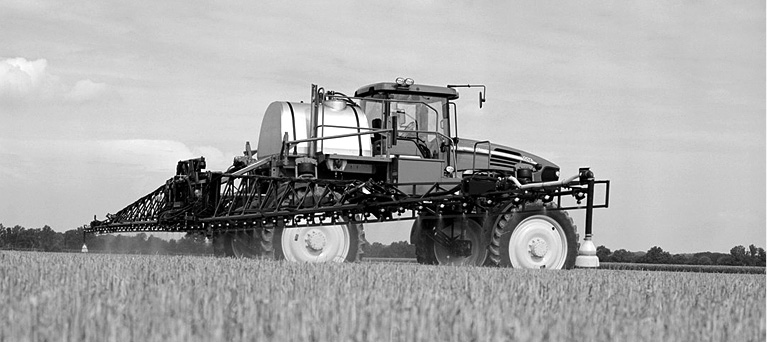
Spray pressures range from near 0 to over 300 pounds per square inch (PSI), and application rates can vary from less than 1 to over 100 gallons per acre (GPA). All sprayers have several basic components: pump, tank, agitation system, flow-control assembly, pressure gauge, and distribution system (Figure 1).
Figure 1. Typical agricultural spray system.
Properly applied pesticides should be expected to return a profit. Improper or inaccurate application is usually very expensive and will result in wasted chemical, marginal pest control, excessive carryover, or crop damage.
Agriculture is under intense economic and environmental pressure today. The high cost of pesticides and the need to protect the environment are incentives for applicators to do their very best in handling and applying pesticides.
Studies have shown that many application errors are due to improper calibration of the sprayer. A North Dakota study found that 60 percent of the applicators were over or under applying pesticides by more than 10 percent of their intended rate. Several were in error by 30 percent or more. A study in another state found that four out of five sprayers had calibration errors and one out of three had mixing errors.
Applicators of pesticides need to know proper application methods, chemical effects on equipment, equipment calibration, and correct cleaning methods. Equipment should be recalibrated periodically to compensate for wear in pumps, nozzles, and metering systems. Dry flowables may wear nozzle tips and may cause an increase in application rates after spraying as little as 50 acres.
Improperly used agricultural pesticides are dangerous. It is extremely important to observe safety precautions, wear protective clothing when working with pesticides, and follow directions for each specific chemical. Consult the operator’s manual for detailed information on a particular sprayer.
Pump and Flow Controls
Asprayer is often used to apply different materials, such as pre-emergent and postemergence herbicides, insecticides, and fungicides. A change of nozzles may be required, which can affect spray volume and system pressure. The type and size of pump required is determined by the pesticide used, recommended pressure and nozzle delivery rate. A pump must have sufficient capacity to operate a hydraulic agitation system, as well as supply the necessary volume to the nozzles. A pump should have a capacity of at least 25 percent greater than the largest volume required by the nozzles. This will allow for agitation and loss of capacity due to pump wear.
Pumps should be resistant to corrosion from pesticides. The materials used in pump housings and seals should be resistant to chemicals used, including organic solvents. Other things to consider are initial pump cost, pressure and volume requirements, ease of priming and power source available.
Pumps used on agricultural sprayers are normally of four general types:
• Centrifugal pumps
• Roller or rotary pumps with rolling vanes
• Piston pumps
• Diaphragm pumps
Centrifugal Pumps and Controls
Centrifugal pumps are the most popular type for low-pressure high-volume sprayers. They are durable, simply constructed, and can readily handle wettable powders and abrasive materials. Because of the high capacity of centrifugal pumps (130 gallons per minute [GPM] or more), hydraulic agitators can and should be used to agitate spray solutions even in large tanks.
Pressures up to 80 PSI are developed by centrifugal pumps, but discharge volumes drop off rapidly above 30 to 40 PSI. This “steep performance curve” is an advantage as it permits controlling pump output without a relief valve. Centrifugal pump performance is very sensitive to speed (Figure 2), and inlet pressure variations may produce uneven pump output under some operating conditions.
Figure 2. Centrifugal and roller pump performance.
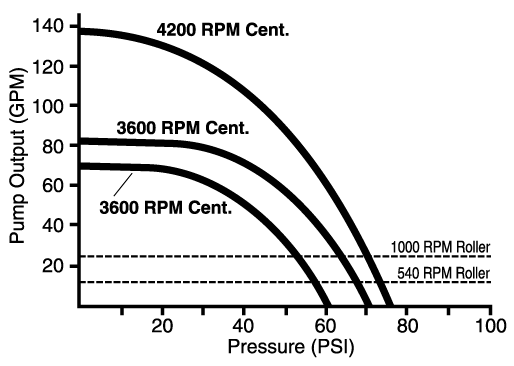
Centrifugal pumps should operate at speeds of about 3,000 to 4,500 revolutions per minute (RPM). When driven with the tractor PTO, a speed-up mechanism is necessary. A simple and inexpensive method of increasing speed is with a belt and pulley assembly. Another method is to use a planetary gear system. The gears are completely enclosed and mounted directly on the PTO shaft. Centrifugal pumps can be driven by a direct-connected hydraulic motor and flow control operating off the tractor hydraulic system. This allows the PTO to be used for other purposes, and a hydraulic motor may maintain a more uniform pump speed and output with small variations in engine speed. Pumps may also be driven by a direct-coupled gasoline engine, which will maintain a constant pressure and pump output independent of vehicle engine speed.
Centrifugal pumps should be located below the supply tank to aid in priming and maintaining a prime. Also, no pressure relief valve is needed with centrifugal pumps. The proper way to connect components on a sprayer using a centrifugal pump is shown in Figure 3. A strainer located in the discharge line protects nozzles from plugging and avoids restricting the pump input. Two control valves are used in the pump discharge line, one in the agitation line and the other to the spray boom. This permits controlling agitation flow independent of nozzle flow. The flow from centrifugal pumps can be completely shut off without damage to the pump. Spray pressure can be controlled by a throttling valve, eliminating the pressure relief valve with a separate bypass line. A separate throttling valve is usually used to control agitation flow and spray pressure. Electrically controlled throttling valves are popular for remote pressure control and are installed in an optional bypass line as shown in Figure 3.
Figure 3. Spray system with centrifugal pump.
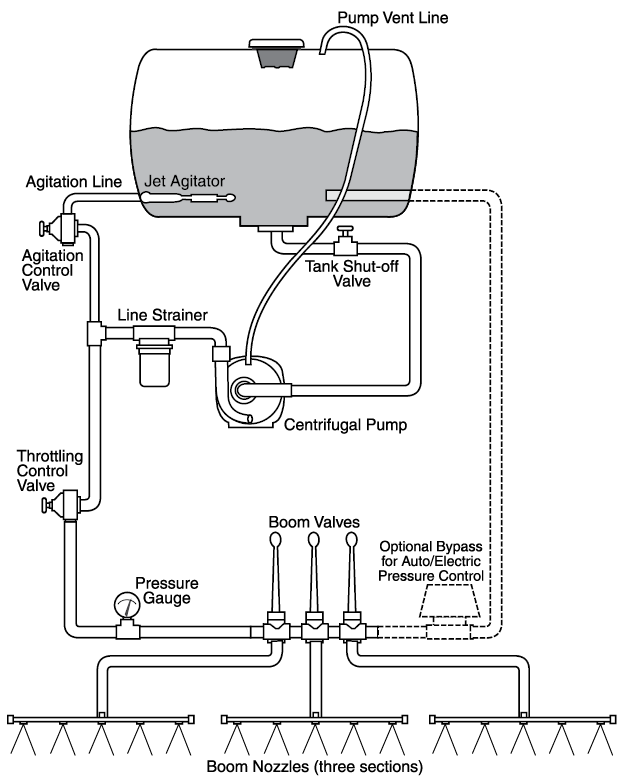
A boom shut-off valve allows the sprayer boom to be shut off while the pump and agitation system continue to operate. Electric solenoid valves eliminate the need for chemical-carrying hoses to be run through the cab of the vehicle. A switch box which controls the electric valve is mounted in the vehicle cab. This provides a safe operator area if a hose should break.
To adjust for spraying with a centrifugal pump (Figure 3), open the boom shut-off valve, start the sprayer and open the throttling control valve until pressure comes up to 10 PSI over the desired spraying pressure. Then adjust the agitation control valve until good agitation is observed in the tank. If the boom pressure has dropped slightly as a result of the agitation, readjust the main control valve to bring the pressure up to 10 PSI above spraying pressure. Then open the bypass valve to bring the boom pressure down to the desired spray pressure. This valve can be opened or closed as needed to compensate for system pressure changes so a constant boom pressure can be maintained. Be sure to check for uniform flow from all nozzles.
Roller Pumps and Controls
Roller pumps consist of a rotor with resilient rollers that rotate within an eccentric housing. Roller pumps are popular because of their low initial cost, compact size and efficient operation at tractor PTO speeds. They are positive displacement pumps and self-priming. Larger pumps are capable of moving 50 GPM and can develop pressures up to 300 PSI. Roller pumps tend to show excessive wear when pumping abrasive materials, which is a limitation with this pump.
Material options for roller pumps include cast-iron or corrosion resistant NI-resist housings; nylon, polypropylene, teflon or Buna-N-rubber rollers and Viton, Buna-N or leather seals. Nylon rollers are used for all-around spraying; they are suitable for fertilizers and weed and insect control chemicals, including suspensions. Buna-N rollers are used for pumping abrasive suspensions and water.
Polypropylene rollers have proved to be excellent for water handling applications and have approved wear characteristics. Teflon rollers have also demonstrated multi-use chemical handling ability. Roller pumps should have factory-lubricated sealed ball bearings, stainless steel shafts, and replaceable shaft seals.
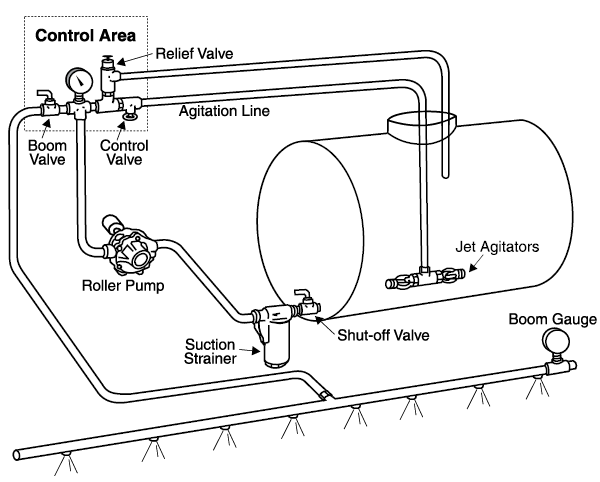
The recommended hookup for roller pumps is shown in Figure 4. A control valve is placed in the agitation line so the bypass flow is controlled to regulate spraying pressure. Systems using roller pumps contain a pressure relief valve (Figure 5). These valves have a spring-loaded ball, disc or diaphragm that opens with increasing pressure so excess flow is bypassed back to the tank, preventing damage to sprayer components when the boom is shut off.
Figure 4. Spray system with a roller pump.
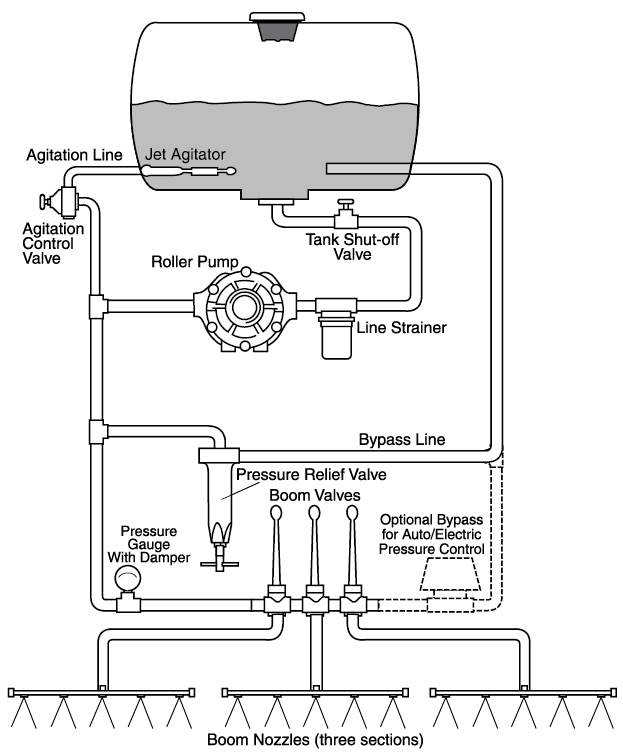
Figure 5. Pressure relief valve.
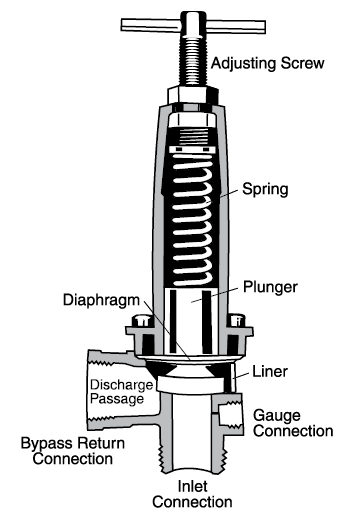
The agitation control valve must be closed and the boom shut-off valve must be opened to adjust the system (Figure 4). Start the sprayer, making sure flow is uniform from all spray nozzles, and adjust the pressure relief valve until the pressure gauge reads about 10 to 15 PSI above the desired spraying pressure. Slowly open the throttling control valve until the spraying pressure is reduced to the desired point. Replace the agitator nozzle with one having a larger orifice if the pressure will not come down to the desired point.
Use a smaller agitation nozzle if insufficient agitation results when spraying pressure is correct and the pressure relief valve is closed. This will increase agitation and permit a wider open control valve for the same pressure.
Piston Pumps and Controls
Piston pumps are positive displacement pumps, where output is proportional to speed and independent of pressure. Piston pumps work well for wettable powders and other abrasive liquids. They are available with either rubber or leather piston cups, which permit the pump to be used for water or petroleum based liquids and a wide range of chemicals. Lubrication of the pump is usually not a problem due to the use of sealed bearings.
The use of piston pumps for farm crop spraying is limited partly by their relatively high cost. Piston pumps have a long life, which makes them economical for continuous use. Larger piston pumps have a capacity of 25 to 35 GPM and are used at pressures up to 600 PSI. This high pressure is useful for high pressure cleaning, livestock spraying or crop insect and fungicide spraying. A piston pump requires a surge tank at the pump outlet to reduce the characteristic line pulsation.
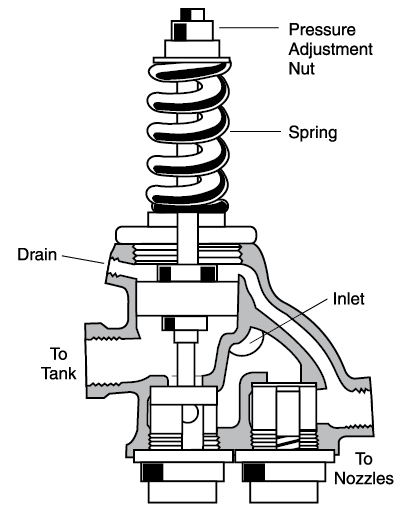
The connection diagram for a piston pump is shown in Figure 6. It is similar to a roller pump except that a surge tank has been installed at the pump outlet. A damper is used in the pressure gauge stem to reduce the effect of pulsa-tion. The pressure relief valve should be replaced by an unloader valve (Figure 7) when pressures above 200 PSI are used. This reduces the pressure from the pump when the boom is shut off so less power is required. If an agitator is used in the system, agitation flow may be influenced when the valve is unloading.
Open the throttling control valve and close the boom valve to adjust for spraying (Figure 6). Then adjust the relief valve to open at a pressure 10 to 15 PSI above spraying pressure. Open the boom control valve and make sure flow is uniform from all nozzles. Then adjust the throttling control valve until the gauge indicates the desired spraying pressure.
Figure 6. Spray system with piston or diaphragm pump.
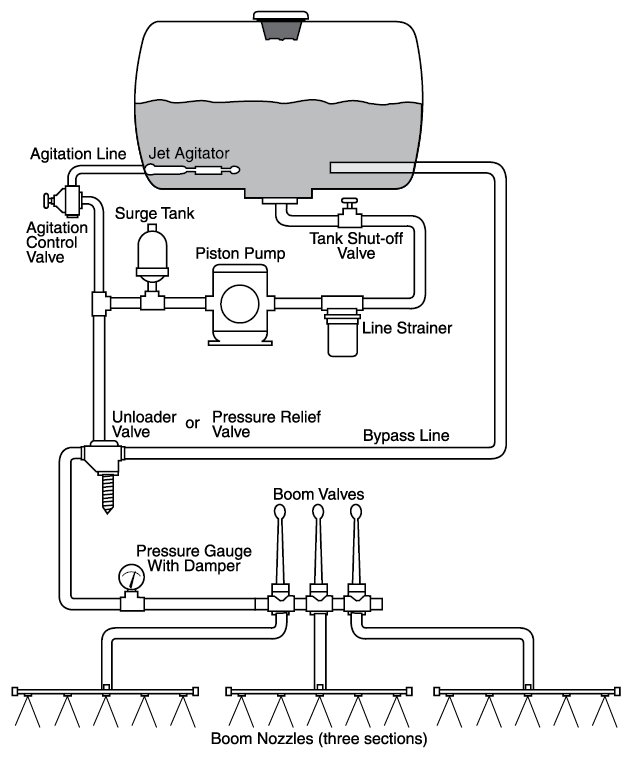
Figure 7. Unloader valve.
Diaphragm Pumps and Controls
Diaphragm pumps are popular in the agricultural market because they can handle abrasive and corrosive chemicals at high pressures. They operate efficiently at tractor PTO speeds of 540 rpm and permit a wide selection of flow rates. They are capable of producing high pressures (to 850 PSI) as well as high volume (60 GPM), but the price of diaphragm pumps is relatively high. High pressures and volumes are needed when applying some pesticides such as fungicides. Diaphragm pumps are excellent for this job. The spray system hookup for diaphragm pumps is the same as for piston pumps (Figure 6). Be sure the controls and all hoses are large enough to handle the high flow, and all hoses, nozzles and fittings must be capable of handling high pressure.
Spray System Pressure
The type of pesticide and nozzle being used usually determine the pressure needed for spraying. This pressure is usually listed on the chemical package. Low pressures of 15 to 40 PSI may be sufficient for spraying most herbicides or fertilizer, but high pressures up to 400 PSI or more may be needed for spraying insecticides or fungicides.
Spray nozzles are designed to be operated within a certain pressure range. Higher than recommended pressures increase the delivery rate, reduce the droplet size, and may distort the spray pattern. This can result in excess spray drift and uneven coverage. Low pressures reduce the spray delivery rate, and the spray material may not form a full width spray pattern unless the nozzles are designed to operate at lower pressures.
Always follow the pressure recommendations of nozzle manufacturers as explained in product catalogs.
Avoid using nozzles too small for the job. To double the spray rate from nozzles, the pressure has to be increased by a factor of four times. This may exert excessive strain on sprayer components, increase wear on the nozzles and produce drift-susceptible droplets.
A pressure gauge should have a total range twice the maximum expected reading. The gauge should indicate spray pressure accurately. Measuring the discharge rate at a specific pressure on the gauge is recommended during calibration. Install a gauge protector or damper to prevent damage.
Sprayer Tanks
The tank should be made of a corrosion-resistant material. Suitable materials used in sprayer tanks include stainless steel, polyethylene plastic and fiberglass. Pesticides may be corrosive to certain materials. Care should be taken to avoid using incompatible materials. Aluminum, galvanized or steel tanks should not be used. Some chemicals react with these materials, which may result in reduced effectiveness of the pesticide, or rust or corrosion inside the tank.
Keep tanks clean and free of rust, scale, dirt, and other contaminants which can damage the pump and nozzles. Also, contamination may collect in the nozzle and restrict the flow of chemical, resulting in improper spray patterns and rates of application. Debris can clog strainers and restrict flow of spray through the system.
Flush the tank with clean water after spraying is completed. A tank with a drain hole at the bottom near one end helps allow complete drainage. A tank with a small sump in the bottom is another excellent alternative. An opening in the top large enough for internal inspection, cleaning, and service is a necessity.
The capacity of the tank must be known to add the correct amount of pesticide. Most new tanks have capacity marks on the side. If your tank is not translucent, it should have a sight gauge to indicate the fluid level. The sight gauge should have a shut-off valve at the bottom to allow closing in case of damage. On plastic and fiberglass tanks, marks can be placed on the side of the tank. Your sprayer should be sitting on level ground when reading the gallons remaining in the tank. Incorrect volume readings cause improper amounts of pesticide to be added, which can result in poor pest control, crop injury, or increased pesticide cost.
Tank Agitators
An agitator in the tank is needed to mix the spray material uniformly and keep chemicals in suspension (Figures 8 and 9).
Figure 8. Jet agitators.
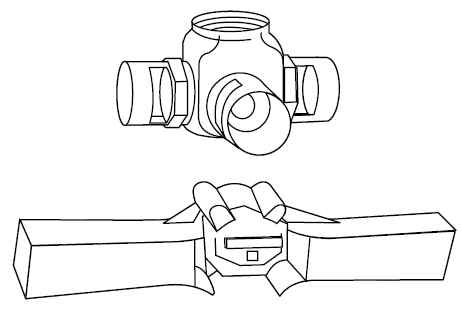
Figure 9. Sparge tube.
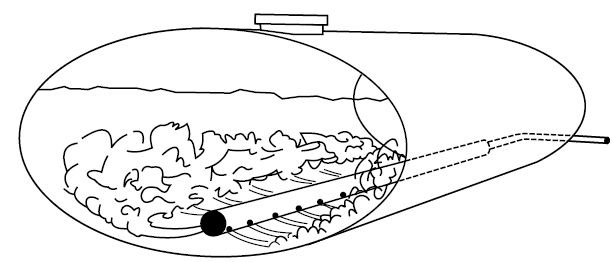
The need for agitation depends on the type of pesticide applied. Liquid concentrations, soluble powders, and emulsifiable liquids require little agitation. Intense agitation is required to keep wettable powders in suspension so a separate agitator, either a hydraulic or mechanical type, is required. The hydraulic jet type is operated by a pressure line hooked into the spray system directly behind the pump. The hydraulic jet agitator should be positioned in the tank to provide agitation throughout the tank. A flow of 5 to 6 GPM for each 100 gallons tank capacity is usually adequate for an orifice jet agitator. Several types of venturi-suction agitators are available that help stir the liquid with less flow. With these, the agitation flow from the pump can be reduced to 2 or 3 GPM per 100 gallon tank capacity.
Do not install a jet agitator on the pressure regulator bypass line, as low pressure and inter-mittent liquid flow will usually produce poor results. They will agitate the spray solution only when the spray boom is shut off.
A mechanical agitator with a shaft and paddles will do an excellent job of maintaining a uniform mixture but is usually more costly than a jet agitator. Mechanical agitators must be operated by a separate drive, hydraulic motor or 12 volt electric motor. They should be run between 100 and 200 RPM. Higher speeds may cause foaming of the spray solution. Adjustable agitators are desirable to minimize the foaming that can occur with vigorous agitation of certain pesticides as the volume in the tank decreases. Agitation should be started with the tank partly filled and before pesticides are added to the tank. With wettable powders and flowables, continue to agitate while filling the tank and during travel to the field. Don’t allow pesticides to settle as the spray mix must be kept uniform to avoid concentration error. This is especially important with wettable powders because they don’t dissolve, they are usually much heavier than water, and they are extremely difficult to get them in suspension after they have settled out in the tank and hoses.
Strainers
A plugged nozzle is one of the most frustrating problems that applicators experience with sprayers. Properly selected and positioned strainers and screens will do much to prevent nozzle plugging and reduce nozzle wear.
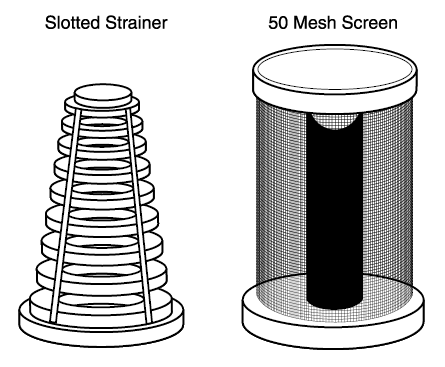
Three types of strainers are commonly used on agricultural sprayers: tank-filler strainers, line strainers, and nozzle screens. Strainer numbers (e.g. 20-mesh, 50-mesh, or 100-mesh) indicate the number of openings per inch. Strainers with high numbers have smaller openings than strainers with low numbers.
Coarse basket strainers set in the tank-filler opening prevent debris from entering the tank as it is being filled. A 16- or 20-mesh tank-filler strainer will also restrain lumps of wettable powder until they are broken up, helping to give uniform mixing in the tank.
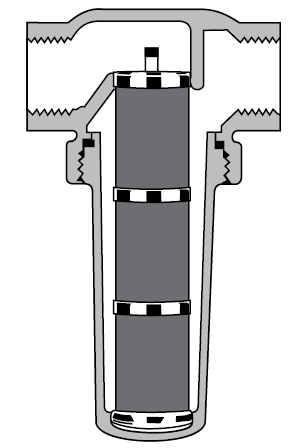
The line strainer is the most critical strainer of the sprayer (Figure 10). It usually has a screen size of 16 to 80 mesh, and it can be positioned between the tank and the pump, between the pump and the pressure regulator, or close to the boom, depending upon the type of pump used. Roller and other positive displacement pumps should have a line strainer (40- or 50-mesh) located ahead of the pump to remove material that would damage the pump. In contrast, the inlet of a centrifugal pump must not be restricted. A line strainer (usually 50-mesh) should be located on the pressure side of the pump to protect the spray and agitation nozzles. Be sure to clean this screen regularly.
Figure 10. Line filter.
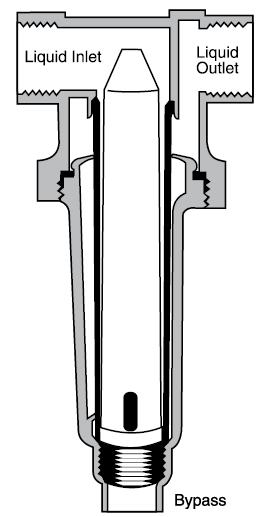
Self-cleaning line strainers are available for sprayers. However, these units require additional pump flow capacity to continually flush a portion of the fluid over the screen and carry trapped material back to the spray tank. Figure 11 shows a cut away of a self-cleaning strainer.
Figure 11. Self-cleaning line strainer.
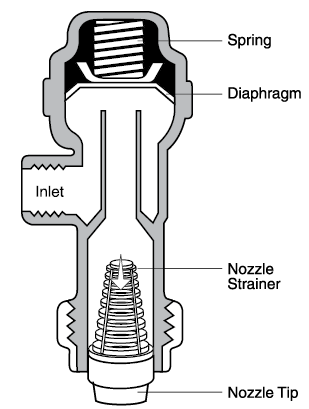
Nozzles are the third place screens are located. Small-capacity nozzles must have screens to prevent plugging. Typically 50- to 100-mesh screens are used (Figure 12). There is little benefit in using a screen size smaller than the nozzle orifice itself. In general, 80- to 100-mesh strainers are recommended for most nozzles with flow rates below 0.2 GPM, and 50-mesh strainers for nozzles with flow rates between 0.2 and 1 GPM. The pesticide being used or nozzle manufacturer may dictate the strainer size; e.g. a 50-mesh or larger screen is used with wettable powders. With a flow rate above 1 GPM, a nozzle strainer is not usually necessary if a good line strainer is used. Nozzle strainers are sometimes used with liquids containing suspended solids.
Figure 12. Nozzle strainer and screen.
Sprayer Distribution System
The sprayer will not function properly without proper hoses and controls to connect the tank, pump and nozzles as they are the key components of the spraying system.
Select hoses and fittings to handle the chemicals at the selected operating pressure and quantity. Peak pressures higher than average operating pressures are often encountered. These peak pressures usually occur as the spray boom is shut off. Choose components on the basis of composition, construction, and size.
Hose must be flexible, durable, and resistant to sunlight, oil, chemicals, and general abuse such as twisting and vibration. Two widely used materials that are chemically resistant are ethylene vinyl acetate (EVA) and ethylene propylene dione monomer (EPDM).
Suction hoses should be air-tight, non-collapsible, as short as possible, and as large as the pump intake. A collapsed suction hose can restrict flow and “starve” a pump, causing decreased flow and damage to the pump. If you cannot maintain spray pressure, check the suction line to be sure that it is not restricting flow.
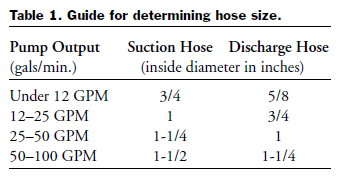
Other lines, especially those between the pressure gauge and the nozzles, should be as straight as possible, with a minimum of restric-tions and fittings. The proper size of these varies with the size and capacity of the sprayer. A high but not excessive fluid velocity should be maintained throughout the system. Lines that are too large reduce the fluid velocity so much that some pesticides, such as dry flowables or wettable powders, may settle out, clog the system, and reduce the amount of pesticide being applied. If the lines are too small, an excessive pressure drop will occur. A flow velocity of 5 to 6 feet per second is recommended. Suggested hose sizes for various pump flow rates are listed in Table 1. Some chemicals will react with plastic materials. Check sprayer and chemical manufacturers literature for compatibility.
Boom stability is important in achieving uniform spray application. The boom should be relatively rigid in all directions. Swinging back and forth or up and down is not desirable. Gauge wheels mounted near the end of the boom will maintain uniform boom heights. The boom height should be adjustable from 1 to 4 feet above the target.
Nozzles
Functions
The nozzle is a critical part of any sprayer. Nozzles perform three functions:
1. Regulate flow
2. Atomize the mixture into droplets
3. Disperse the spray in a desirable pattern.
Nozzles are generally best suited for certain purposes and less desirable for others. In general, herbicides are most effective when applied as
droplets of approximately 250 microns, fungicides are most effective at 100 to 150 microns, and insecticides at about 100 microns.
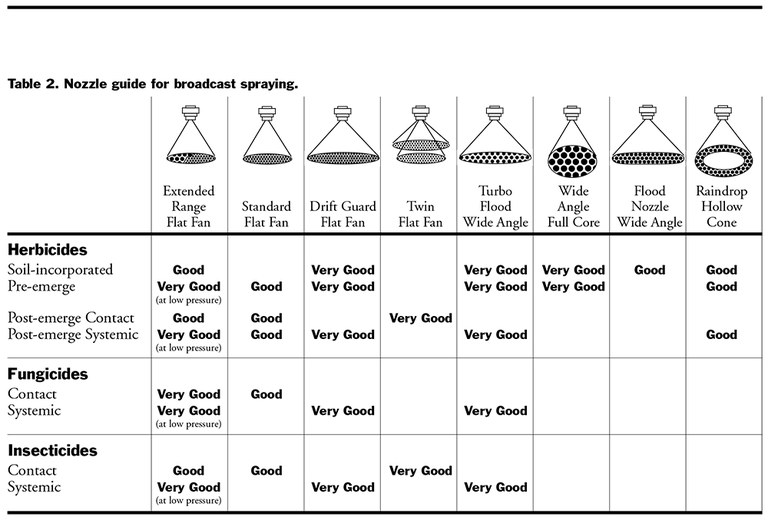
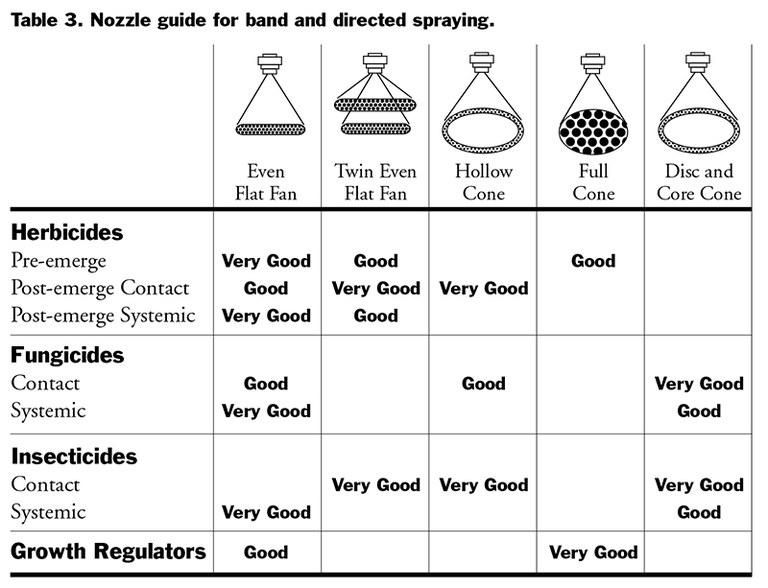
The chart in Table 2 compares various nozzles, their droplet sizes and their effectiveness for broadcast spraying. Table 3 compares nozzle characteristics for banding or directed spraying.
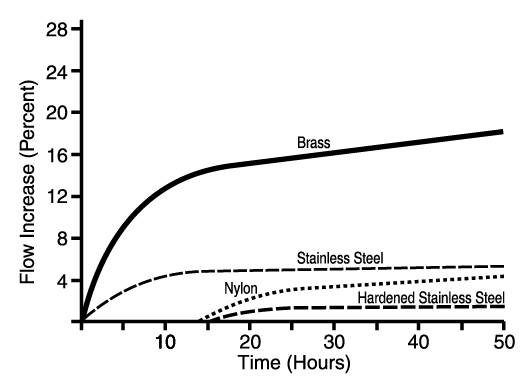
Nozzles determine the rate of pesticide distribution at a particular pressure, forward speed, and nozzle spacing. Drift can be minimized by selecting nozzles that produce the largest droplet size while providing adequate coverage at the intended application rate and pressure. Nozzles are made from several types of materials. The most common are brass, plastic, nylon, stainless steel, hardened stainless steel, and ceramic. Brass nozzles are the least expensive but are soft and wear rapidly. Nylon nozzles resist corrosion, but some chemicals cause thermoplastic to swell. Nozzles made from harder metals usually cost more but will usually wear longer. The durability of various nozzle materials compared to brass is shown in Figure
13. Nozzles wear with use and flow rate. It is important to check and replace worn nozzles regularly, because worn nozzles may increase pesticide application cost and cause crop injury, illegal rates or residue. For example, a 10 percent increase in flow rate may not be readily noticeable; however, spraying 150 acres with a pesticide that costs $10 per acre at the increased rate would cost an extra $1 per acre or $150 more for the field.
Figure 13. Wear rates of various nozzle materials.
Each nozzle on a sprayer should apply the sae amount of pesticide. If one nozzle applies more or less than adjoining nozzles, streaking may occur. Nozzle flow rates need to be monitored by regularly collecting the flow from each nozzle under operating conditions and compare the output. If the discharge from a nozzle varies more than 10 PERCENT above or below the average of all the nozzles, replace it.
Do not mix nozzles of different materials, types, discharge angles, or gallon capacity on the same sprayer. Any mixing of nozzles will produce uneven spray patterns.
Care must be used when cleaning clogged spray nozzles. The nozzle should be removed from the nozzle body and cleaned with a soft bristled nozzle cleaning brush. Blowing the dirt out with compressed air is also an excellent method. Do not use a small wire or jackknife tip to clean the nozzle orifice as it is easily damaged.
Flow Rate
Nozzle flow rate is a function of the orifice size and pressure. Manufacturers’ catalogues list nozzle flow rates at various pressures and discharge rates per acre at various ground speeds. In general, as pressure goes up flow rate increases, but not in a one-to-one ratio. To double the flow rate, you must increase the pressure four times. Many spray control systems use this principle to control output. They increase pressure to maintain correct application rates with an increase in speed. Use caution in speed changes as the spray system pressures may need to operate above recommended nozzle operating ranges, producing excessive driftable fines.
Drop Size
Once the spray material leaves the nozzle orifice, only droplet size, number and the velocity of drops can be measured. Droplet size is measured in microns. A micron is one millionth of a meter, or 1 inch contains 25,400 microns. To give this some perspective, consider that a human hair is approximately 56 microns in diameter.
All hydraulic nozzles produce a range of droplet sizes – some large droplets to many small drops. The size is expressed as volume median diameter (VMD). In other words, 50 percent of the volume is composed of droplets smaller than the VMD and 50 percent of the volume is in larger droplets. The VMD should not be confused with the NMD (number median diameter), which is usually a smaller number. The NMD is the median size that divides the spectrum of droplets into an equal number of smaller and larger drops. The design of the nozzle affects the droplet size and is a useful feature for certain applications. Large droplets are less prone to drift, but small droplets may be more desirable for better coverage. Pressure affects droplet size – higher pressures produce smaller droplets.
The size of the spray droplet can have a direct influence on the efficacy of the chemical applied, so selecting the proper nozzle type to control spray droplet size is an important management decision. When the average droplet diameter is reduced to half its original size, eight times as many droplets can be produced from the same flow. A nozzle that produces small droplets can theoretically cover a greater area with a given flow. This works down to a particular drop size. Extremely small drops may not deposit on the target, as evaporation is reducing their size during travel to the target and air currents in the drop pathway may interrupt the drop movement and carry the drop off-target. Environmental conditions of relative humidity and air currents (wind) can have a major affect on drop deposit on the target when small drops are used to apply pesticides.
Water-sensitive paper can be used to assess droplet size and density. Experience has shown that for low volume sprays with medium size droplets, insecticides should have a density of not less than 20 to 30 droplets/cm2, herbicides 20 to 40 droplets/cm2, and fungicides 50 to 70 droplets/cm2. Drop number and size can be estimated with a hand lens.
Nozzle Check Valves
Some nozzle strainers are equipped with check valves that produce quick shutoff and prevent dripping at the nozzle during turns or transport. Diaphragm check valves (Figure 14) are best at stopping nozzle drip. Ball check valves are more susceptible to corrosion than diaphragm check valves and are not as trouble free. Check valves cause a pressure drop of 5 to 10 psi, depending on the spring pressure in the valve. Check valves allow the nozzles to be changed without material leaking from the boom.
Figure 14. Diaphragm check valve.
Nozzle Spray Patterns
Every spray pattern has two basic characteristics: the spray angle and the shape of the pattern. Most agricultural nozzles have an angle from 65 to 120 degrees. Narrow angles produce a more penetrating spray; wide-angle nozzles can be mounted closer to the target, spaced farther apart on the boom, or provide overlapping coverage (Figure 15).
Figure 15. Basic nozzle spray angles and patterns.
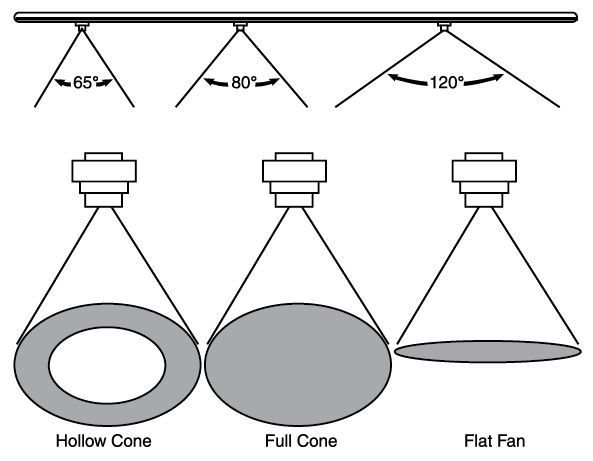
Though there are a multitude of spray nozzles, there are only three basic spray patterns: the flat fan, the hollow cone and the full cone. Each of these has specific characteristics and applications.
Flat-Fan Spray Nozzles
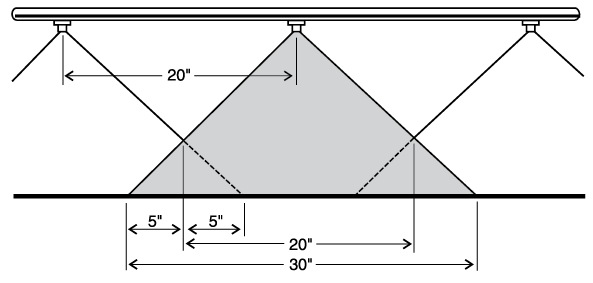
Flat-fan nozzles are widely used for broadcast spraying of herbicides and some insecticides. They produce a tapered-edge, flat-fan spray pattern. Less material is applied along the edges of the spray pattern, so the patterns of adjoining nozzles must be overlapped to give uniform coverage over the length of the boom. For maximum uniformity, overlap should be about 30 to 50 percent of the nozzle spacing (Figure 16) at the target level. Normal operating pressure is variable depending on the nozzle used.
Figure 16. Proper overlap with a flat-fan type nozzle on a 20-inch nozzle spacing.
Lower pressures produce larger droplets, which reduces drift potential, while higher pressures produce small drops for maximum plant coverage, but small drops are more susceptible to drift. Newer extended range nozzles are available that will operate over a range of 15 to 60 psi without causing a significant effect on the width of the spray pattern. These nozzles produce the same flow rate and spray pattern as a regular flat-fan nozzle at the same pressure. Lower operating pressure produces larger droplets and reduces the drift potential while the higher pressures produce fine drops with higher drift potential. Extended range nozzles operate over a wider pressure range and work well with automatic spray controls.
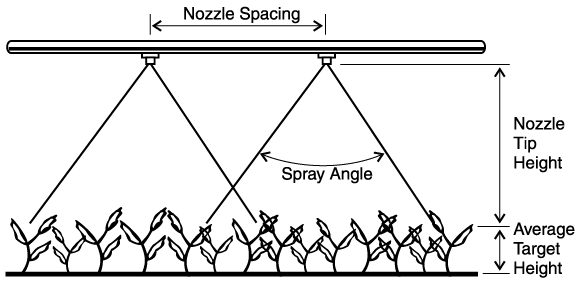
Flat-fan nozzles are available in several spray discharge angles. The most commonly used nozzles are listed in Table 4. Proper spray boom height depends on nozzle discharge angle and is measured from the target to the nozzle. For postemergence pesticides, the target is the growing crop and not the soil surface (Figure 17).
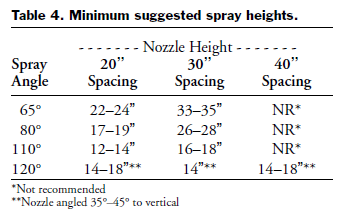
Figure 17.
Another flat-fan nozzle designed as a drift reducing nozzle was recently introduced by several manufacturers. This nozzle has a chamber ahead of the final orifice that is effective in reducing the number of fine droplets dispersed that are susceptible to drift. It contains an internal chamber that reduces the operating pressure at the outer orifice, reducing the fines produced.
A recent nozzle introduction is called the Turbo Teejet flat-fan nozzle from Spraying Systems Co. It contains a pre-orifice design that creates a large drift-resistant drop over a wide pressure operating range of 15-90 PSI that will reduce the driftable fires. This nozzle is designed to fit nozzle caps that hold standard flat fan nozzles.
“Even” Flat Fan Spray Nozzles
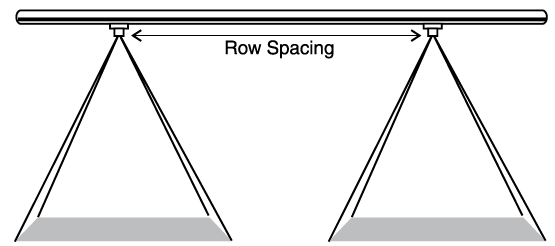
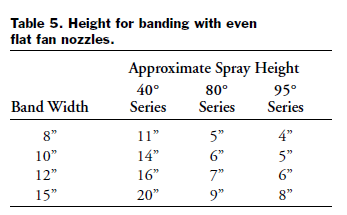
“Even” flat-fan nozzles apply a uniform coverage across the entire width of the spray pattern (Figure 18). They should be used for banding pesticides over the row and should be operated between 30 and 40 PSI. This nozzle should not be used for broadcast applications. The width of the band is dependent upon the nozzle height above target and spray pressure as shown in Table 5.
Figure 18. Discharge pattern of an “Even” spray nozzle.
Flooding Fan Nozzle
Flood fan nozzles produce a wide-angle, flat-spray pattern and are used for applying herbicides and mixtures of herbicides and liquid fertilizers. The nozzle spacing for applying herbicides should be 60 inches or less. These nozzles are most effective in reducing drift when they are operated within a pressure range of 10 to 25 PSI. The width of the spray pattern of flood nozzles is changed more by pressure changes than occurs with flat-fan nozzles. Also, the distribution pattern is not as uniform as that of the regular flat-fan nozzle. The best distribution is achieved when the nozzle is mounted at a height and angle to obtain at least 100 percent overlap (double coverage). When set for 100 percent overlap, a change in nozzle
pressure distorts the spray pattern.
A new nozzle called the “turbo floodjet” from Spraying Systems Company produces larger drops and a more uniform spray pattern than a standard flood tip. It is designed to reduce drift and provides uniform deposition with 30 to 50 percent overlap instead of 100 percent required by standard flood nozzles. The turbo flood nozzle is designed for use with soil incorporated herbicides and liquid fertilizer and should be operated at pressures ranging from 10-20 PSI.
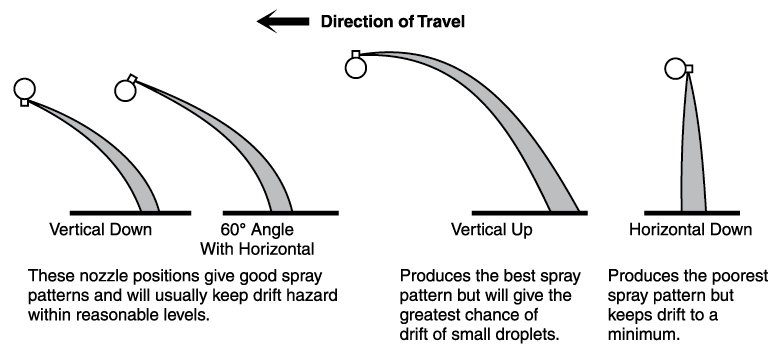
Flood nozzles can be mounted so they spray straight down, straight back, or at any angle in between (Figure 19). Studies indicate the most uniform pattern is obtained when the spray is directed straight back, but this will produce the greatest chance for drift of the small droplets. Directing the spray straight down will minimize the drift potential but produces the most irregular spray pattern. The best com-promise position is to set the nozzle at a 45 degree angle with the sprayed surface. Care should be taken so incorporation equipment does not intercept or interfere with the spray
discharge pattern.
Figure 19. Various positions for mounting flood nozzles.
Hollow Cone Nozzles
Hollow cone nozzles are generally used to apply insecticides or fungicides to field crops where complete coverage of the leaf surface is important. The hollow cone pattern is used for applications where a fine spray pattern is needed for thorough coverage. These nozzles usually operate in the pressure range of 40 to 100 PSI or more depending on the nozzle being used and the pesticide applied. Spray drift is higher with hollow cone nozzles than with other nozzles as small droplets are produced.
A hollow cone nozzle produces a spray pattern with more of the liquid concentrated at the outer edge of the pattern (Figure 15) and less in the center. Any nozzle producing a cone pattern, including the whirl-chamber type, will not provide uniform distribution for broadcast applications when directed straight down at the sprayed surface. They must be angled 30 to 45 degrees from the vertical.
Hollow cone nozzles used on high pressure sprayers for applying fungicides can be aimed straight down when they are spaced 10 to 12 inches apart. This produces extremely fine drops which move enough to compensate for the non-uniformity of the pattern.
“Raindrop” nozzles from Delavan have been designed to produce large drops in a hollow cone pattern at pressures of 20 to 60 PSI. They are designed to reduce spray drift and are recommended for broadcast applications when tilted 45 degrees or more from the vertical.
Full Cone Nozzles
The full cone nozzle produces a swirl and a counter swirl inside the nozzle that results in a full cone pattern. Full cone nozzles produce large, evenly distributed drops and high flow rates. A wide full cone tip maintains its spray pattern over a range of pressures and flow rates. It is a low-drift nozzle and is often used to apply soil incorporated herbicides.
Nozzle Adjustment Problems
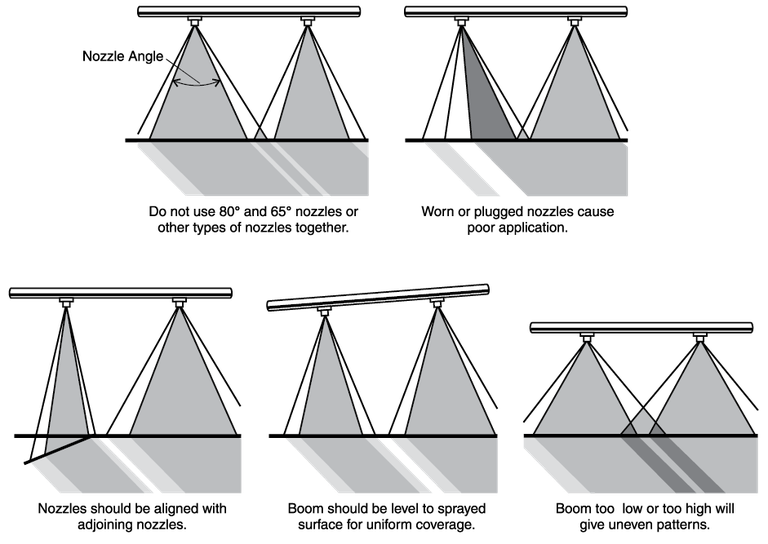
For broadcast application, flat-fan nozzles should be properly spaced and adjusted on the sprayer. For good spray coverage, nozzle discharge angle, nozzle distance from the sprayed surface and nozzle spacing on the boom must all be considered. Refer to Table 4 for proper nozzle adjustments. Figure 20 shows some of the spray patterns that may result from common boom adjustment problems.
Figure 20. Some common errors in nozzle and boom adjustment.
Other Pesticide Application Equipment
Wiper Applicators
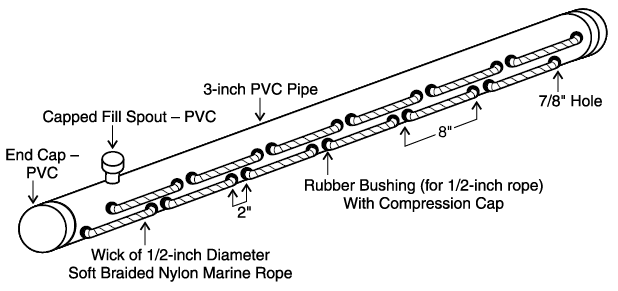
Several types of wiper applicators are available commercially. One consists of a long horizontal tube or pipe (3 to 4 inches in diameter) which is filled with a systemic herbicide (Figure 21). A series of short, overlapping ropes or a wetted pad on the tube is in contact with the herbicide and becomes saturated by wicking action. Another unit is the roller applicator which consists of a tube 8 to 12 inches in diameter turned by a hydraulic motor. The tube is covered with carpet that is being continuously wetted. These units are mounted on the front or rear of a tractor on a three-point-hitch that is hydraulically adjusted so it can be set at a height so the pad applies herbicide to weeds taller than the crop but does not contact the crop. Best results are obtained with double coverage of wiper applicators. The second pass should be in the opposite direction to the first pass so two sides of the plant are covered.
Figure 21. Typical rope wick applicator showing the components assembled.
Injector Sprayers
Injector sprayers continuously meter concentrated pesticide into the spray system as needed. They contain two or more tanks with one or two tanks for concentrated pesticide and a larger tank for carrier. Some units are designed so the volume of pesticide metered is determined by ground speed. Others are adjusted based on a constant travel speed. Any change in speed may cause over or under application.
The advantage of injector sprayers is that no mixed chemical is left over when the application is complete. These units may also be used to save weed control by spot spraying troublesome pests that may be encountered. This is done by adding to the spray solution another pesticide that effectively controls the isolated or patches of pests instead of treating the whole area with both pesticides.
One problem with injection sprayers is the timely injection of the chemical into the system so it is discharged at the proper time. Lead time on injection may vary due to the size of the hoses on the sprayer, travel speed, the amount of liquid being applied, and the point of injection of the chemical into the system. Injection equipment requires precise measuring equipment that is maintained in good condition. Remember, it is more difficult to measure a small amount of chemical on a continuous basis as compared to measuring one larger quantity and mixing it in the spray tank.
Spray Monitors
Spray monitors may be of two types – nozzle monitors and system monitors. Use of the nozzle monitor will alert the operator to a nozzle problem immediately so corrections can be made and skips in the field avoided.
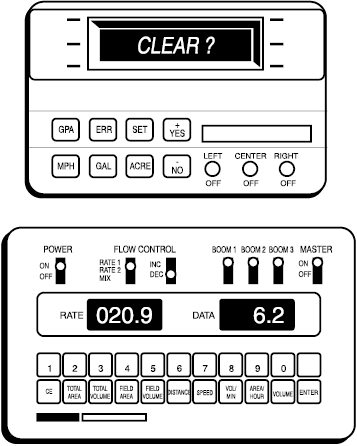
System monitors detect the operating conditions of the total sprayer. They are sensitive to variations in travel speed, pressure and flow rate. These values, along with operator input such as swath width and gallons of spray in the tank, are fed to a computer that calculates and displays the travel speed, pressure and application rate (Figure 22). The monitor can also calculate and display other information – the field capacity in acres per hour, the acres covered, the remaining mix in the tank and the distance covered. To function properly, the monitor must have suitable sensors which are accurately and regularly calibrated.
Figure 22. Typical sprayer control monitors.
Some monitors can also control the flow rate and pressure automatically to compensate for changes in speed or flow. The automatic flow rate controller will respond if there is a change of the monitored rate from the desired flow rate. Flow compensation is usually done by changing the pressure setting within a certain range. If for some reason, such as an excessive speed change or problems with the spray system, the controller is not able to bring the application rate back to the programmed flow rate, the unit will signal the operator that a problem exists. Monitors are helpful in precise chemical application work and should result in better pest control, more efficient distribution and reduced chemical cost.
Swath Markers
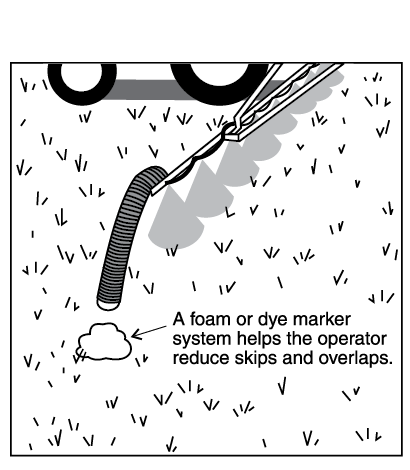
Foam and dye marker systems aid uniform spray application by marking the edge of the spray swath (Figure 23). This mark shows the operator where to drive on the next pass to reduce skips and overlaps and is a tremendous aid in non-row crops such as spraying tilled fields for applying pre-emergent pesticides. The mark may be continuous or intermittent. Typically, 1-2 cups of foam are dropped every 25 feet. The foam or dye requires a separate tank and mix, a pump or compressor, a delivery tube to each end of the boom and a control to select the proper boom end. Another marker is the paper type. This unit drops a piece of paper intermittently the length of the field. The paper may blow across the field unless it can be anchored by applying some moisture from the sprayer on the paper.
Figure 23. Foam marker.
Global Positioning System
Technology is now available to automatically determine position using the global positioning system (GPS) (Figure 24). This system, developed by the U.S. Department of Defense, uses a network of 24 satellites orbiting the earth. The user must have a receiver to interpret the signals sent from the satellites and to compute its position. It works whether the receiver is stationary or mobile, anywhere in the world, 24 hours a day.
Figure 24. Global positioning system.
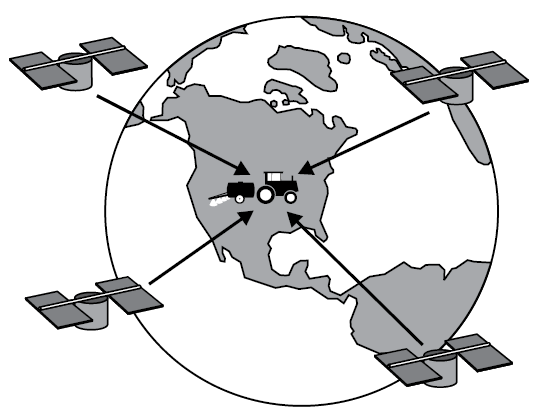
Signals from three satellites are required to determine a two-dimensional position on the earth. Altitude determination requires a signal from a fourth satellite. The global positioning system is in use now in aerial and ground application work and holds good potential for improved pesticide application by spotspraying patches of weeds with a chemical injection system or maintaining better swath spacing.
Equipment Guidance Systems
Lightbar-guided and automated steering systems help maintain precise swath-to-swath widths. Guidance systems identify an imaginary A-B starting line, curve or circle for parallel swathing using GPS positions and a control module. The module takes into account the swath width of the implement and then uses GPS to guide machines along parallel, curved, or circular evenly spaced swaths. Guidance systems include a display module that uses audible tones or lights as directional indicators for the operator. The guidance system allows the operator to monitor the lightbar to maintain the desired distance from the previous swath.
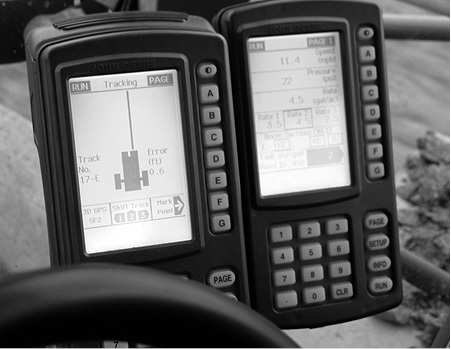
Guidance systems require two principle components: a light bar or screen, which is essentially an electronic display showing a machine’s deviation from the intended position (Figure 25), and a GPS receiver for locating the position. This receiver must be designed for this purpose and it must operate at a higher frequency (position calculations are usually 5 to 10 times per second) than a GPS receiver designed to record positions for a yield monitor. GPS receivers designed for guidance can be used in conjunction with a yield monitor or for other positioning equipment.
Figure 25. A guidance system.
Automated steering systems integrate GPS guidance capabilities into the vehicle steering system. Automated steering frees the operator from steering the equipment except at corners and at the ends of fields.
Shielded Spray Boom
Shielded spray booms or completely covered booms show potential for use on broadcast sprayers to increase spray deposition in the target swath. Studies show that shielded booms and individual nozzle shield cones can reduce spray drift by 50 percent or more. Research shows that spray drift with a shielded sprayer operating in a 20 mph wind is equal to or less than an unshielded boom operating in a 10 mph wind. Shields DO NOT eliminate all drift; they only reduce the amount. Be aware of susceptible crops downwind and use caution when spraying. Be sure to check with the state department of agriculture or agency that is responsible for enforcing state pesticide laws to be sure they allow spraying during strong wind conditions when shields are used.
The main disadvantage of shielded booms is the increased weight that must be carried on the boom and the added cleanup of the shield when different pesticides are going to be applied with the sprayer. A wheel-carried boom is almost a necessity to carry the extra weight and maintain a stable boom height. Sprayer cleanup should be done in the field or on a sprayer mixing/loading pad that collects washwater so the rinsate can be contained and used as makeup water for future spraying jobs.
Air Assist Sprayers
Air assist sprayers inject pesticides into a high-speed air stream, which helps carry the chemical to the crop to give better penetration of the crop or weed canopy. Studies show that air assist sprayers are capable of carrying spray drops deeper into the plant canopy and help deposit more pesticide on the underside of crop or weed leaves than other sprayers and may improve pest control.
NDSU studies show in a full potato plant canopy, that air assist sprayers improve leaf coverage about 5% over conventional sprayers at the same application rate.
Air assist sprayers may have a high drift hazard early in the growing season when the plant canopy is small. It is recommended to reduce the air velocity in small or young crop canopies due to the small drops produced. This is due to dissipation of the air blast when hitting the ground, and the resulting upward rebound of the air that can carry the small spray drops up and drift away. Spray drift hazard is considerably lower when used to apply pesticides to full plant canopies later in the growing season.
Spray Drift
Drift of pesticides away from the target is an important and costly problem facing applicators. In addition to the potential damage to non-target areas, drift tends to reduce the effectiveness of chemicals and costs money. Drift can occur by two different means.
VAPOR DRIFT occurs when a chemical vaporizes after being applied to the target area. The vapors are then carried to another area where damage may occur. The amount of vaporization that occurs depends largely on the air temperature and formulation of the pesticide being used. Some products may vaporize rapidly at temperatures as low as 40 degrees Fahrenheit. “Low volatile” esters of 2, 4-D or MCPA may vaporize at 75-90 F. The amine formulations of 2, 4-D or MCPA are essentially “non-volatile.” The dangers of vapor drift can be reduced substantially by choosing the correct herbicide formulation.
PHYSICAL DROPLET DRIFT is the actual movement of spray particles away from the target area. Many factors affect physical drift, but one of the most important is droplet size. Small droplets fall through the air slowly, so they are carried farther by air movement.
Liquid sprayed through a nozzle divides into droplets that are spherical or nearly spherical in shape. The recognized measurement for indicating the size of these droplets is in microns.
Droplets smaller than 100 microns are usually considered highly “driftable.” Drops this size are so small that they cannot be easily seen unless in extremely high concentrations such as on a “foggy” morning.
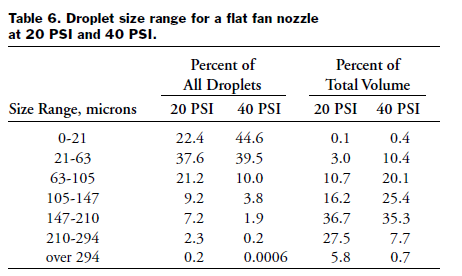
All spray droplet atomizers available today produce a range of droplet sizes. Some produce a wider range than others. Table 6 shows a typical distribution of droplet sizes for a flat-fan nozzle when spraying water at two different pressures. Most of the droplets produced from a hydraulic spray nozzle are small. Table 6 indicates that more than half of all of the droplets were less than 63 microns in diameter at 20 or 40 PSI. However, little of the total volume is contained in droplets less than 63-micron diameter. Most of the volume is contained in the larger droplets, particularly those ranging in size from 63 to 210 microns. These principles hold true for both pressures, although increasing the pressure caused more of the spray to be contained in small droplets. Even though the volume of small droplets is low, downwind crops can be seriously affected if the crop is susceptible to injury from the pesticide.
The number of droplets deposited per square inch of surface from the ordinary spray nozzle is normally far more than the minimum required to control a specific pest. In some situations, particularly when using fungicides or insecticides, high spray droplet density may be needed. Table 7 shows that coverage or density of droplets on a surface can be theoretically achieved with uniform droplets of various sizes when applied at 1 gallon per acre. Decreasing the drop size from 200 to 20 microns will increase coverage 10 fold. Results of many studies indicate that spray density required for effective weed control varies considerably with plant species, plant size and condition as well as herbicide type, additives and carrier used. Table 7 shows that drop density decreases for drops above 200 microns in diameter at low application rates. Although excellent coverage can be achieved with extremely small drops, decreased deposition and increased drift potential limit the minimum size drop that will provide effective pest control.
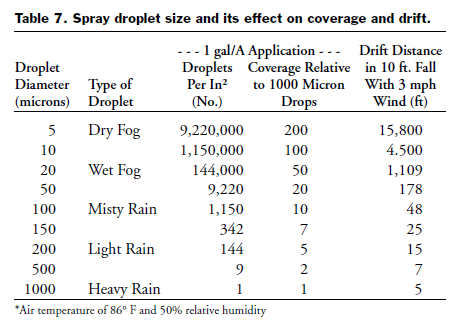
Drift potential of various size drops is also shown in Table 7. It can be seen that a non-evaporating 100 micron drop will move 48 feet horizontally in a 3 mile per hour breeze while falling 10 feet. Drops under 50 microns are nearly invisible in the air and can remain suspended for long periods of time. The objective in applying pesticides is to achieve uniform spray distribution while retaining all the spray droplets within the intended spraying area.
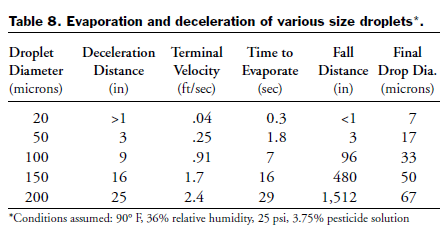
Spray liquid may have a velocity of 60 feet per second or more when leaving a nozzle. The speed is reduced due to air resistance and the spray material breaking into small drops. Table 8 shows the distance in which droplets will decelerate to a free fall condition and the length of their life before they disappear due to evaporation. For example, water droplets less than 20 microns in diameter will evaporate in less than one second while falling less than one inch. Droplets over 100 microns in size resist evaporation much more than smaller droplets due to their larger ratio of volume to surface area.
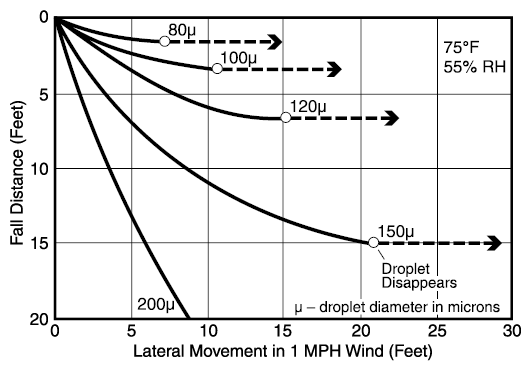
With water carriers, spray droplets will decrease in size due to evaporation during their fall. Figure 26 shows the trajectories of evaporating spray droplets falling through stable air at 77 F, having 55 percent relative humidity in a 1-mile per hour crosswind. Droplets less than 100 microns in size obtain a horizontal trajectory in a very short time and the water in the droplet disappears. The active ingredient in these droplets become very small aerosols, most of which will not reach the ground until picked up in falling rain. From Figure 26, it can be concluded that there is a rapid decrease in drift potential of droplets as they increase to about 150 or 200 microns. The size drop where drift potential decreases depends on wind speed, but generally lies in the range of 150 to 200 microns for wind speeds of 1 to 7 miles per hour. For typical ground applications of herbicides with water carriers, droplets of 50 microns or less will completely evaporate to a residual core of pesticide before reaching the target. Droplets greater than 150 microns will have no significant reduction in size before deposition on the target. Evaporation of droplets between 50 and 150 microns are significantly affected by temperature, humidity, and other climatic considerations.
Figure 26. Evaporation rate of water droplets.
Drift is not always harmful. It depends on the pesticide being used, the targeted pest and the non-target organisms or objects that are downwind or adjacent to your target area. Keep in mind that if you have considerable drift downwind you will be losing pesticide. Drift from most herbicides should be kept to a mini-mum and all drift reducing techniques should be used if the chemical permits. When using an insecticide for mosquito control, “drift” may be desirable. In this situation, a small driftable droplet is needed to get into small areas to do an effective job.
Several factors affect droplet size and potential drift. They include:
1. Wind direction
2. Wind speed
3. Air stability
4. Nozzle type
5. Flow rate
6. Spray pressure
7. Nozzle spray angle
8. Boom height
9. Relative humidity and temperature
10. Spray thickeners
11. Shielded booms
Wind direction: Pesticides should not be applied when the wind is blowing toward an adjoining susceptible crop or to a crop in a vulnerable stage of growth. Wait until the wind blows away from any susceptible crop, plants or sensitive areas downwind.
Wind speed: The amount of herbicide lost from the target area and the distance it moves both increase as wind velocity increases. However, severe drift injury can occur with low wind velocities, especially under temperature inversion conditions.
Air stability: Air movement largely determines the distribution of spray droplets. Wind is generally recognized as an important factor, but vertical air movement is often overlooked. Temperature inversion is a condition where cool air near the soil surface is trapped under a layer of warm air. A high inversion potential occurs when ground air is 2 to 5 F cooler than the air above. Under inversion conditions, little vertical mixing of air occurs, even with a breeze. Spray drift can be severe under inversion conditions since small spray droplets may fall slowly or may stay suspended due to the cool dense air and will move with a gentle breeze into an adjoining area.
Spray drift may occur even with relative calm conditions under stable air or an inversion condition, especially with small spray droplets. Some of the most severe drift problems have occurred with low wind velocities, inversion conditions and small spray droplets. Avoid spraying under inversion conditions. Spray drift potential can be reduced by increasing droplet size, by using larger orifice nozzles and/or lower spray pressures with extended range nozzles.
Another cause of spray drift is from “lapse” being greater than a 3.2 F, decrease per 1,000 feet altitude. Under a normal “lapse” situation, cool air gently sinks, displacing lower warm air and causing vertical mixing of air. This may cause small droplets to be carried aloft and dispersed. When the “lapse” is stronger, more spray will be carried upward causing a greater chance for spray drift. Research has shown that temperature inversion causes more spray drift than “lapse” conditions at a given wind speed.
Avoid applying herbicides near susceptible crops during temperature inversion conditions. Inversions can often be identified by observing smoke from a fire. Smoke moving horizontally close to the ground would indicate a temperature inversion.
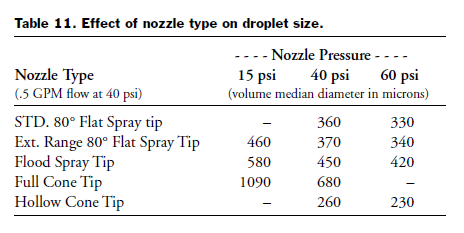
Nozzle type: Droplet sizes produced by various nozzle types at different spray pressures are shows in Table 11. Flat-fan and flood nozzles produce similar sized droplets. The full cone nozzle produces larger droplets than the flat fan, while the hollow cone nozzle produces smaller droplets than the flat fan.
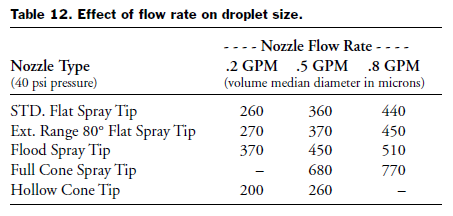
Flow rate: Nozzle flow rate has a large effect on drop size. This is shown Table 12. Nozzles with small orifices produce small drops while large nozzles produce larger drops. Increasing nozzle size to the next step up in size is an excellent way to reduce the number of driftable fines.
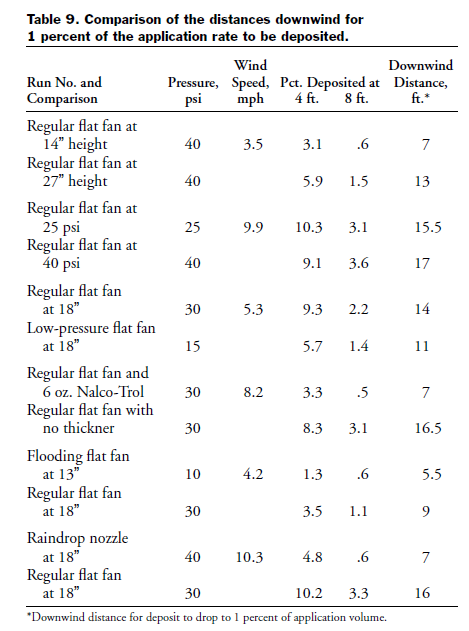
Spray pressure: Spray pressure influences the formation of droplets from the spray solution. The spray solution emerges from the nozzle in a thin sheet, and droplets form at the edge of the sheet. Higher pressures cause the sheet to be thinner, and this sheet breaks up into smaller droplets. Large nozzles with higher delivery rates produce larger droplets than smaller nozzles. Small droplets are carried farther downwind than larger drops formed at lower pressures. Table 9 shows the percentage of chemical deposited downwind at various distances. It also shows the distance downwind at which the chemical deposition rate decreases to 1 percent of the application rate.
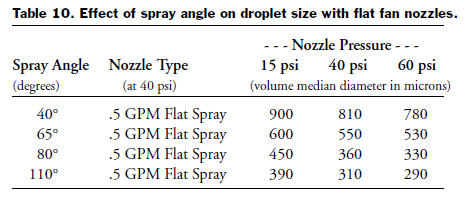
Nozzle spray angle: Spray angle is the interior angle formed between the outer edges of the spray pattern from a single nozzle. Table 10 shows that nozzles with wider spray angles will produce a thinner sheet of spray solution and smaller spray droplets than a nozzle with the same delivery rate but narrower spray angle. However, wide angle nozzles are placed closer to the target than narrow ones, and the benefits of lower nozzle placement outweigh the disadvantage of slightly smaller droplets.
Volume median diameter (VMD) is a term used to describe the droplet size produced from a nozzle. VMD is defined as the diameter at which half the spray volume is in droplets of larger diameter and the other half of the volume is in smaller droplets.
Boom height: Operating the spray boom as close to the sprayed surface as possible is a good way to reduce drift. The closer the boom is to the ground, the wider the angle the spray discharge must be to give uniform coverage. Be sure nozzles are right for the application. Booms that bounce will cause uneven coverage and drift. Wheel-carried booms are a good way to stabilize boom height, which will reduce the drift hazard and produce a better spraying job.
The effect of reducing drift when nozzles are mounted as close to the ground as possible is shown in Table 9. Chemical discharged from the flat-fan nozzle shows a considerable reduction in downwind deposits at both the 4 and 8 foot distances for the lower positioned nozzles. Flood nozzles produce a wide spray pattern and can be operated at low pressures. The wide pattern allows them to be mounted close to the ground keeping drift to a minimum.
Relative humidity and temperature: Low relative humidity and/or high temperature conditions cause faster evaporation of spray droplets between the sprayer and the target. Evaporation reduces droplet size, which in turn increases the potential drift of spray droplets. Spraying during lower temperatures and higher humidity conditions will help reduce drift.
Spray thickeners: Some spray adjuvants act as spray thickeners when added to the spray tank. These materials increase the number of larger droplets and decrease the number of fine drops. They tend to give water-based sprays a somewhat “stringy” quality. Thickeners reduce drift but do not make the spray drift-proof. The reduction in deposits downwind when a thickener is added to the spray tank is shown in Table 9.
Droplets formed from an oil base spray tend to drift farther than droplets from a water carrier because oil droplets are usually smaller, lighter and remain airborne for a longer period. Oils form into smaller droplet sizes than water when the spray is produced with the same hydraulic nozzle and the same spray pressure. Oil base sprays do not evaporate as soon as water based sprays so drops remain active for a longer time.
Shielded booms: Spray shields have become extremely popular for spraying small grain as studies show that drift is reduced by 50 percent or more. Wind during the spraying season is often a limiting factor to timely spraying in North Dakota. Shields help extend the spraying time when moderate winds blow. Spraying must be stopped when winds are too strong or when susceptible crops are downwind. Shields do not stop all drift, they only reduce it. Major drift problems can result when using shields if applicators are careless by not paying attention to downwind crops.
Drift Control
Because all nozzles produce a range of droplet sizes, the small, drift-prone particles cannot be completely eliminated, but drift can be reduced and kept within reasonable limits.
1. Use adequate amounts of carrier. This means larger nozzles, which in turn usually produces larger droplets. Although this will increase the number of refills, the added carrier improves coverage and usually increases the effectiveness of the chemicals. Smaller droplets will be produced with lower spray volumes, resulting in a greater drift hazard.
2. Avoid using high pressure. Higher pressures create fine droplets; 40 PSI should be considered the maximum for conventional broadcast spraying.
3. Use a drift-reducing nozzle where practical. They produce larger droplets and operate at lower pressure than the equivalent flat-fan nozzle.
4. Many drift-reducing spray additives which can be used with regular spray equipment are available today.
5. Use wide angle nozzles and keep the boom stable and as close to the crop as possible.
6. Spray when wind speeds are less than 10 mph and when wind direction is away from sensitive crops.
7. Do not spray when the air is completely calm or when an inversion exists.
8. Use a shielded spray boom when wind conditions exceed prime pesticide application conditions.
Calibrating Chemical Applicators
The amount of chemical solution applied per acre depends on forward speed, system pressure, size of nozzle, and nozzle spacing on the boom. A change in any one of these will change the application rate.
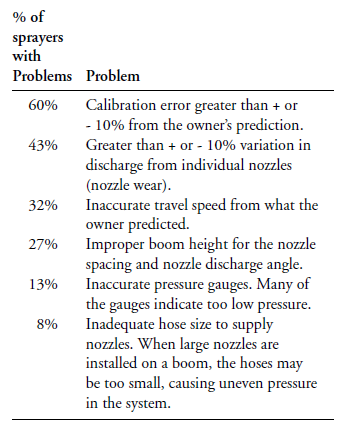
Testing of over 100 farm sprayers in North Dakota found a number of problems that can have a major impact on application accuracy. These include:
The first thing to do with sprayer calibration is select the type and size nozzle for your spraying job. You can base the nozzle type decision on spraying conditions and guidelines as recommended in Tables 2 and 3.
Once you’ve selected the type of nozzle, the next step is to calculate the nozzle size.
Nozzle selection should not be based on “gallons per acre” as advertised by some manufacturers. A nozzle that is identified as a 10-gallon nozzle will deliver this amount per acre only for one condition, such as when the nozzle spacing is 20 inches on the boom, the sprayer is traveling at 4 mph and the boom pressure is 30 psi. If the spacing, speed or pressure varies from these set values, the nozzle will not deliver the specified gallons per acre.
Choice of nozzle size should be based on a gallons-per-minute calculation rather than a gallons-per-acre calculation. Basing calculations on gpm allows the operator to make the spraying decisions based on the crop and field conditions.
Calibration Method No. 1
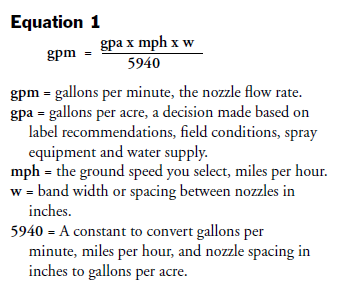

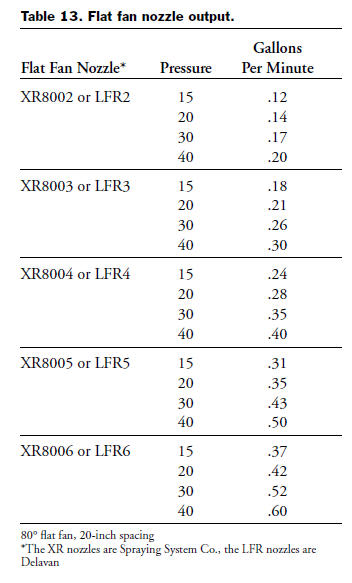
Once you have determined the proper size tip, put these nozzles on the sprayer and operate it with water. Test for leaks, other sprayer problems, spray pattern uniformity and calibration.
Equation 2
If a set of nozzles is available for use, the previous formula, after rearranging the values, can be used to determine the sprayer application rate in gallons per acre.
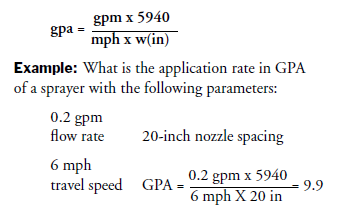
Operate the sprayer using the same throttle setting you use when spraying and when making the speed check. This will assure the pump is delivering the same volume as it will when you’re actually spraying.
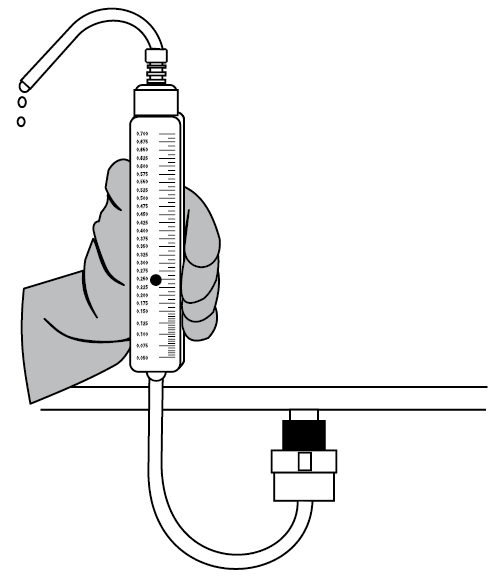
Catch the spray material from each nozzle in a measuring container for one minute. Carefully measure the discharge from each nozzle. It is usually easier to make measurements in ounces per minute rather than gallons per minute. The gallons per minute flow rate given in the nozzle catalogs can be converted to ounces per minute by multiplying the number of gallons by 128. Many nozzle catalogs also list flow rate in ounces per minute as well as gallons per minute.
Equation 3

If the average output is not what is needed, adjust the output by raising or lowering the pressure. A simple and fast method to check nozzle flow rate is with the use of a nozzle flow calibrator as shown in Figure 27. It is faster than collecting flow in a measuring container and very accurate.
Figure 27. Nozzle flow calibrator.
Speed Check
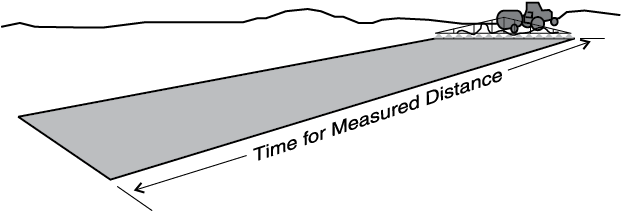
An accurate speed is essential for good sprayer operation. Tractor or pick-up speedometers may not give accurate readings so they need to be checked. Use a tape measure to stake out a measured distance. Then record the time it takes to drive the loaded sprayer over this distance (Figure 28) at the throttle setting and the gearing that you will use for spraying. Do this with the sprayer at least half-full of water and on the same surface that will be sprayed – calibrating on loose soil or hard roads will not give accurate speeds when operating in fields.
Figure 28. Sprayer speed check.
Equation 4

Calibration Method No. 2
The following calibration method eliminates guesswork and enables you to quickly and accurately determine just how the sprayer must be set up to deliver the GPA that you require. This method permits the sprayer to be set up and calibrated by operating the sprayer over a short distance in the field. It assures that the nozzles will provide the uniform output that is needed.
This method involves spraying over a measured distance starting with a full tank of water. Traveling over a longer distance will provide more accurate results.
This formula can be used to calibrate over any distance. This method works well when you have a field of a known length such as ½ mile (2640 feet) or 1 mile (5280 feet). Other distances of measured length can also be used.
1. Start with a full tank of water.
2. Spray a known distance in the field in which you will be spraying.
3. MEASURE the gallons of water required to refill the tank.
4. Use the following formula to figure gallons per acre (GPA).
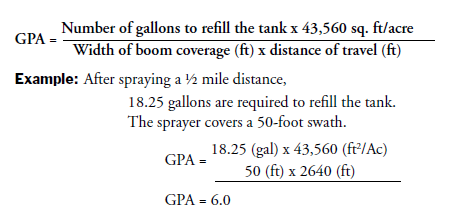
For example, if 100 acres were sprayed and 600 gallons of chemical mix were used, this was an application rate of 6 gallons per acre. This system is very simple and has the advantage of measuring the amount of spray that was actually being applied to an area. Keep in mind, this should not be your only calibration method.
Calibration Method No. 3
OUNCES = GALLONS METHOD
This method of calibration is very easy and can be used to check and fine-tune a sprayer quickly, but it does require driving a distance in the field. Before calibrating the sprayer with any method, you must check nozzle output for uniformity. Correct any nozzles that vary in flow rate by more than + 5 percent. Also check that the pressure gauge is reliable and the pressure is properly set. Then proceed as follows:
1. For broadcast application, determine the distance, in inches, between nozzles. For banded applications, determine the band width in inches. For directed applications, collect the discharge from all nozzles per row.
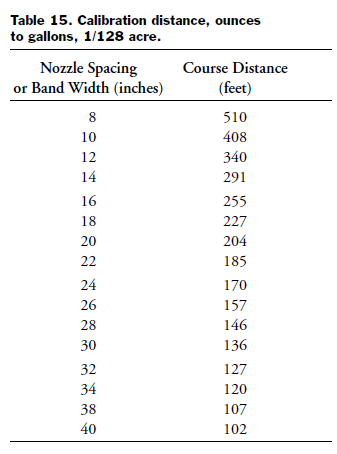
2. From Table 15, determine the distance needed to equal 1/128 acre. Mark this distance off in a field you will be spraying.
3. Measure the time (in seconds) needed to drive the required distance at normal operating speed with all equipment attached and the spray tank ½ full.
4. Collect the discharge from all nozzles directing spray to one row for the time measured in step 3. All chemical added together in ounces is gallons per acre. If broadcast spraying is being done, the ounces collected from one nozzle is gallons per acre.
Band and Directed Spraying
Band application is applying a chemical in parallel bands, leaving the area between bands free of chemical.
Directed spraying is application of a chemical to a specific area such as a plant canopy, a row or at the base of the plants.
Several nozzle configurations are often used when foliage penetration or row crop height present a problem. Figure 29 shows several commonly used nozzle configurations.
Figure 29. Nozzle placement for band and directed spraying.
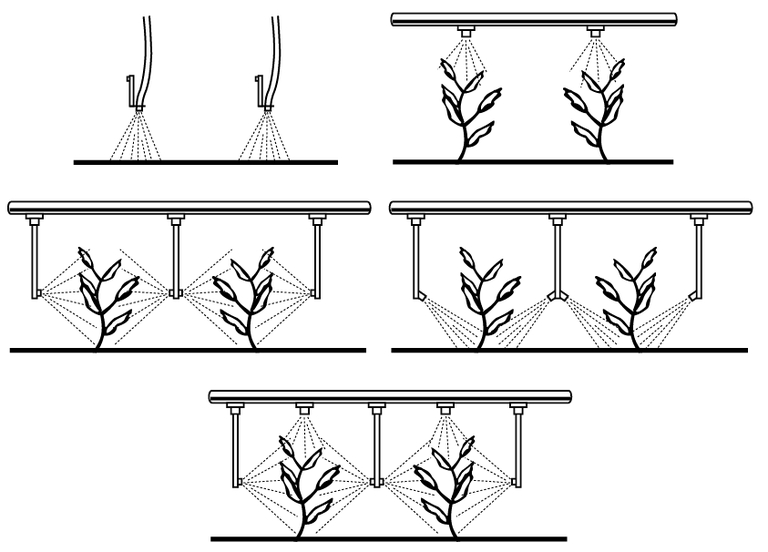
The two- and three-nozzle configurations give better bottom leaf coverage than a single nozzle. This can be important with many pesticides. Drop nozzles are useful for herbicide application in taller row crops to reduce the risk of crop injury. In smaller row crops a single nozzle “band” configuration using a nozzle with a uniform pattern, such as even flow flat-fan, should be adequate.
Band Application Calibration
The same calibration methods can be used to calibrate band applicators as were used for broadcast spraying. The only difference is the amount of area being covered. The main idea to keep in mind is what is meant by an acre. Total acres refers to the entire acreage in the field. This would include the sprayed band and the area between the bands. A treated acre refers only to the treated area in the band. The spray that would be discharged on a broadcast rate is concentrated in a narrow band by the ratio of the row spacing divided by the band width (see the following example). In band spraying, the row spacing and the nozzle spacing are the same.
Unless otherwise specified, chemical application rates are given on a broadcast basis. For band applications, the rate per treated area is the same as the broadcast rate, but the total amount of pesticide used on a field is less because only a portion of the field is treated.
Spray discharge charts furnished by manufacturers for band nozzles are usually listed as applying chemical on a broadcast basis. The amount applied will increase when directed into a narrow band.
Band Calibration
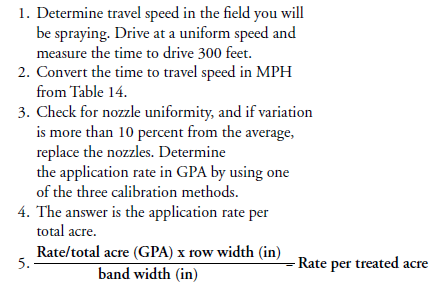
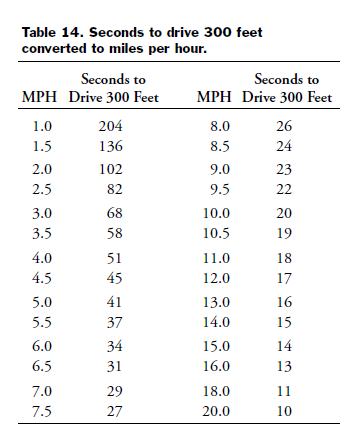
Example: In nozzle manufacturer charts, gallons per acre means volume applied to the area sprayed (treated acre). Depending on row spacing and band width, this area is some fraction of the total field. The following shows the higher volume discharged in a treated acre when the broadcast rate is determined:
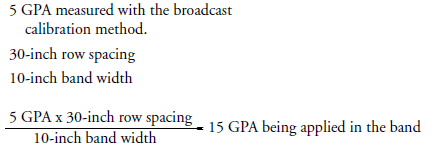
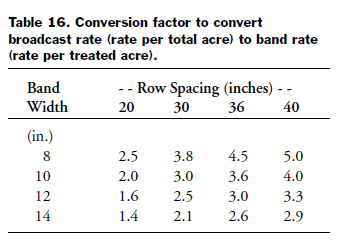
With 15 GPA being applied in the row (treated acre), MIX THE CHEMICAL IN THE SPRAY TANK BASED ON THIS RATE. Do not mix it on the 5 GPA (total acre) rate or you will be applying chemical in the row at three times the desired rate. If you do not want to apply water in the row at 15 GPA, a smaller nozzle would be needed. Refer to the charts in the nozzle manufacturers catalog.
Hand Sprayer Calibration
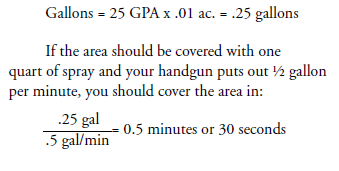
Hand sprayers are usually used for applying chemicals to small areas. Hand sprayers may be calibrated as follows: determine the square feet in an area, measure the output of the hand gun for one minute, and calculate how fast the measured area should be covered. Then mix enough chemical to cover the area and apply all the chemical to the area as evenly as possible.
Example: You measure an area 21 feet by 21 feet. This is approximately 1/100 acre. Your handgun puts out ½ gallon in one minute and the chemical should be applied at the rate of 25 gallons per acre. In this case: 1/100 acre = .01 ac.
How Much Chemical to Put in the Tank
To determine the amount of pesticide to add to the spray tank, you need to know the recommended rate of pesticide, the capacity of the spray tank, and the calibrated output of the sprayer.
The recommended application rate is usually indicated as pounds per acre for wettable powders and pints, quarts, or gallons per acre for liquids. The recommendation can also be given as pounds of active ingredient (lb. AI) per acre rather than the amount of total product per acre. The active ingredient must be converted to actual product.
Be sure your spray tank has accurate markings on the side so you can determine the amount of spray mix remaining in the tank. This is needed so you don’t add more or less chemical than is needed. Be sure to place your sprayer on level ground so an accurate reading can be made.
Most pesticides are sold as formulations in which the active ingredient (AI) is combined with a carrier of water, oil or an inert material. Once you’ve chosen the chemical and the formulation, you must determine the amount of spray mix needed for the application. This will depend on the tank size, the spray volume per acre, the acres to cover and the required application rate given on the product label.
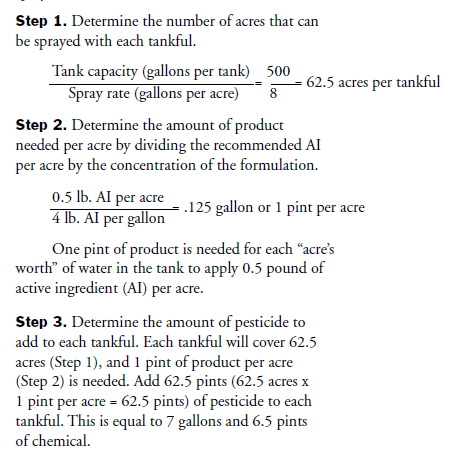
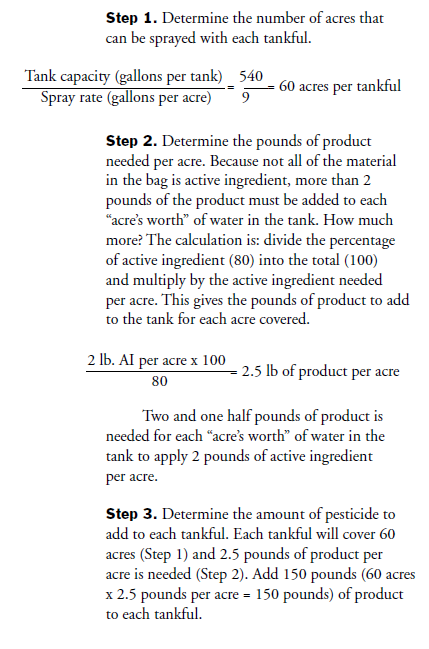
Example: A liquid recommendation calls for 0.5 pound of active ingredient (AI) per acre.
The pesticide contains 4 pounds (AI) per gallon formulation. The sprayer being used has a 500 gallon tank and is calibrated at 8 gallons per acre. How much product should be added to the spray tank?
Adjuvants (Spreaders – Sticker, Surfactant, Etc.)
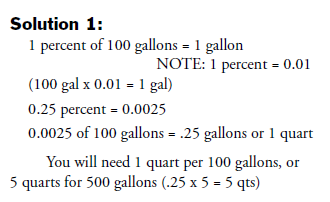
The manufacturer may recommend a small amount of adjuvant be added in addition to the regular chemical.This recommendation is often given as “percent concentration.”
If an adjuvant at a 0.25 percent concentration by volume is recommended, how much should be added to a 500-gallon tank?
Chemical Mixing and Disposal of Excess Pesticide
All agricultural chemicals should be handled carefully to avoid accidental spills and contamination. Because some minor spillage and runoff of sprayer wash water is almost inevitable when working with pesticides, it is wise to load and clean the sprayer on a mixing-loading pad. The pad will contain spills and rinsate and allow it be to be pumped into a holding tank for later use as makeup spray water or for proper disposal.
The pad can be constructed of sealed concrete or made from appropriate fabric when portability is desired. The handbook “Designing Facilities for Pesticide and Fertilizer Containment,” MWPS-37, from the Midwest Plan Service has many ideas and suggestions for constructing these facilities. This book is available through your local county agent office or from Extension Agricultural Engineering at North Dakota State University.
The best disposition of chemicals is to use them according to label directions. To minimize disposal problems, buy and mix only the quantities of chemicals that you need. When small quantities of pesticide must be disposed of, apply them to the same crop in another location or to another crop and pest for which the pesticide is labeled. Check the label carefully to be certain that the chemical is registered for this alternate application.
Cleaning Equipment
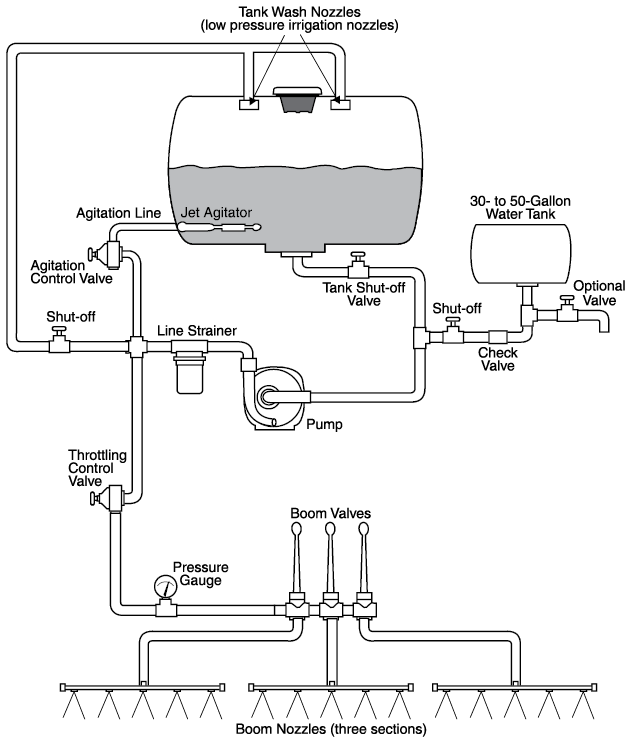
A practice that is gaining acceptance is to carry an auxiliary tank of clean water on the sprayer that can be used to wash down and rinse the sprayer in the field. This leaves the diluted spray material in the field and permits the sprayer to return to the pad “clean,” thus eliminating an accumulation of chemical wash water that would need to be disposed of later. A suggested plumbing arrangement showing water tank and valve locations is shown in Figure 30. The water tank and wash nozzles can be added to most sprayers.
Figure 30. Sprayer field wash system.
Triple-rinse the inside of the sprayer using 5 to 10 gallons of clean water for each rinse. Circulate the rinsate through the sprayer and spray it across the field on an approved crop. Repeat the rinse procedure two more times. Also, never drain surplus pesticide or rinsate where it can run off into streams, lakes or other surface water, or where it can contaminate wells and groundwater.
To remove residues of oil-based herbicides, such as esters of 2, 4-D and similar materials, rinse the sprayer with a spray tank cleaner available from most pesticide dealers.
After rinsing the equipment with oil or a water-detergent, fill the tank one-fourth to one-half full with a water-ammonia solution (1 quart of household ammonia to 25 gallons of water) or a water-trisodium phosphate (TSP) solution (1 cup TSP to 25 gallons of water). Circulate the solution through the system for a few minutes and let a small amount go through the nozzles. Allow the remainder of the solution to stand at least six hours, then pump it through the nozzles. Remove the nozzles and strainers and flush the system twice with clean water. Equipment in which wettable powders, amine forms, or water-soluble liquids have been used should be thoroughly rinsed with a water-detergent solution (2 pounds of detergent in 30 to 40 gallons of water). Water-soluble materials should be treated as water-soluble liquids. Allow the water-detergent solution to circulate through the system for several minutes. Remove the nozzles and strainers and flush the system twice with clean water.
When it is time to store your sprayer, add 1 to 5 gallons depending of the size of your tank, of anti-freeze (ethylene glycol) and water or recreational vehicles (RV) anti-freeze before the final flushing. As water is pumped from the sprayer, the anti-freeze will leave a protective
coating inside the tank, pump, and plumbing.
Container Disposal
Returnable, reusable containers are recommended if they are available because they eliminate disposal problems. Recycling is a solution to non-returnable containers; approximately 48,000 were recycled in 1995. When this is not an option, proper disposal of empty pesticide containers is very important. Empty containers should not be left around as they pose a hazard to the area, animals and people.
Empty liquid containers must be triple-rinsed or power-rinsed before disposal. After completely draining the contents into your sprayer, rinse it by filling it at least 1/10 full of water, capping it, then shaking until all inside surfaces have been rinsed. Empty the rinse water into the spray tank. Drain the container completely (at least 30 seconds) and repeat the rinse process two more times, adding the rinse water to the spray tank.
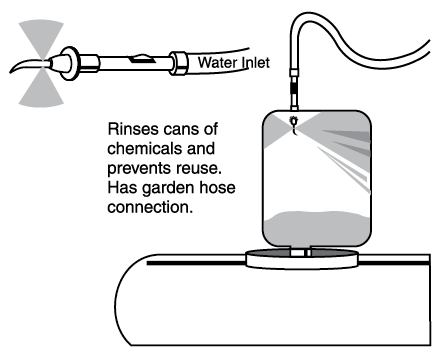
Triple-rinsing is slow and tedious. An easier and faster way is to use a power rinse device that attaches to a hose and pierces the bottom or side
of the container (Figure 31). The water spray rinses the container as it drains. A 60-second spray rinse is usually better than a triple rinse. Special rotating nozzles are also available to flush out containers and rinse spray tanks. Rinsed containers should be crushed and disposed of in a waste handling system or recycled if they are returnable.
Figure 31. Power rinse device.
If burning of packages is allowed by local ordinances, burn no more than one day’s accumulation at a time. The smoke and fumes from pesticides can be toxic. Burn containers in a location where smoke and fumes do not move toward people or an inhabited area. An alternative to burning is to place empty paper and cardboard containers in a plastic trash bag and dispose of them in an approved waste handling facility.
Approved procedures for disposal of excess chemicals and empty containers have changed frequently. Disposal techniques that are legal today may not be acceptable tomorrow. Check with local authorities on proper methods to use.
Chemical Injection
Injection metering of spray chemicals is another approach to solving many of the handling problems and the disposal of surplus spray tank mix and rinsate.
Injection sprayers are designed so that tank mixing is unnecessary. Because the tank contains only clean water, tank washout between sprays and disposal of any unused chemical mixture is eliminated.
In place of tank mixing, chemicals from a concentrate container are metered and injected into the water being pumped through the sprayer, giving the correct proportion of chemical and water for the needed spray. Injection can take place at various points on the sprayer, depending upon the design. When spraying is complete, the containers of concentrate can be removed to storage and with minimum cleanup the sprayer is ready for another use.
References
Chemical Applications In Agriculture, NCR 520, Michigan State University, 1994.
Boom Sprayers, NRAES 19, Pennsylvania State University, 1983.
All About Application Accuracy, Dupont, Wilmington, Delaware, 1982.
A Guide to Field Sprayer Operation, Saskatchewan, 1983.
Spraying Systems Catalog, Wheaton, Illinois.
Delavan Spray Catalog, Lexington, Tennessee.
Weights and Measures
Weight
16 ounces = 1 pound = 453.6 gms
1 gallon water = 8.34 pounds = 3.78 liters
Liquid measure
1 fluid ounce = 2 tablespoons = 29.57 milliliters
16 fluid ounces = 1 pint = 2 cups
2 pints = 1 quart
8 pints = 4 quarts = 1 gallon
8 ounces = 1 cup
Length
3 feet = 1 yard = 91.44 centimeters
16 ½ feet = 1 rod
5,280 feet = 1 mile
320 rods = 1 mile
Area
9 square feet = 1 square yard
43,560 square feet = 1 acre = 160 square rods
640 acres = 1 square mile
Speed
88 feet per minute = 1 mph
Volume
27 cubic feet = 1 cubic yard
1 cubic foot = 1,728 cubic inches = 7.48 gallons
1 gallon = 231 cubic inches
Common Abbreviations and Terms Used With Pesticide Sprayers
GPM = Gallons Per Minute
GPA = Gallons Per Acre
PSI = Pounds Per Square Inch
MPH = Miles Per Hour
RPM = Revolutions Per Minute
GPH = Gallons Per Hour
FPM = Feet Per Minute
Using Pesticides Safely
In addition to the traditional recommendations of buying only the right amount of the proper chemicals and being sure they do not get stolen, eaten, drunk, spilled, or misused before you are ready to use them, the following suggestions for use of chemicals in the field are worth reviewing:
1. Read and understand all of the pesticide label before use. The label has detailed instructions on how to use the pesticide wisely. Re-read all bold print.
2. Don’t use a tank mixture of two or more chemicals unless the mixture has label clearance.
3. When pouring and mixing chemicals, be sure the breeze blows the chemical away from you. Wear clean clothes, rubber gloves, and chemical goggles when handling chemicals. Wash all clothing, gloves, and caps before wearing them again.
4. Don’t hurry when using chemicals. Hurrying causes most people to be more accident prone. Spilled chemicals, the wrong chemicals in the sprayer, and the wrong rate of application are examples of problems that rushing promotes.
5. Reduce spray drift by applying chemicals on relatively calm days. Operate the sprayer at the lowest recommended pressure to minimize drift.
6. Mix only the amount of pesticide needed for the job. Use your best judgement when disposing of leftover spray or used containers. As you empty a container, rinse it three times and pour the rinsate into the sprayer tank.
7. Thoroughly rinse sprayer tank and hoses before changing pesticides or repairing equipment. Contamination may not be completely eliminated, but it can be minimized so the resulting hazard to crops and humans is small.
8. Be familiar with symptoms of chemical poisoning. Dizziness, headaches, upset stomach, blurred vision, and excessive sweating are symptoms of poisoning from several pesticides. See a doctor any time you do not feel well and have handled a chemical within the past 12 hours. Take the label along. The label will tell the doctor which chemical has caused the poisoning so corrective action can be done.
9. If a pesticide is spilled on the skin, wash the affected area with soap and water. Remove any contaminated clothing and put on clean clothes before continuing.
This publication was authored by Vern Hofman and Elton Solseng, Department of Agricultural and Biosystems Engineering, NDSU, 2004.
Reviewed March 2018


