

2018
Pruning Shrubs
It’s spring! Time for my favorite activity – pruning!! Last year I gave some pointers on pruning fruit trees (or really any trees). This year, let’s talk about your shrubs.
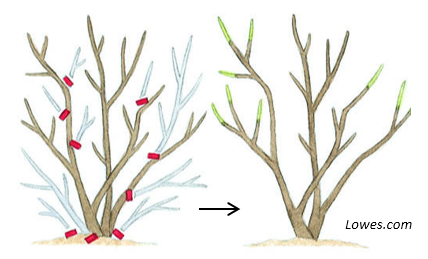
Most shrubs grow new shoots right from the area where they are planted. We call this “expanding from the crown.” It can get pretty thick in there with old, new, weak or dead branches all growing together.
Remember, during the winter, most of a deciduous plant’s energy is stored in the roots. If you remove some branches, in the coming growing season, the root energy will go into the remaining branches and create new buds and growth. The remaining branches will be more vigorous after pruning.
Pruning opens up the shrub so that more light and air gets inside. Pruning also allows you to manage the height and shape of the shrub.
- If your shrub flowers in early spring, prune it right after the blossoms fade so that it can make new growth and new flower buds for next year.
- If your shrub produces fruit in summer, you will have to use the renewal pruning methods in spring while the plant is dormant.
Use a sharp, quality hand pruner, lopper or pruning saw (think Felco brand – high quality, more expensive, but you will use them your whole life).
- Remove branches that grow downward or cross through the shrub.
- Cut out small, weak branches that crowd good branches.
- Keep branches that are growing outward and upward and look healthy.
- Don’t be afraid – shrubs are very forgiving!
Click here for CREC’s shrub pruning handout.
Renewal Pruning
Best for most flowering and fruiting plants. Remove ¼ to ⅓ of old growth each year.

Heading Cuts
Proper heading cuts lower a branch back to a lateral bud or shoot which is less vigorous than a vertical shoot.
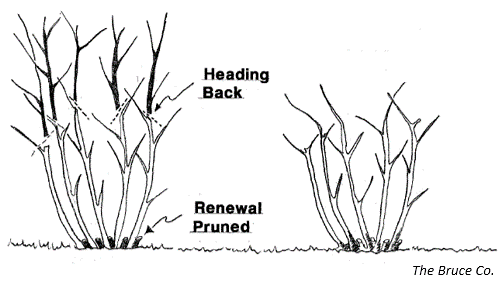
Thinning Cuts
These open the plant to light and air. Make proper cuts, without leaving stubs, just above a bud or side branch so that growth is ‘upward and outward’.
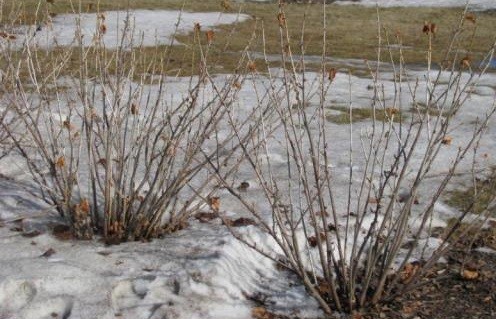
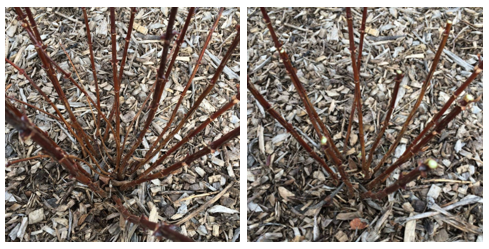
Shrub Pruning Examples
Currant shrubs. On right: Thinned by renewal pruning.
Haskap shrub. On right: Small and crossing canes removed, thinned and headed back.
NDSU does not endorse commercial products or companies even though reference may be made to tradenames, trademarks or service names.
Kathy Wiederholt
Kathy.Wiederholt@ndsu.edu
Fruit Project Manager
Timing of Cover Crop Establishment
The interest in planting cover crops has recently increased in North Dakota. The traditional method for seeding is to do so after a small grain crop. However, with our short growing season, the window to successfully establish a cover crop is limited. Most years, adequate moisture for germination is available for only a few days after combining the small grain crop. If seeding later than this, germination of the cover crop is determined by the next adequate rainfall event, which may be days or weeks after harvest. Delayed germination drastically reduces the amount of biomass produced by the cover crop. Because labor is likely in short supply for most farms, combining and seeding at the same time can be challenging. This lead us to ask the question: Where are the opportunities within the growing season to successfully establish a cover crop without impacting grain yield of the cash crop and not significantly increasing production costs?
A cover crop trial was conducted at the CREC as well as the Langdon, North Central, Central Grasslands, and Hettinger RECs, and the Oakes Irrigation Center. The objective was to assess the influence of planting time on cover crop establishment and performance in a barley cash crop.

Cover Crop mix seeded with barley crop.
The cover crop consisted of a mixture of turnips, radishes, lentils, and flax with the timings of establishment as follows:
- Check (no cover crop seeded)
- At seeding with the drill (in the same seed tubes as the barley)
- 4-5 leaf barley (broadcast seeded at herbicide application timing)
- Anthesis (broadcast seeded at fungicide application timing)
- After harvest with a drill (traditional timing and method)
Below are the combined results from the three locations that were not severely impacted by drought (produced a harvestable grain crop): Carrington, Langdon, and North Central.
- In 2015, sufficient timely rains occurred after each cover crop seeding therefore all of the before harvest seeding timings produced significantly more biomass than the check and after harvest treatments.
- In 2016, there was an early dry spring with little significant rainfall after seeding and the good barley crop was raised on adequate subsoil moisture. This lack of rain impacted cover crop establishment and growth of all timings with none being significantly better than others.
- In 2017, again there was little significant rainfall after seeding. However, there was adequate moisture at seeding to successfully establish the cover crop then and raise a respectable grain crop.
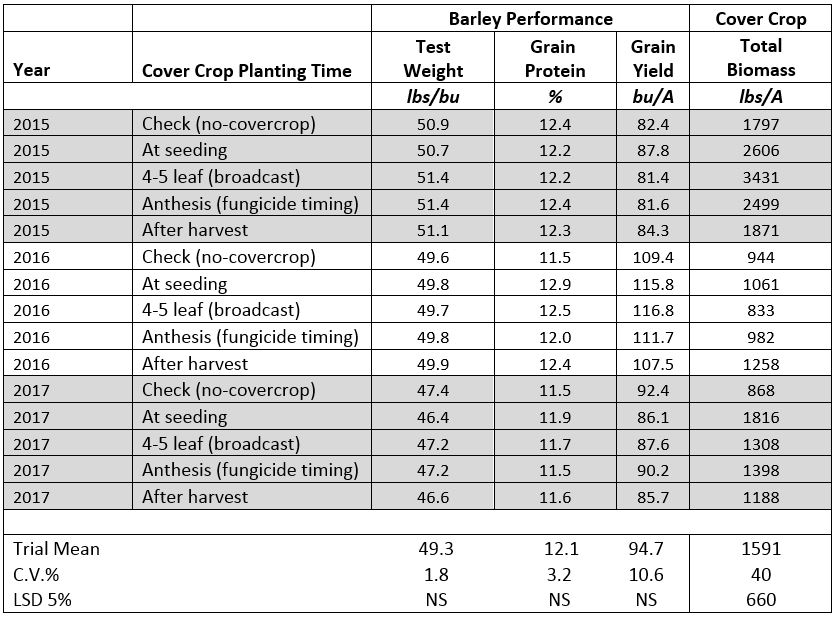
These are preliminary results that suggest there is no significant impact on barley yield regardless of when this cover crop mix was established. Moisture will determine if and when the cover crop is successfully established. Data from additional years will be needed to determine which treatments may become acceptable practices for crop insurance in different areas of the state. If have any questions or would like additional information contact Ezra.Aberle@ndsu.edu or 701-652-2951.
Ezra Aberle
Ezra.Aberle@ndsu.edu
Agronomy Research Specialist
Goss’s Leaf Blight and Wilt of Corn
Goss’s leaf blight and wilt (commonly referred to as ‘Goss’s wilt’) is a bacterial disease of corn that has been in the U.S. (Nebraska) since 1969, in ND (Emmons County) for about a decade, and in east-central ND for at least five years. We have observed the disease in Carrington REC corn trials. NDSU has conducted field surveys for the disease since 2014, and in 2017 found the disease in 35% of commercial fields surveyed. The disease will cause economic yield loss of corn in ND, with potential to reduce yield 30-50% in field areas where the disease is present.
The bacteria causing the disease can survive on corn residue for 10-14 months and is transported by water to corn plants. Disease infection primarily occurs after corn leaves are damaged by high wind, hail, etc. in combination with rainfall (or irrigation). Disease development in the plant is favorable with wet and warm weather (80 degrees is optimal temperature). The bacterial disease has two phases: 1) leaf blight and 2) systemic wilt. The leaf blight phase is most common and typically appears mid-season. Corn leaf symptoms and disease signs include irregular, water-soaked tan lesions that have ‘freckles’ and shiny patches (bacterial ‘ooze’). The picture shows typical leaf blight symptoms (courtesy of A. Friskop, NDSU Extension plant pathologist). Typically, areas along field edges or small spots within fields will show upper leaves turning brown and dying. However, a field near Carrington in 2016 had a high incidence of Goss’s wilt essentially throughout the entire corn field.
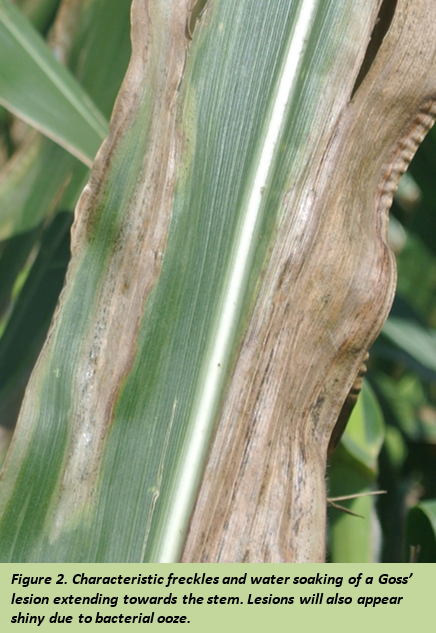
Typical leaf blight symptoms.
The most important management factor for minimizing potential yield loss from Goss’s wilt is use of tolerant corn hybrids. Crop rotation, not locating corn fields adjacent to previous year’s disease-infected corn field, and corn residue management will aid in reducing disease risk.
Greg Endres
Gregory.Endres@ndsu.edu
Area Extension Specialist, Agronomy
Beef Quality Assurance – Taking care of our meat
The NDSU Carrington Research Extension Center sells finished (fat) cattle as a result of our research and outreach programs. We strive to practice good animal husbandry and keep the animals healthy and comfortable. I believe all ranchers share a common goal of taking good care of their cattle. If we take good care of the animals, the animals will reward us with income.
Just a few mistakes or bad publicity can ruin profitability in an industry where the consumer expects healthy, wholesome food.
How does the industry validate good animal care? The Beef Quality Assurance (BQA) program sponsored by the Beef Checkoff.
The BQA program has been available for many years. I looked through my files and found my North Dakota certification letter and number dated March 24, 2003. My certification has been updated many times since, with each renewal lasting 3 years.

Karl's first BQA certification card.
The North Dakota BQA program contact is Lisa Pederson, NDSU Extension Service Beef Quality Assurance specialist. Lisa conducts many education and certification programs throughout the year. She can be contacted at 701-328-9718. The ND BQA website is https://www.ag.ndsu.edu/bqa.
The national BQA program website is https://www.bqa.org/. The national BQA offers online certification. Certification has three options: Cow-Calf, Backgrounder/Stocker, and Feedyard.
The national BQA states: “Today, the stakes are even higher because of increased public attention on animal welfare. BQA is valuable to all beef and dairy producers because it:
- Demonstrates commitment to food safety and quality.
- Safeguards the public image of the dairy industry.
- Upholds consumer confidence in valuable beef products.
- Protects the beef industry from additional and burdensome government regulation.
- Improves sale value of marketed beef cattle.
- Enhances herd profitability through better management.”

Steers returning to pens after being weighed.
Recently, I was notified by the packer that processes finished cattle from the CREC that by January 1, 2019, the packer will require BQA certification by the feedyard before they can buy the cattle. No problem for those of us that have been BQA certified.
If you haven’t been BQA certified or don’t have a current certification, please either attend a local BQA training meeting this summer or fall organized by Lisa Pederson and your local county Extension agent or go online at https://www.bqa.org/ to complete the training. Times and locations of local BQA meetings will be announced later.
Karl Hoppe, Ph. D.
Karl.Hoppe@ndsu.edu
Area Extension Livestock Specialist
Corn Plant Populations…Revisited
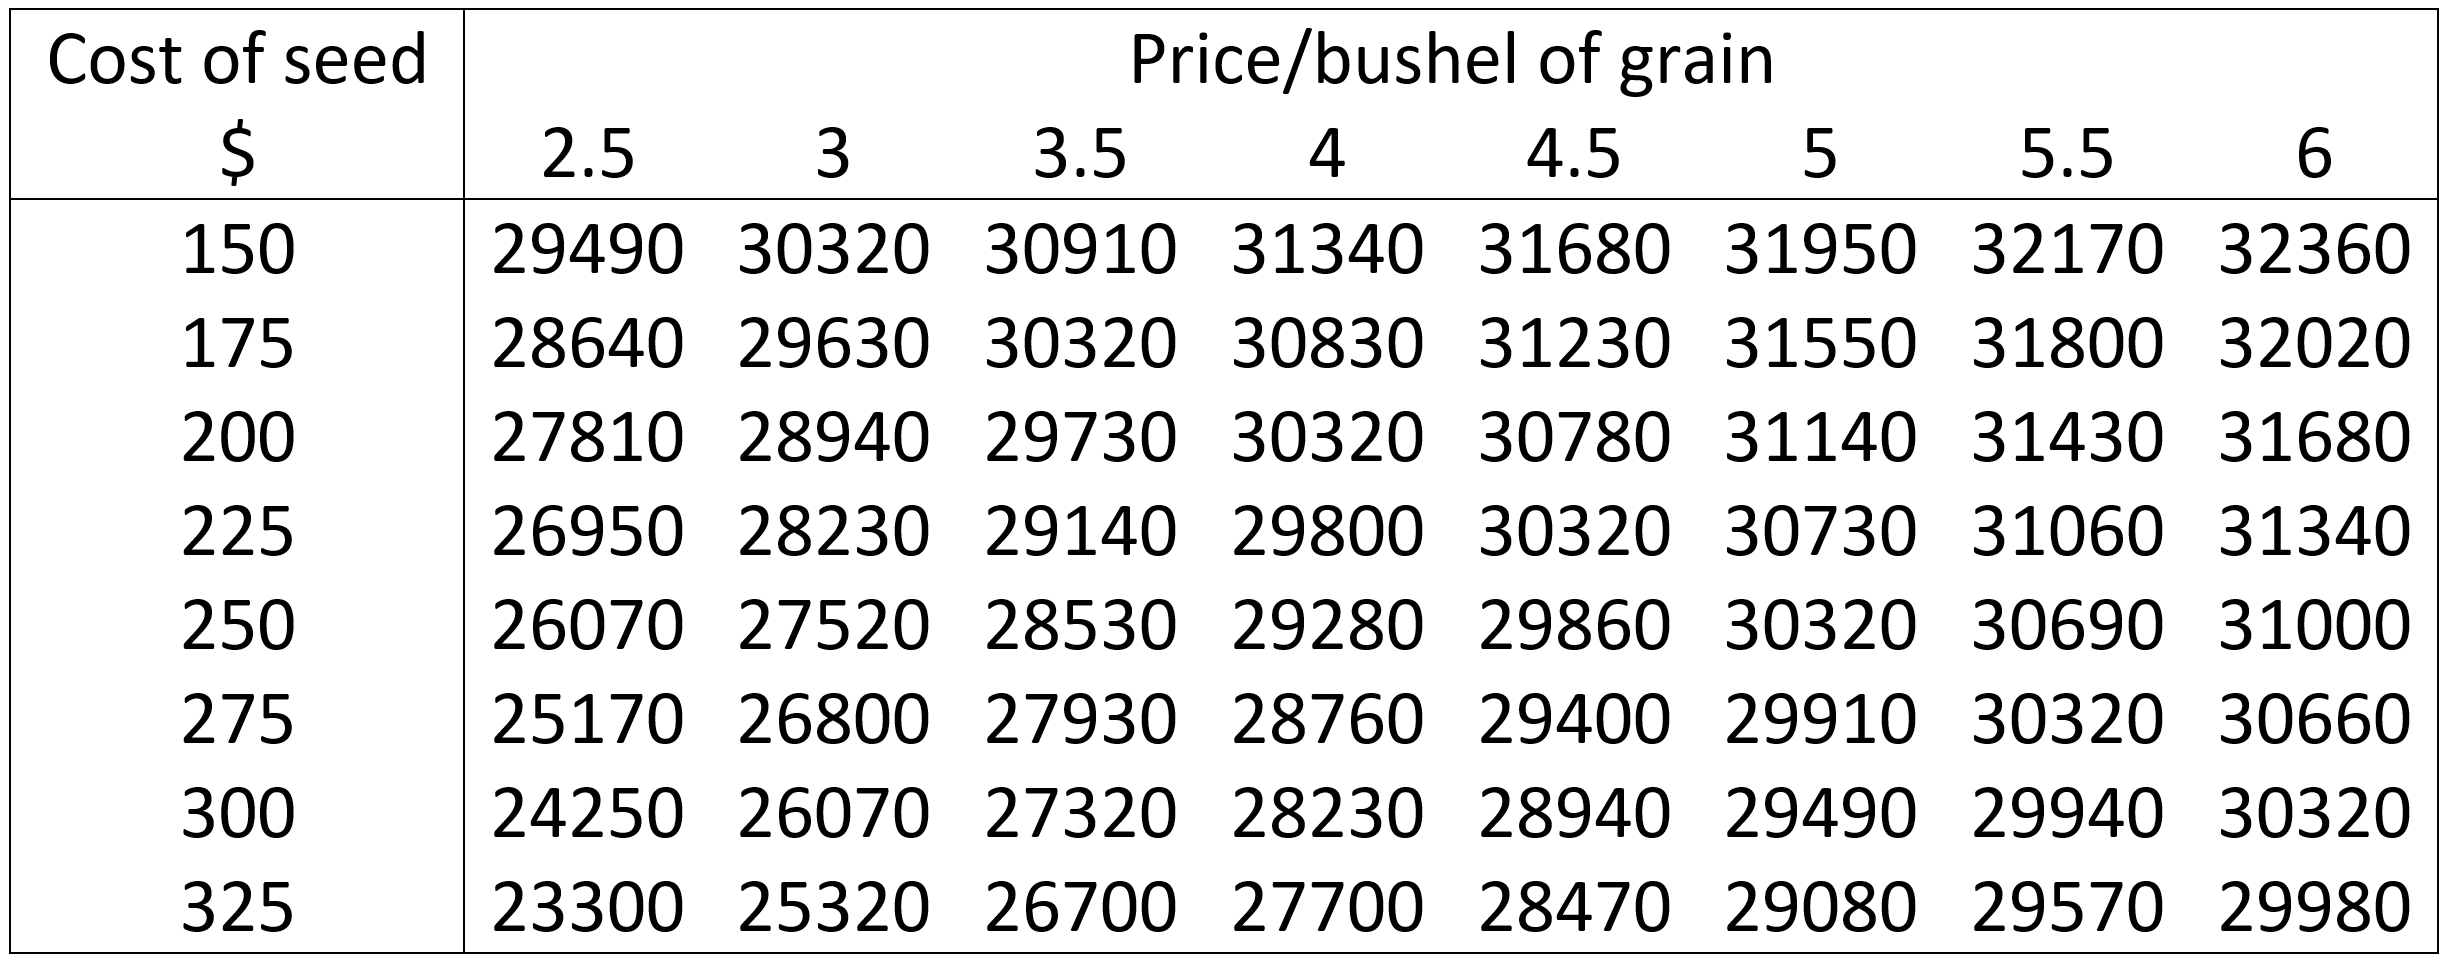
Many surrounding states have recently conducted research into optimum corn plant populations with goals of updating older research. Much of that research has come to the similar conclusion that recommendations from the 80’s-90’s haven’t changed much. From 2012 to the present, the Carrington Research Extension Center has conducted plant population x hybrid maturity research in dryland and irrigated environments. The results presented here are specifically for dryland corn. The goal of the study was not only to find the population that resulted in maximum yield, but also to identify economically optimum populations. For simplicity, we grouped maturity as either short maturity (RM 83-85) or long maturity (RM 87-90). Plant populations are established plants/a.
Here are a few of the important findings:
- If you have a shorter maturing hybrid (RM in the low 80s), more plants were needed to reach maximum and economically optimum yields than later maturing hybrids (upper 80 RM). Economically, you needed roughly 3000 more plants/a for shorter maturity hybrids.
- Over the three years of the dryland study, the short maturing hybrids had an average yield of 153 bu/a and the longer maturing hybrids had an average yield of 163.5 lb/a
- For maximizing yield, the shorter maturity hybrids needed a population of just over 37,000 plants/a though a population of 32,500 provided a yield within 1% of maximum. The longer maturing hybrids reached maximum yield at 34,300 plants/a but a population of 29,500 provided a yield within 1% of maximum.
- Table 1 and Table 2 provide a breakdown of the economically optimum plant populations based on seed cost and grain price combinations for short and long maturing varieties.
- See this previous Center Points for information on how hybrid maturity affects yield.
Table 1. The plant population that gives maximum economic return based on seed cost / unit (80,000 seeds) and grain price for corn varieties ranging from RM83-RM85. 95% stand establishment is assumed.
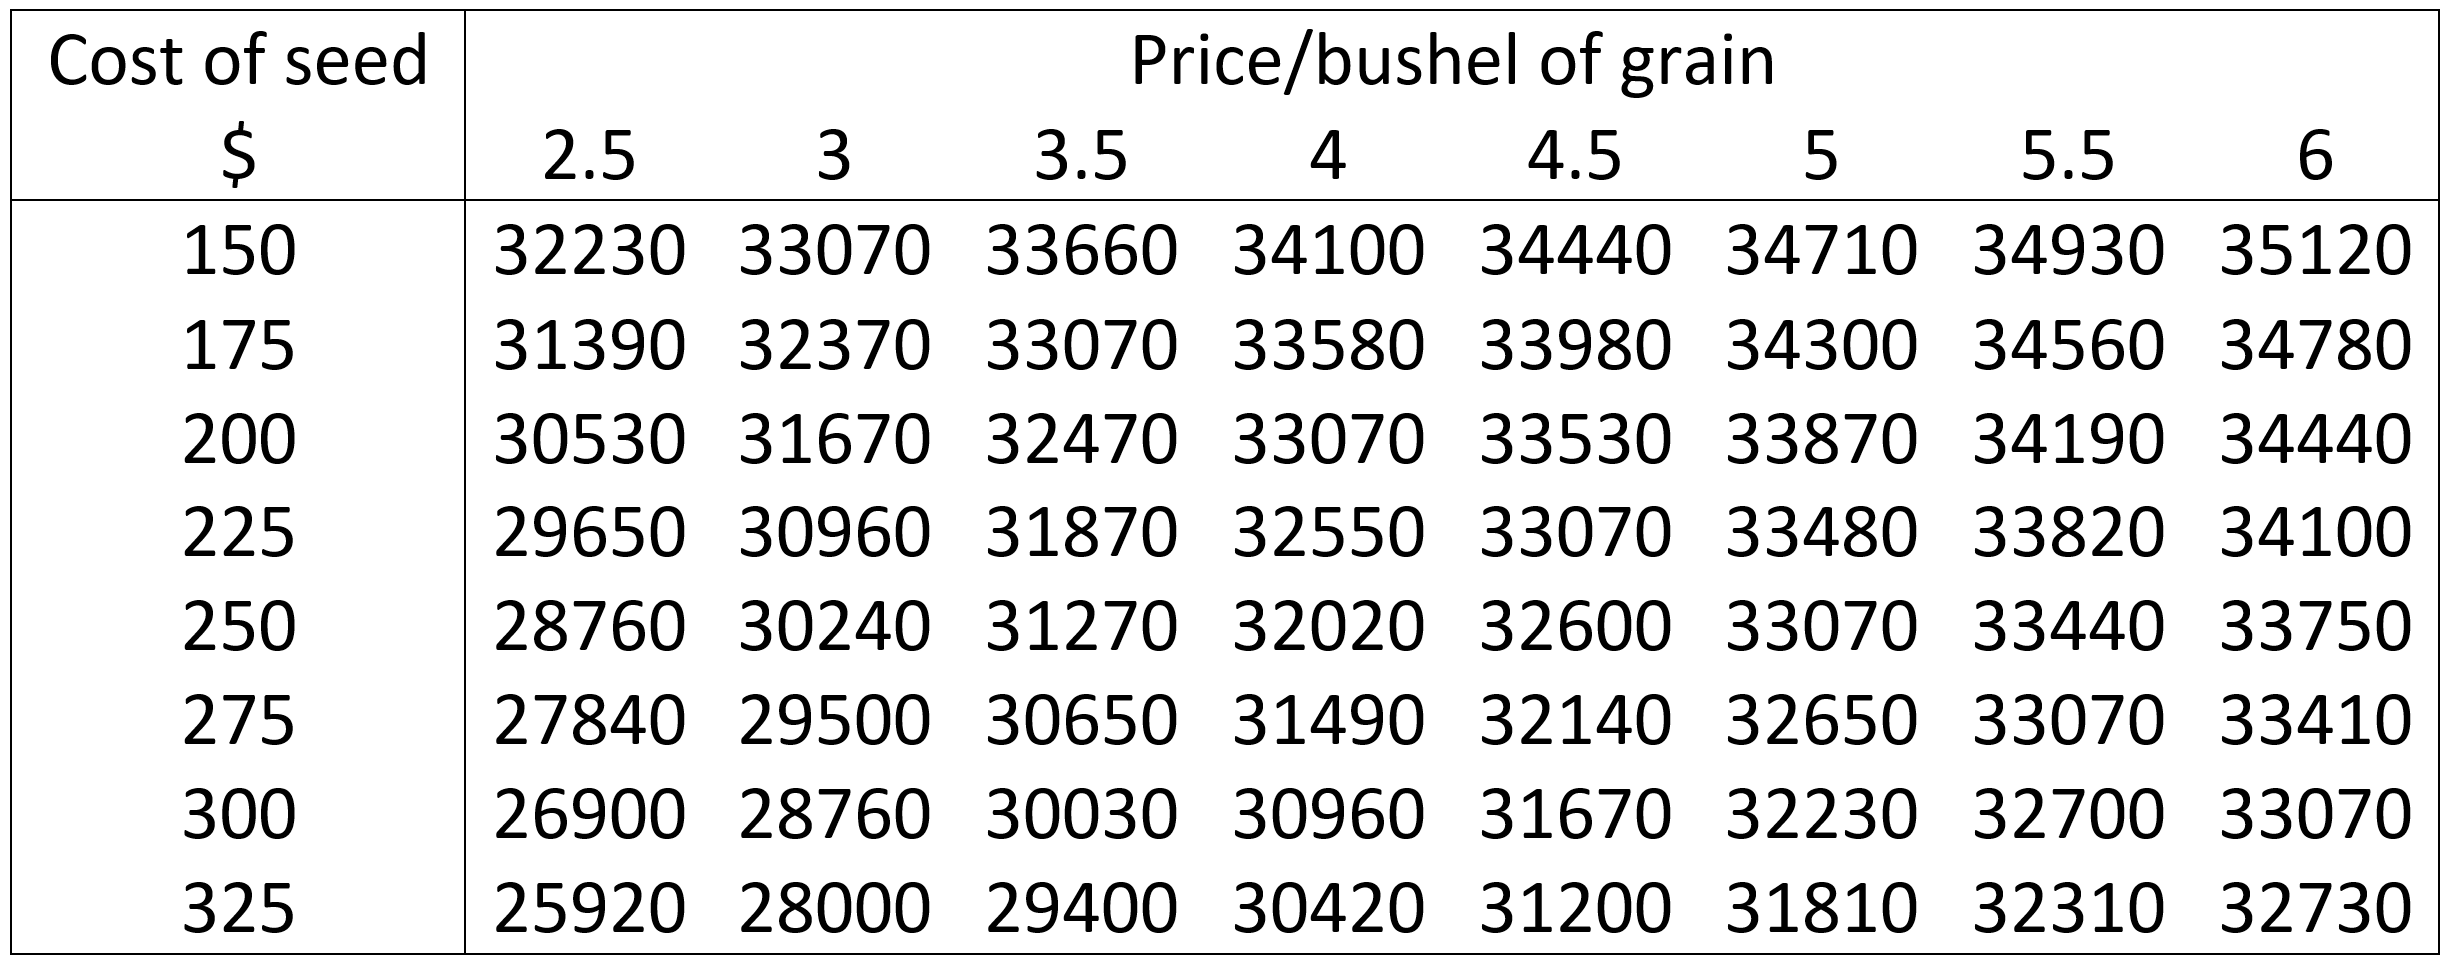
Table 2. The plant population that gives maximum economic return based on seed cost / unit (80,000 seeds) and grain price for corn varieties ranging from RM87-RM90. 95% stand establishment is assumed.
Mike Ostlie, Ph. D.
mike.ostlie@ndsu.edu
Research Agronomist
Intercropping as a Crop Production System
A group of CREC agronomists recently participated in a research summit focused on a crop production approach that most would consider to be clearly outside the box. Intercropping was the production strategy discussed among a group of university and USDA researchers recently at the North Central Research Extension Center in Minot. Speakers from North Dakota, South Dakota and Canada presented information on research projects that address intercropping practices. Intercropping may be simply defined as a crop production system where two or more crops are grown together on the same field. The specifics of what constitutes a true intercrop will vary among those of us in agriculture. Some purists will define an intercrop as a production system where multiple crops are grown at the same time, in the same space and harvested together. Others will define an intercrop as any approach where more than one crop is grown on the same field within the same season.
I had the opportunity to present information on intercropping research that the CREC has conducted in the past and to the present time. The research and demonstration projects presented included crop production systems that we have defined as intercropping, multi-cropping, relay cropping and strip cropping. Much of the information presented was work that John Gardner, Steve Zwinger and myself conducted from 1989 to 1993. The crop mixtures were evaluated to explore possible benefits of an intercrop system. Potential benefits include an increase in total crop production, stabilized production, improved water and fertilizer use efficiency, reduced incidence of pests, full use of the frost-free season, enhanced soil biological activity, reduction in erosion, improved crop harvestability and others. Examples of the crop mixtures we evaluated were presented to summit attendees with example photographs and published research results.
The following crop combinations were among the mixtures discussed: spring wheat and flax; grain sorghum and pinto bean; flax and chickpea; spring wheat and field pea; flax and lentil; soybean and flax; safflower and flax; spring wheat and soybean; rapeseed and crambe; field pea and canola; corn and dry bean; and spring wheat and lentil.
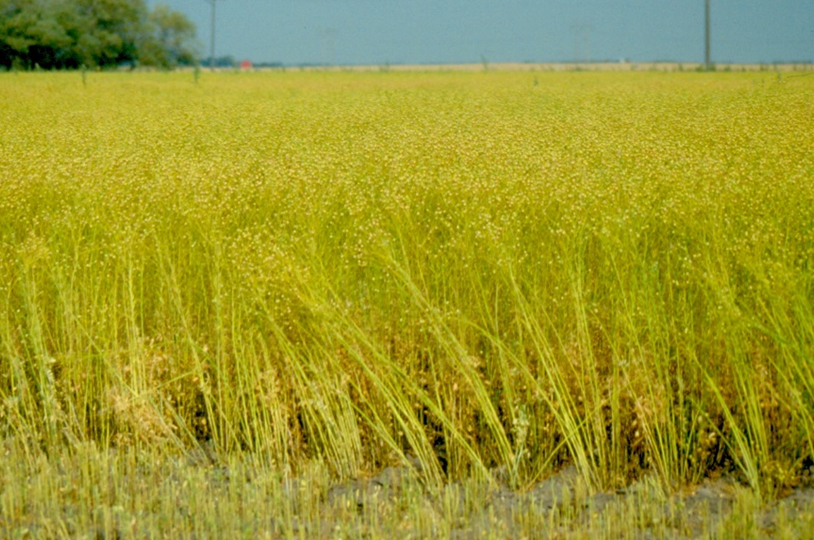
Figure 1. Flax and lentil being intercropped on a field scale.
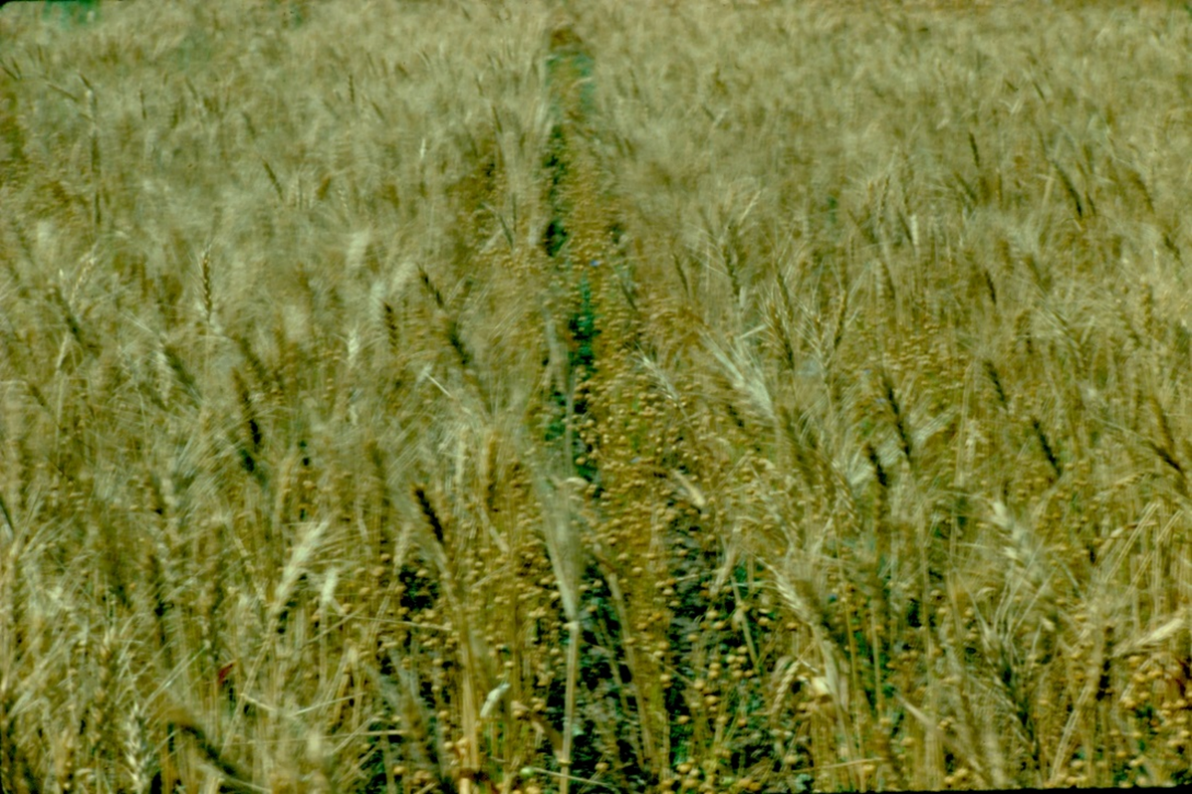
Figure 2. A producer field representing the spring wheat and flax intercrop.
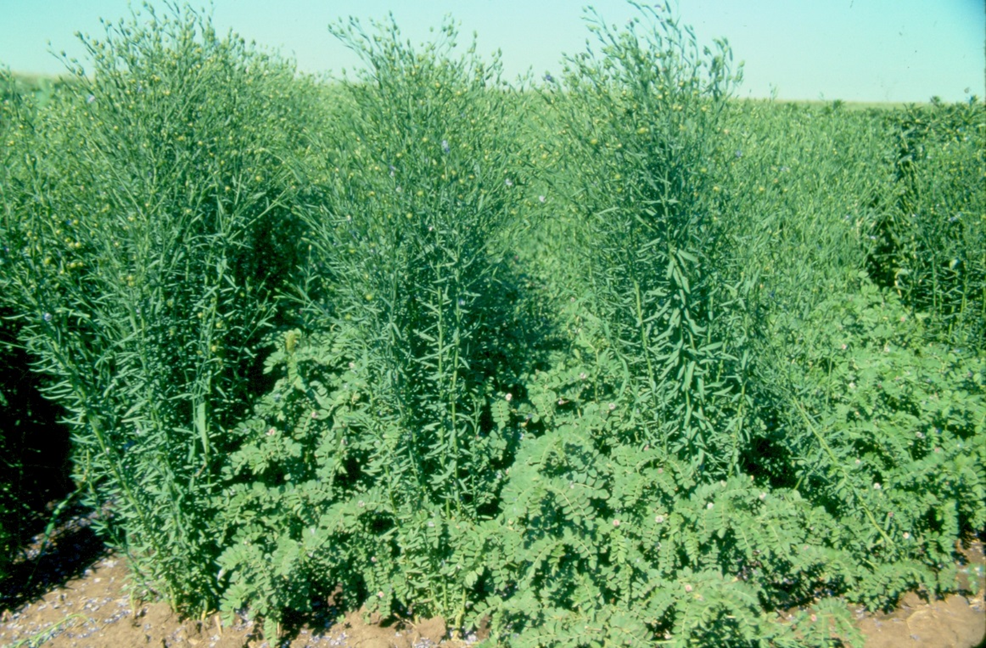
Figure 3. Flax and chickpea planted as an intercrop in an alternate row arrangement.
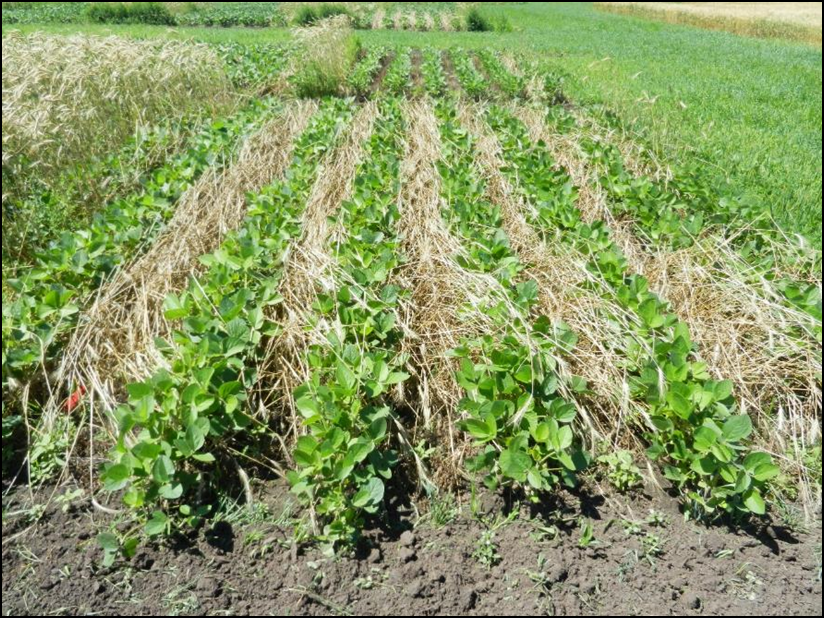
Figure 4. Soybean planted into winter rye followed by terminating rye at anthesis.
In recent years, the CREC has conducted a number of research projects that can be categorized as intercropping. Among these projects are relay or double crop systems where soybean or dry bean are planted into a winter rye crop. In these systems, the main benefits targeted are reduced erosion and weed control, however a number of the other benefits referenced previously may also be attained.
Blaine G. Schatz
blaine.schatz@ndsu.edu
Director/Research Agronomist
Published CREC Intercropping Research Resources:
- Carr, Patrick M., John C. Gardner, Blaine G. Schatz, Steven W. Zwinger, and Steven J. Guldan. 1995. Grain Yield and Weed Biomass of a Wheat-Lentil Intercrop. Agron. J. 87:574-579.
- Carr, P.M., B.G. Schatz, J.C. Gardner, and S.F. Zwinger. 1993. Grain yield and returns from intercropping wheat and flax. J. Prod. Agric., Vol. 6, no. 1:11.
- Carr, P.M., B.G. Schatz, J.C. Gardner, and S.F. Zwinger. 1992. Intercropping sorghum and pinto bean in a cool semiarid region. Agron. J. 84:810-812.
- Ostlie, Mike, Steve Zwinger, Jasper M. Teboh, Greg Endres, and Ezra Aberle. 2017. Winter rye in soybeans: what you need to know. A Report of Agricultural research and Extension in Central North Dakota, NDSU Carrington Research Extension Center 58:35-36.
- Schatz, B.G., S. Zwinger, and P. Carr. Intercropping flax and lentil. 1992. Carrington Research Extension Center annual report. Vol.33, p2-3.
- Weiss, M. J., B. G. Schatz, J. C. Gardner, and B. A. Nead. Influence of a intercrop of canola and field peas on population levels of the crucifer flea beetle, Phyllotreta cruciferae (Goeze) (Coleoptera: Chrysomelidae). Environ. Entomol. 1994. 23:654-568.
Using Single Drone Pictures to Scout Your Fields
Some of the most common drones in the market have cameras with resolutions between 12 and 20 megapixels (MP). In addition to the camera, altitude and size of the target are key factors in determining ground resolution. At the Carrington Research Extension Center, we have a DJI Phantom 4 Pro, which has a RGB camera with a 20.1 MP resolution. Below you will find some pictures captured with that drone; all single pictures without any post processing. We will check how flight altitude affects our ground resolution and hopefully that will provide you with useful information to help you plan your flight for different purposes in your fields.
The bigger yellow box shows a zoomed-in view of the small yellow box in each picture.
It is unlikely that you be able to do stand counts on corn (around V3 leaf stage) flying at 190 above ground level (AGL), but you can still spot some weeds (Figure 1).
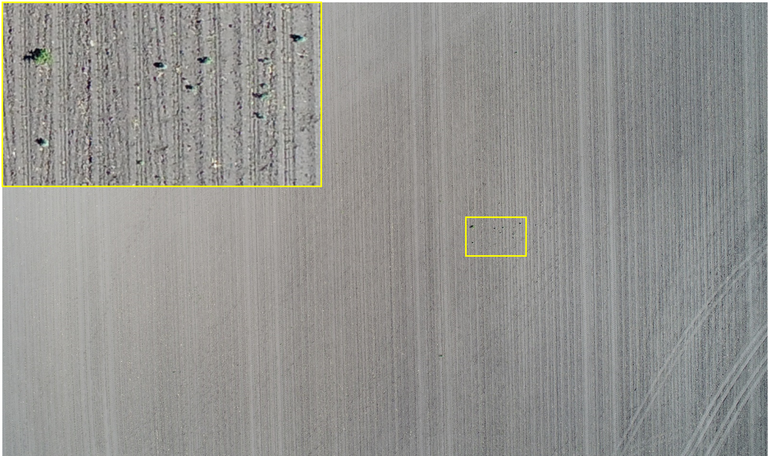
Figure 1. Corn field picture captured on 06/04/2017 at 190 ft AGL.
But you can accomplish that flying at 40 ft AGL, as shown below for sunflower just 1-2 days after emergence (Figure 2).
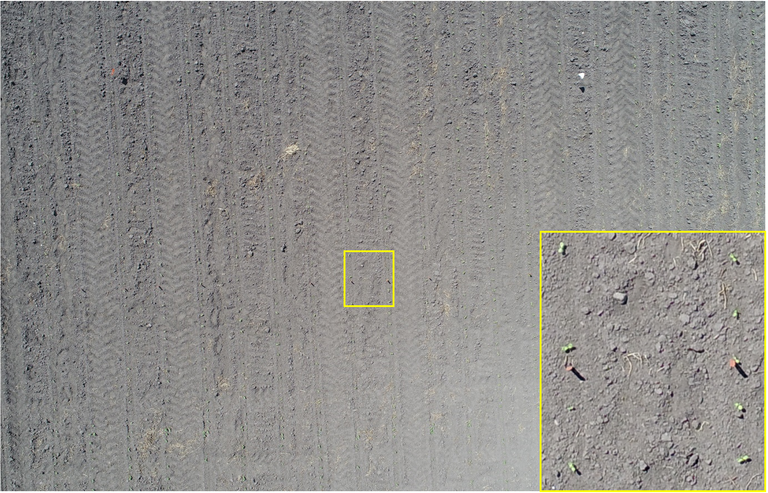
Figure 2. Sunflower plots picture captured on 06/08/2017 at 40 ft AGL.
Now, if you want to scout your field early in the season to identify weeds, check plants for leaf damage, or just the general look of the plants, then you need to be a little closer to the plants. Below are some examples of pictures taken at around 20 ft AGL.
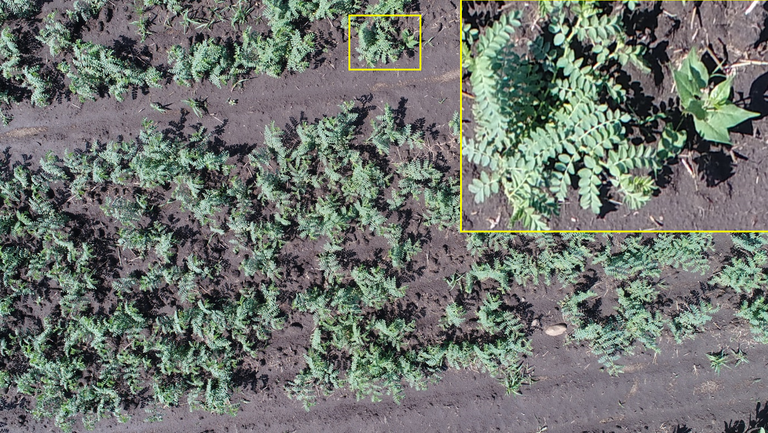
Figure 3. Chickpeas picture captured on 06/14/2017.
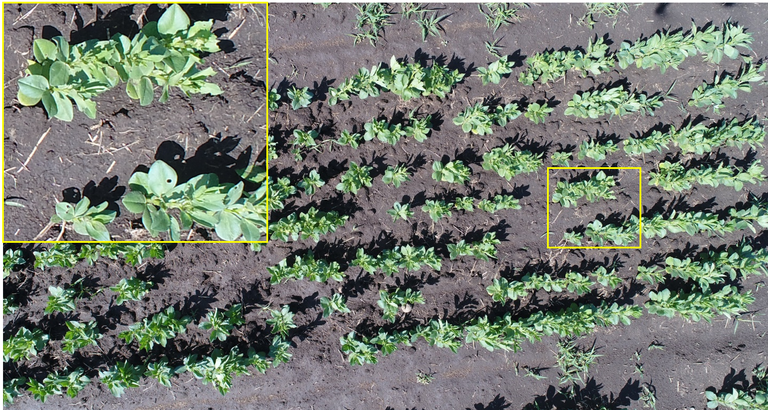
Figure 4. Fababeans picture captured on 06/14/2017.
If you are using a drone to scout for weed infestation or to check on your weed control, you might be able to accomplish that flying a little higher. Check the examples below.
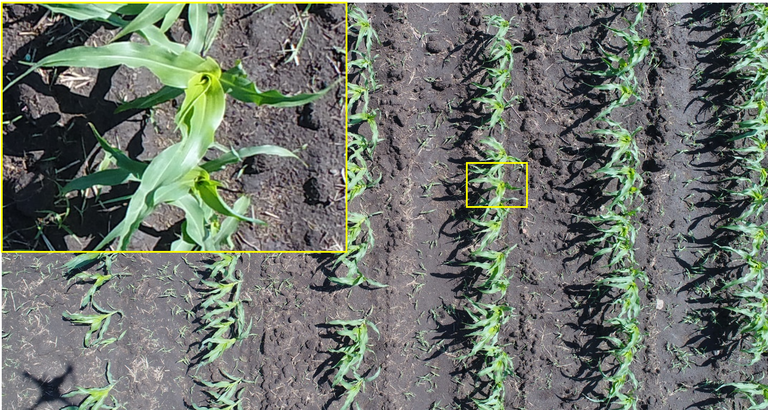
Figure 5. Corn (around V5) picture captured on 06/14/2017.
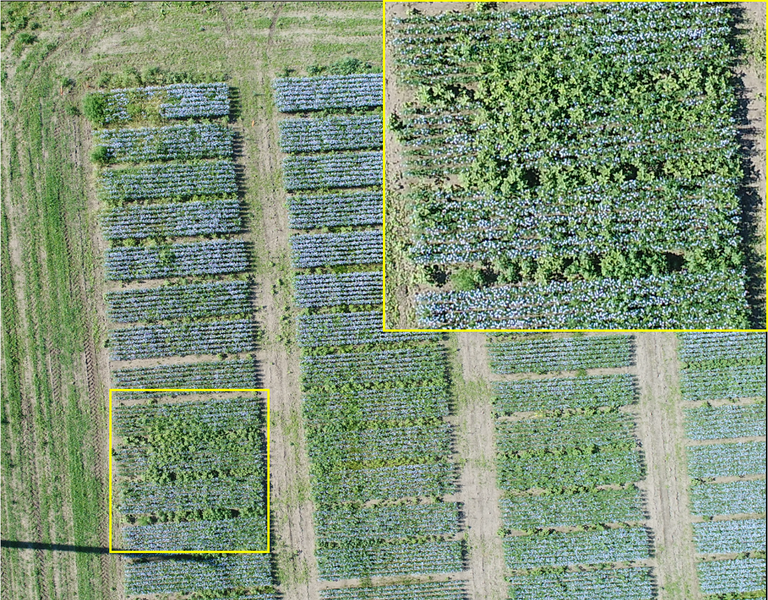
Figure 6. Weeds in flax. Picture taken at 120 ft AGL on 07/05/2017.
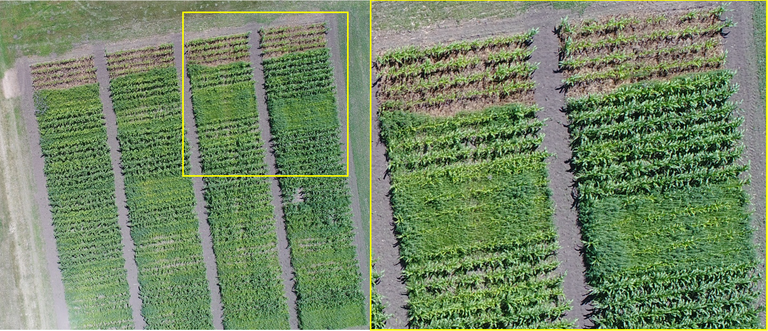
Figure 7. Corn weed control plots. Picture taken at 180 ft AGL on 07/13/2017.
The picture below shows some of the things that you can expect to see from higher altitudes, in this case, 360 ft AGL. As one can see in Figure 8, the plant in the large plot (towards the middle of the picture) shows a yellowish color for both crops: corn (bottom) and sunflower (top). In addition, one can see that there are some stand issues, especially for the sunflower, on both ends of the plot. Flying that high will allow one to cover a large area per flight, but do not expect to see much plant level details in the pictures.
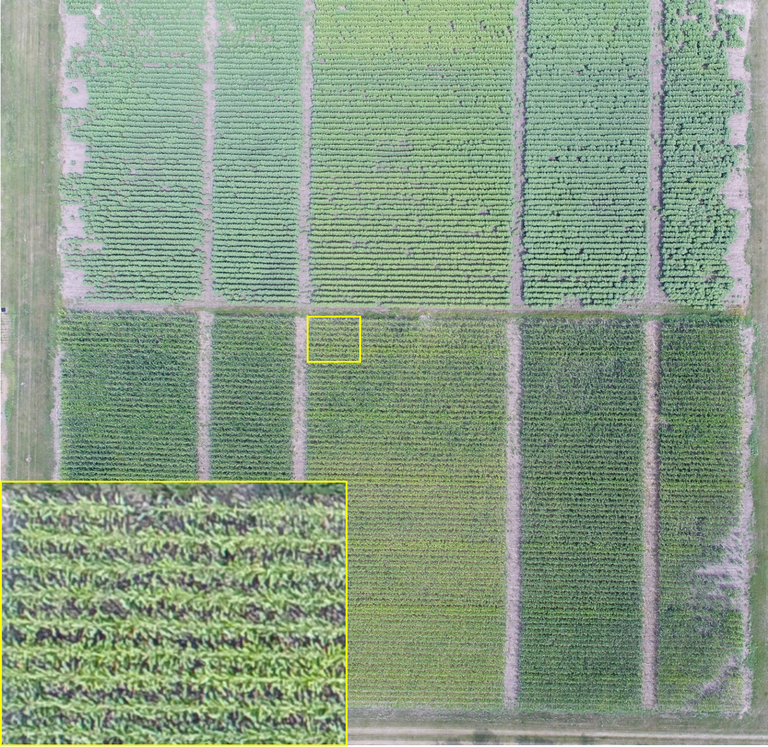
Figure 8. Corn and sunflower plots. Picture taken at 360 ft on 07/27/2017.
As always, please keep safety as a top priority when flying out there. Fly at altitudes that you are comfortable with. The closer to the ground, the less time you have to recover from any problems with your drone. Capturing single pictures across a field can be an efficient and quick way to scout your fields, since those pictures do not require any post processing.
Paulo Flores, Ph. D.
paulo.flores@ndsu.edu
Precision Ag Specialist
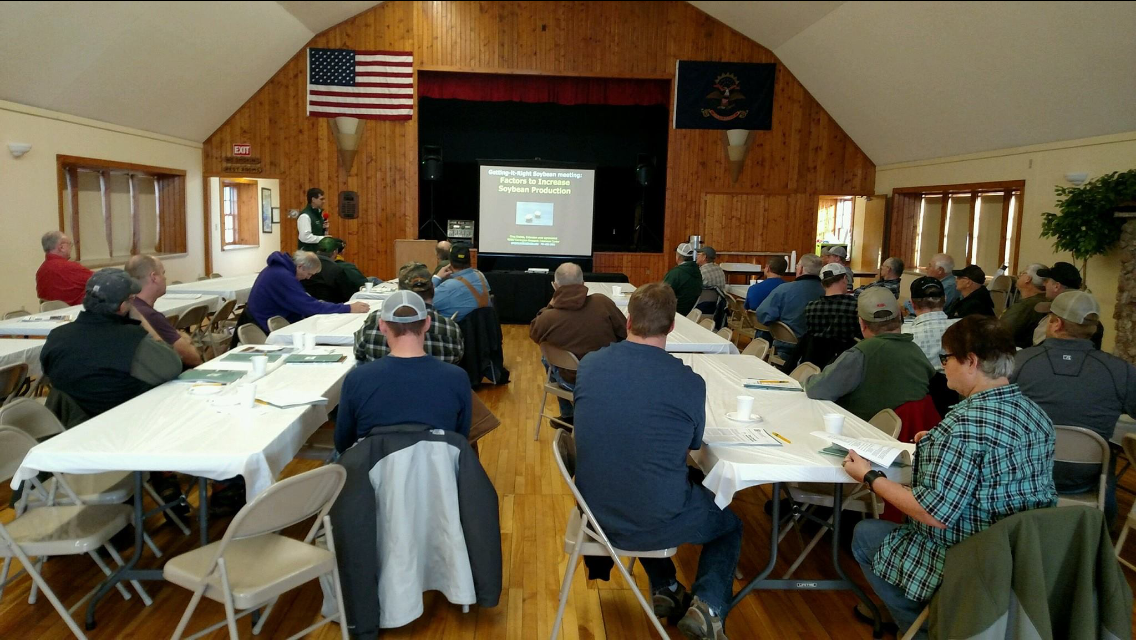
Eight Soybean Production Tips for ‘18
The NDSU Extension Service, with support from the ND Soybean Council, conducted a series of four meetings called ‘Getting-it-Right in Soybean Production’ during January 23-26 for farmers and crop advisers. A major subject area discussed during the event was soybean plant establishment. Soybean plants are generally easy to establish but ‘getting-it right’ will increase profits.
The following is a summary of soybean plant establishment tips:
- Do your homework when selecting soybean varieties. Choosing the correct variety for each field can give you the highest yield potential of all production management practices.
- Soybean yield can increase 4-5 percent by following wheat or corn compared to soybean. Threats of yield reduction with continuous soybean in a field include root rots, soybean cyst nematode, and herbicide-resistant weeds.
- Loss of soil due to erosion, reduced soil moisture, loss of soil productivity, and increased production costs are all reasons to minimize tillage for soybean production. Averaged over 37 NDSU trials, a reduced till system (e.g. strip till, no-till) increased soybean yield by 4 percent compared to production with conventional tillage.
- Don’t plant soybean in salt-affected soils. Soybean yield will be significantly reduced if soil electrical conductivity (EC) is greater than 1 mmho/cm. For example, ECs of 2 and 3 can reduce yield by 25 and 50 percent, respectively. Soil sample suspect areas and if soil salts are present, do not till and grow a tolerant crop (e.g. barley or hay crop). If soybean are grown on salt-affected soils, money will be lost (direct costs for soybean are approximately $150/acre) and the affected area likely will expand in the field.
- Plant early, when soil conditions are appropriate and after cool-season crops are in the ground. Soybean yield increased an average of 9 percent with NDSU trials conducted in the southeast quadrant of ND comparing early planting (first week in May or earlier) to planting the last half of May.
- Establish an early season soybean stand of 150,000 plants/acre. Averaged over 43 NDSU trials, pure live seed (PLS) planting rates ranging from 150,000-175,000/acre had a 6 percent yield advantage compared to 100,000-130,000 PLS/acre.
- Plant narrow. Over years, yield potential is greater as row spacing narrows. Averaged over 25 NDSU trials, intermediate rows (14-22 inches) resulted in yield 4 percent greater than wide rows.
- Treat seed with fungicide, especially if anticipating any challenges with establishing an optimum stand (e.g. early planting or field history with root rots). Yield with fungicide-treated seed was 6 percent greater than untreated seed when averaged across 29 NDSU trials.
Greg Endres
Gregory.Endres@ndsu.edu
Area Extension Specialist / Agronomy
Scratch, scratch, scratch…Are cattle lice the problem?
As the daylight hours lengthen and the temperatures start to warm up we also see cattle starting to rub. With their full, heavy winter coat of hair, it’s easy to think that the cows are hot and are ready to get rid of extra hair. Besides, it’s been a long time since a nice summer shower has rinsed the dust off the cattle.
However, scratching and rubbing can also indicate that cattle have a lice infestation. Lice don’t like the summer sun and warm temperatures, so summer time lice infestations in cow herds is usually not a problem. Besides, some fly control practices can control lice.
However, winter time can lead to outbreaks of hair loss. Scratch. Scratch. Rub. Rub. The cattle are uncomfortable and are likely dealing with lice. Cattle that are thin and dealing with cold stress seem more susceptible to lice outbreaks.
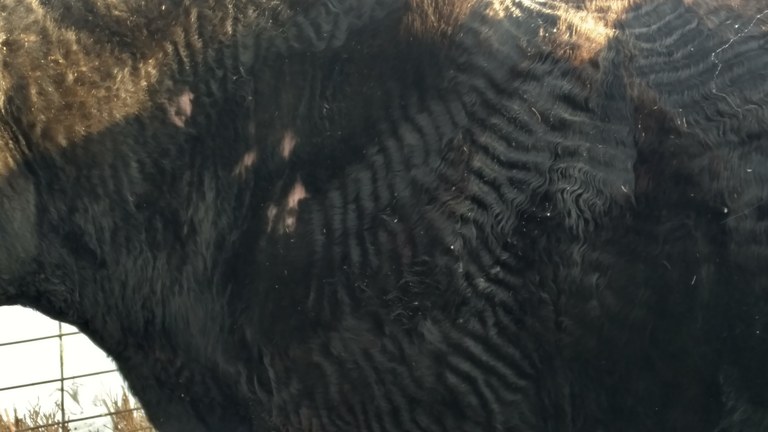
The pink areas on this cow's neck are exposed skin due to hair loss from a lice infestation.
Don’t confuse hair loss due to lice with hair loss due to the fungal infection called ringworm. Ringworm isn’t a worm, it is a fungus that commonly grows in areas around the eyes, head, shoulders, and tail head but can be found anywhere else. Ringworm is spread by contact and is also present in the facilities. Eventually, most cattle will develop an immunity to the fungal infection and hair will regrow in a month.
Lice don’t just go away. There are two types of lice – biting and sucking. Sucking lice feed off the blood of the host by piercing the skin and sucking blood. Biting lice feed off the skin tissues. Either type of lice are uncomfortable to the cow.
Treatment is simple. Find an insecticide labeled for lice control on cattle and apply.
However, cattle that have been treated with an insecticide in the fall can still have a January through March outbreak. Why? Many possible reasons.
Lice are shared between animals by contact. So if one animal was missed and not treated or an untreated animal was added to the herd, that animal is a source of repopulating the lice through the herd. Treat each animal.
The population of lice on a cow is relatively low coming off of pasture in November. It takes a while to grow a population of lice that is bothersome to a cow. Cattle are also spread out more on pasture than during winter feeding. Close winter contact leads to sharing lice.
Biting lice need to be treated so that the insecticide reaches the lice. Topical treatments of insecticide are usually applied as pour-ons or spot-ons. The lice need to migrate from the shoulders or tail area over the back to where the insecticide is applied to be killed. Lice do migrate but it takes time. Also, lice eggs (nits) can hatch and if the insecticide doesn’t have a long enough residual (greater than 21 days), retreatment will be needed.
Total body submersion (dip tank) works great for getting total body coverage of insecticide in the summer. Obviously, dip tanks are not advised in cold North Dakota winters.
Systemic insecticides, like the avermectin series, work well on both types of lice. However, lice can become resistant to insecticides. If the previous insecticide didn’t control the lice, you will need to switch to a different class of insecticide.
If you see cattle rubbing, it’s likely to be time to delouse. The good news? Lice are species specific, so cattle lice are not transferred to the owner.
NDSU does not endorse commercial products or companies even though reference may be made to tradenames, trademarks or service names.
Karl Hoppe, Ph. D
Karl.Hoppe@ndsu.edu
Area Extension Specialist/ Livestock
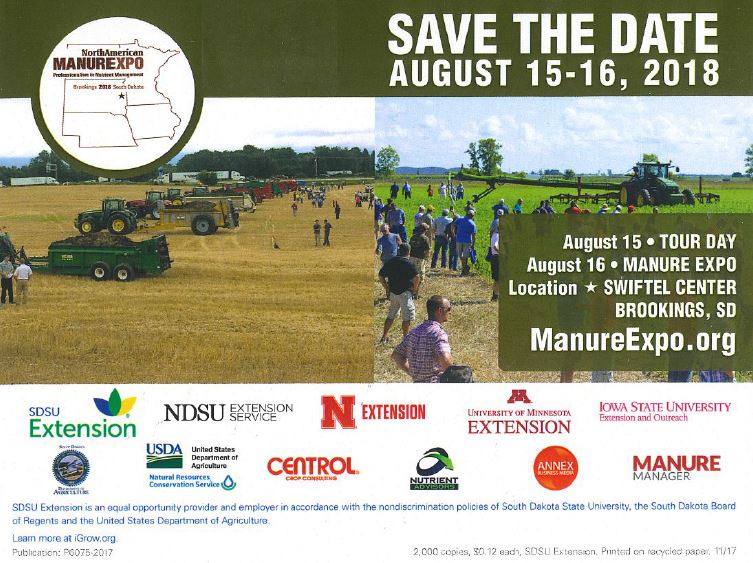
Join Us at the North American Manure Expo
The North American Manure Expo (NAME or Manure Expo) was launched in 2001 in Wisconsin by (what eventually became) the Professional Nutrient Applicators Association of Wisconsin (PNAAW) and the University of Wisconsin Extension Nutrient Management Team. The event was put together at the request of custom manure applicators who wanted to see similar equipment go head-to-head with their competitors. The event has evolved to include three main attractions: an industry trade show, manure technology demonstrations and educational events (continuing education credits). The Manure Expo is an annual event that is hosted in a new location each year. It has been hosted in Wisconsin, Michigan, Minnesota, Missouri, Ohio, Iowa, Nebraska, and Pennsylvania in the US and Guelph, Ontario, Canada.

In 2018, North Dakota State University Extension Service is co-hosting the event for the first time with South Dakota State University, University of Minnesota, University of Nebraska – Lincoln and Iowa State University. The Manure Expo will be held on August 15-16, 2018 in Brookings, SD.
NAME is a two-day event.
- Day 1 – Tours & Agitation Demonstration
- Off-site tours of real farms, ranches, and businesses uniquely using or managing manure
- Demonstration of liquid agitation equipment
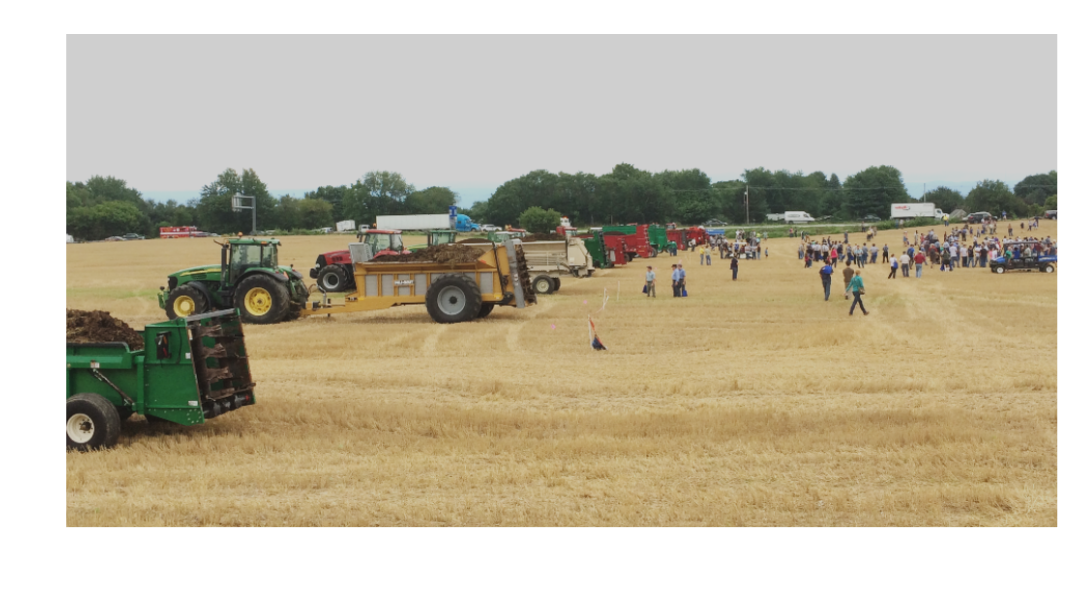
- Day 2 – Education, Trade Show, & Spreader Demonstrations
- Relevant educational sessions, huge trade show (with huge equipment), and head-to-head demonstrations of composting equipment and liquid and solid manure spreaders!
Professional manure applicators are not the only ones who attend NAME. The list also includes: dairy, livestock and poultry producers; handlers of both liquid and solid manures; crop consultants and nutrient management specialists; compost managers; custom operators; agricultural support industry; Extension and Government agency personnel. The Manure Expo is open to anyone who wants to learn about manure and nutrient management!
 If you have questions about attending the Manure Expo please view www.manureexpo.org or contact mary.berg@ndsu.edu. It would be great to have a herd of folks head to Brookings, SD in August to learn about “Manure: Your Soil Health Supplement”.
Mary Berg
Mary.Berg@ndsu.edu
Area Extension Specialist
