Field Guide to Sustainable Production of High-quality Durum Wheat in North Dakota (A1825, May 2017)
Availability: Web only
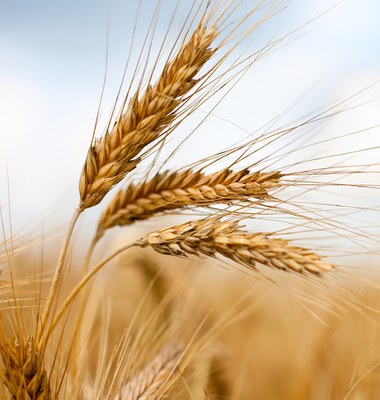
In the last 10 years, the area cropped to durum has ranged from 750,000 to 1.8 million acres. North Dakota grows more than 65 percent of all the durum produced in the U.S. and has an average yield of about 40 bushels per acre.
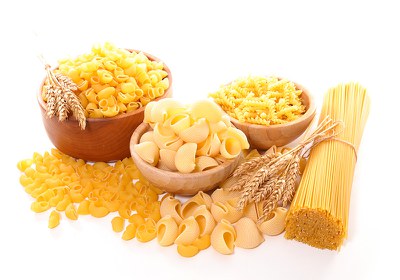
Durum is a premium market class of wheat used largely for making pasta. The production of pasta requires grain with high protein content, density and gluten strength. Therefore, grain quality is critical in marketing durum. High-quality durum wheat commonly fetches a significant premium, compared with the other market classes of wheat.
Sustainable durum production takes into account the long-term impacts of production practices on the soil and water, and other environmental factors, as well as profitability to the producer. This guide seeks to identify “best practices,” based on information derived from unbiased, scientific research, that are considered to be good for the soil, environment, producer, processor and end-user of the grain.
Field Selection and Crop Rotation
Successful durum production can be problematic during flowering and early grain fill in humid, wet conditions that favor Fusarium head blight (FHB) because durum does not have a high level of genetic resistance to this disease. Rainfall after maturity and before harvest also is problematic because these conditions can cause the grain to bleach and lose its amber color. For these reasons, most of the durum production in North Dakota occurs in the northwestern quarter of the state, with lesser amounts in the southwest.
If durum is grown in higher rainfall regions of the state, apply the best practices for FHB management and the timing of harvest to avoid the potential for bleaching (to the extent that is possible).
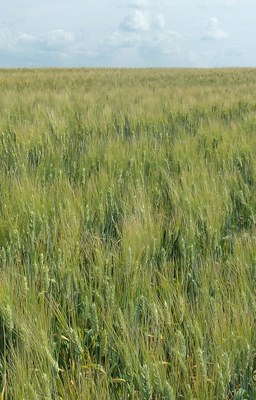
Growing durum within an appropriate crop rotation impacts the productivity of the crop and potential for long-term sustainability of the cropping systems. Growing durum after a noncereal crop is highly recommended. The positives for growing durum after a broadleaf crop include the following, when compared with another cereal crop:
- Increased yield
- Reduced disease pressure, especially for residue-borne foliar diseases such as tan spot and Septoria
- Reduced inoculum load of Fusarium graminearum, the causal organism of FHB, or scab
- Reduced potential for the buildup of soil-borne pathogens
- Ability to use herbicides with different modes of actions, which helps delay the buildup of herbicide-resistant/tolerant weeds. This is especially important as limited options are available for some of the crucially important herbicides used for weed control in durum.
When deciding where to place durum in your cropping system, also consider the following:
- When a legume crop proceeds durum, a nitrogen credit of 40 pounds per acre is available and can help reduce fertilizer costs. Following a legume crop also reduces the risk for FHB, compared with following corn or a small grain. It also increases the likelihood of reaching adequate protein to make marketing grade.
- Shallow-rooted and earlier-maturing crops such as peas and lentils generally use less water than other crops and will leave more water for the succeeding crop.
- Deep-rooted crops such as sunflower, corn and safflower tend to use more soil water and extract it from deeper depths than other crops. These are not good preceding crops if rainfall is likely to be low or stored moisture is a significant portion of the water used within a cropping season, and when little soil moisture recharge occurred during the winter.
- Corn produces significant amounts of residue. Corn residue can harbor Fusarium and increase the problem of FHB in years when the environment is conducive for FHB. Therefore, it is not recommended to grow durum following corn.
- Durum grown for the production of foundation or registered-class seed cannot be planted on land that had been grown to spring, durum or winter wheat either of the two preceding years.
- Data suggest that in some crop sequences, durum yields may be improved when cereals are grown only once in three years (see data from the Crop Sequence Calculator.
(NDSU photo)
Tillage and Residue Management
Tillage has long been a primary means of managing crop residues, controlling weeds and preparing the seedbed for the crop. Nevertheless, tillage hastens the loss of soil moisture through evaporation and exposes the soil’s surface to greater risk of erosion by wind and water, and reduces long-term productivity.
With newer machinery and herbicide technology, no-till planting of durum eliminates the negatives of tillage while still enabling adequate weed control, and excellent seed placement and crop emergence. No-till planting with retained crop residues is one of the most significant technical breakthroughs of the last century for the drier cropping regions of North Dakota. It has enabled more intensive cropping, higher yields, better water use efficiency and superior protection of the soil resource.
Additionally, soil health parameters generally improve after a few years of continuous no-till cropping. Water infiltration rates are improved and beneficial biological activity is increased. Nitrogen (N) fertilizer rates are 50 pounds per acre less for long-term no-till production of durum, compared with traditionally cultivated fields, due to enhanced nitrogen efficiency from biological N cycling and reduction of the potential for leaching and denitrification losses.
Retaining residues helps protect the soil from wind erosion and growing-season evaporation, and fosters greater microbial activity and diversity within the primary root zone of crops (Figure 1). Previous crop residues have value as a cover and a source for carbon because they are returned to the soil. They are also a valuable source of plant nutrients that will be recycled back into the cropping system through decomposition. A number of resources on the web can provide you with an approximate fertilizer value of a given crop residue (for example).
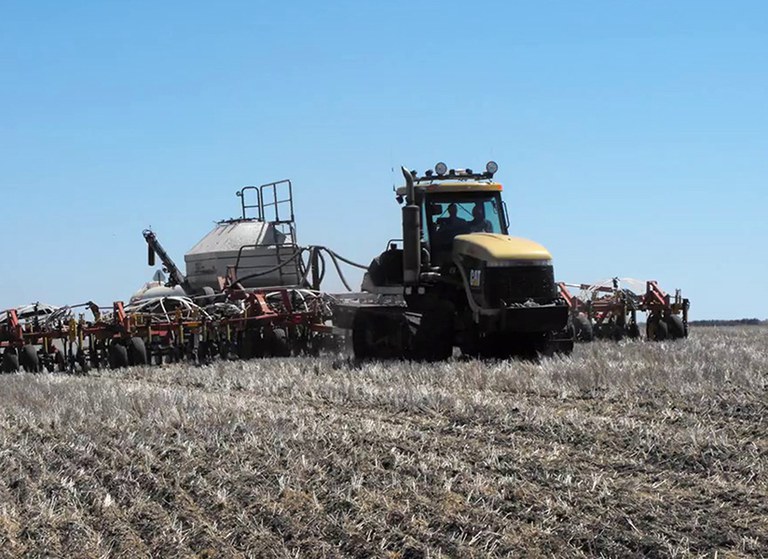
Figure 1. No-till with retention of previous crop residues provides a protective soil cover and reduces soil moisture loss that occurs when soil is exposed to the air when tilled. (C. Patterson)
In no-till systems, excessive residue can be problematic, particularly if the previous crop produced a good yield or if it was corn. Using choppers and spreaders when harvesting can help produce a more uniform cover and facilitate planting the following season.
Cutting the previous crop high and leaving as much stalk as possible in small grains and corn can help avoid residue matting. Baling and removing straw occasionally (once in three years) in most situations will not impact the sustainability of the system negatively.
Crop rotations that alternate low-residue-producing crops with high-residue-producing crops is also an effective means of regulating the buildup of residues. Most growers who have been using no-till for more than 10 years complain about the difficulty of maintaining residue into the next year due to the tremendous diversity of macro and microorganisms in their system.
(NDSU photo)
Variety Selection
Research suggests that variety selection is a foundational component for obtaining high-yielding, high-quality durum wheat. Varietal choice can impact yield, grain quality and the type of management practices that might be needed to optimize profitability. Durum varieties vary in their agronomic and quality characteristics. Moreover, variety performance may interact with the environment, meaning the performance of a variety relative to another variety may change, depending on the environment in which they are grown.
The number of durum varieties available for planting in North Dakota is relatively small, compared with the number of spring wheat varieties. In some ways, this makes the selection process easier.
When considering a durum wheat variety, producers should consider the strengths and weaknesses a variety can offer, field characteristics, and weather and disease challenges that might be associated with the crop. The following are some important characteristics to consider:
Yield
When evaluating a variety for its yield potential, use data from replicated trials in multiple locations and years if possible. Varieties that do well when the results are averaged from many environments likely will do well in future seasons. These varieties are characterized as stable varieties and are more likely to be the most productive, year after year, when compared with a variety with relatively very high yield in one location/year and only average performance in other environments.
Reliable multilocational data can be found on the NDSU Extension Service variety trial results website, or in the annually produced “Durum Wheat Variety Trial Results and Selection Guide”, then select A1067) or from the NDSU Extension Service.
Disease Resistance
Giving the most weight to yield is common when selecting a variety. However, host resistance to diseases can impact the performance of the crop significantly, so consider disease resistance as an important criterion when selecting a variety. Disease resistance ratings for common diseases for most available cultivars can be found in the current selection guide (see the first table in that guide).
Most available varieties have good levels of resistance to leaf and stem rust and moderate resistance to other foliar diseases. Nevertheless, disease resistance genes can break down as pathogens evolve. Even with the ability to manage many fungal diseases with a fungicide, the most sustainable, longer-term strategy is to have the best genetic resistance available in an adapted cultivar.
Moreover, in environments when disease pressure is high, an integrated approach using genetic resistance with a well-timed fungicide results in the best management of a disease. Current levels of genetic resistance to Fusarium head blight (FHB) in durum varieties is not comparable to what is available in spring wheat.
The current recommendation is to avoid using any variety rated as susceptible or very susceptible to FHB. With these varieties, the risk of having severe damage from FHB is high, even if FHB is not that common in your region of the state. If you are growing durum in an environment where FHB has been problematic in the past, use only varieties with “M” (signifying that the variety has an intermediate resistance response) ratings for FHB (at the time this publication was written, no varieties were rated as MR or R, signifying moderately resistant or resistant).
End-use Quality
Durum as a premium market class of wheat has high grain quality standards in the marketplace. Grain protein levels of 13 percent are the standard for the choice milling grade. Discounts are usual and can be significant when protein levels are below this standard. Conversely, grain protein levels that exceed 14 percent can fetch a substantial premium in some years. Protein is often related to vitreous kernel content. To make choice milling grade, 85 to 90 percent vitreous kernel content is required.
The environment and the variety grown impact grain protein content at harvest. Although the environment is hard to predict, reaching high levels of protein is more difficult when conditions are favorable for high yield; the nitrogen to produce the grain exceeds the amount of nitrogen provided, so the protein content becomes diluted.
Varieties vary in their ability to produce protein in a given environment. If you routinely have difficulty in reaching 13 percent in your environment, and the protein premium/discount appears that it will be high at harvest and for higher yielding environments, consider selecting a variety that is known to have high protein levels.
In recent studies evaluating the influence of variety, planting data and seeding rate of new durum wheat varieties, characteristics such as protein content, falling number, kernel yellow pigment content and gluten index were more dependent on the particular variety than the environment in which it was grown. Much of the end-use data generated in that research are consistent with regional and multiyear evaluations currently conducted and were not impacted by changes in planting date or seeding rate.
Bleaching of the bright amber color of durum can occur due to weathering, which also can result in discounts at the elevator. No published data are available on varietal differences for weathering.
Low falling numbers (below 315 to 330) are another source of discount. Low falling numbers are an indication of sprout damage in a seed lot and generally are a problem when rainfall or very high humidity levels occur after the grain has matured and before harvest. Delayed harvest has a negative effect on yield and other quality parameters due to prolonged exposure to the environment.
Some varieties resist preharvest sprouting better than others and may be identified in the selection guide in the tables that report falling numbers. Those with the highest falling numbers are those that are the most likely to resist preharvest sprouting, although maturity timing relative to the time of rainfall can cause a field grown to a variety with good falling number characteristics to sprout.
Cadmium Accumulation Potential
Cadmium (Cd) is a heavy metal that can be toxic to humans. Durum wheat is one of the few cereals that accumulates Cd when grown in soils with high levels. Varieties are now available that have reduced accumulation of Cd. Varieties with this trait should be grown if your soils are high in Cd and if exceeding the market threshold for Cd has been problematic. These varieties will be highlighted in the selection guide.
Certified Seed
Certified seed is seed that has been inspected and tested by the State Seed Commission, which then is able to certify that the seed is a known variety, the seed lot is genetically pure, free from prohibited weed and other crop seeds, and free of certain seed-borne diseases. Further, the seed is certified as to its germination percentage at the time that it was certified.
With certified wheat seed, you purchase the purest genetics, meaning the seed is assured to germinate well and be free from noxious weeds and harmful diseases. If you keep your own seed for future plantings, you should purchase certified seed at least every three years to help maintain the genetic purity of the variety grown.
Also be sure to conduct a germination test every year to know the germination of the seed lot you will plant. Seed lots with less than 80 percent germination may show a loss of vigor in the field. Additionally, be wary of seed lots with low falling numbers (below 200 to 250) or high DON levels, or that were frosted during grain filling because these factors are known to impact germination and vigor. For a list of certified seed dealers, consult the latest “North Dakota Field Seed Directory”.
(NDSU photo)
Planting Date and Seeding Rate
Planting date and seeding rate of durum wheat can impact yield and harvested durum wheat quality. The economic implications of planting date and seeding rate are also of importance. The temperature, humidity and rainfall at key growth stages of durum wheat greatly impact subsequent quality.
One key growth stage of durum wheat is flowering. During this time period, if environmental conditions are favorable, severe FHB levels can occur. All durum wheat varieties are susceptible to FHB, and staggering planting dates is one option of reducing the risk that all fields will be damaged by this disease when environmental conditions are favorable to its development during a specific period of the growing season.
Also, high temperatures at flowering can affect fertilization. By optimizing the planting date, producers may be able to reduce the risk associated with flowering during July, when higher temperatures are expected.
Durum wheat typically is planted later than many of the other early season crops. However, a reduction in yield may be experienced. Recent planting date trials found that the earliest date at which producers were able to plant resulted in a significant yield increase over later dates (Figure 2). Subsequent, two-week delays in planting from the first date continued to decrease yield significantly.
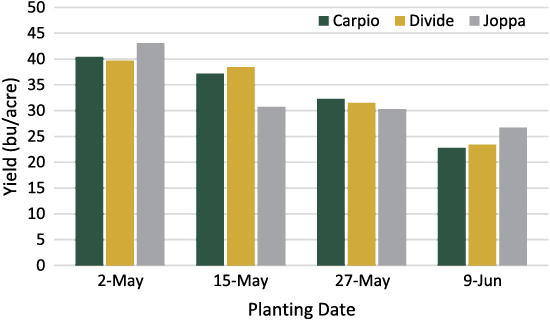
Figure 2. Effect of planting date on yield of three durum cultivars, Minot, 2014.
In addition to yield, test weight also declined as the planting date was delayed. Early planting dates also will enable producers to harvest durum wheat in August, when the threat of rainfall and damage to mature grain is lower.
Seeding rates of durum wheat are similar to those of other small-grain crops. Lower seeding rates may result in the production of more tillers, while higher seeding rates tend to produce fewer tillers and increase the chances of lodging.
Research conducted in North Dakota on new durum wheat varieties indicated that a plant population of 1.2 million pure live seeds (pls) per acre resulted in the highest average yield, compared with plant populations of 900,000 and 1.5 million pls per acre.
Data suggest that a significant cultivar x seeding rate interaction may result for yield in environments that have yield values below 52 bushels per acre. In 2014 and 2015 in these lower yielding environments, an increase in the seeding rate above 1.2 million seeds tended to increase grain yield. Overall, the seeding rates evaluated had limited effect on the agronomic and quality traits for the cultivars evaluated.
Seed Treatment
Seed treatments are an important tool in durum production and help manage pests that affect stand establishment. Fungicide seed treatments are most effective when managing seed-borne diseases such as loose smut and common bunt.
Fungicide seed treatments also can be used to manage Fusarium crown rot, common root rot and Pythium root rot. However, fungicides should not be viewed as providing seasonlong protection because the residual of a fungicide lasts only a couple of weeks after planting.
Insecticide seed treatments are very effective in managing soil-dwelling insects such as wireworm. Most seed treatment packages will be broad spectrum, combining multiple fungicides and potentially an insecticide.
The decision to use a seed treatment should include several factors. Remember, a seed treatment may not always be needed. Refer to the “North Dakota Field Crop Plant Disease Management Guide” and “North Dakota Crop Insect Management Guide” for more information on labeling and efficacy.
The use of a seed treatments does not guarantee a higher stand. A positive stand establishment response with the use of a seed treatment is more likely to be observed in seed lots harboring a seed-borne pathogen or when planting early into cool, wet, undesirable soils; planting a durum crop following another small-grain crop; or planting into a field with a known history of root rots. Similarly, yield responses are not always consistent because the durum crop can tiller to help compensate for stand loss.
Fusarium head blight causes losses in quality and yield, and also increases the presence of scabby seed. Although not ideal, if scabby seed is to be used as a seed source, it should be cleaned and conditioned thoroughly to remove the majority of the scabby kernels. Also, a germination test should be conducted to check the viability of the seed and a fungicide seed treatment should be used.
Another common head disease resulting in a contaminated seed source is ergot. Fungicide seed treatments do not manage ergot, and cultural practices such as crop rotation and incorporating ergot sclerotia below the soil surface can help lower the risk.
(NDSU photo)
Fertility Management
Providing adequate levels of plant-essential nutrients is a component of sustainable durum production. Soil testing and NDSU published recommendations are the best guide because they’re not influenced by corporate marketing for growers in North Dakota.
A phosphate seed-placed or near seed-placed starter is crucial to highest durum yield. Applying adequate nitrogen is also extremely important. Other nutrients are required only if specified on the soil test report. Refer to the NDSU publication “Fertilizing Hard Red Spring Wheat and Durum” for current recommendations. This publication covers recommendations for the nutrients likely to be limiting North Dakota durum production.
Phosphorus and potassium recommendation charts are based on soil test results. Additionally, to determine the most economical rate of nitrogen to apply, a web-based tool called the North Dakota Wheat Nitrogen Calculator takes into account the location of your farm, soil organic matter content and residual nitrogen, nitrogen credits for the previous crop, and the price of nitrogen and wheat. Soil testing is also a key input into this calculator. The nitrogen calculator is also available as a downloadable app for iPhones and Android phones. Search for North Dakota Crop Nitrogen Calculator for the free download.
Applying excessive nutrients, on the other hand, can be costly and may result in some of the applied nutrients moving off-farm. Phosphate and nitrogen movement into surface water resources are particularly harmful and can result in damage of the water body through algal blooms. The death and subsequent decomposition of those blooms result in eutrophication, or depletion of dissolved oxygen. Some algal blooms also release toxins that are harmful to wildlife, people and even hunting dogs that enter the water and ingest the toxins.
The 4Rs (right rate, right time, right source, right place) of fertility management help guide the sustainable use of fertilizers and include applying the right amount of the required nutrient at the right time, using the right source in the right place.
Nitrogen timing and placement
Nitrogen is not only the most commonly used fertilizer; it is also the most likely to be lost from the soil before the crop can use it and, therefore, requires special consideration. The general rule of thumb to minimize nitrogen losses is to apply most of the nitrogen closest to the time of greatest use.
With durum wheat, applying fertilizer nitrogen during late vegetative stages when nitrogen uptake accelerates is difficult because the crop canopy has closed completely. Therefore, a best practice for timing is to apply most or all of the nitrogen needed for the crop prior to planting.
Spring applications are preferable to fall applications. However, fall applications are acceptable on loam soils or heavier in areas not prone to spring flooding after snowmelt.
Anhydrous ammonia and urea are the two N sources that can be fall-applied in the state. Anhydrous ammonia application should not begin before Oct. 1, and then only after soil temperatures measured at the 4-inch depth fall to 50 F between 8 and 10 a.m.
Subsurface banded urea can be applied a week after this date. Broadcast and incorporated urea should wait two weeks after the anhydrous ammonia date. Surface application of urea to no-till acres is not as efficient as subsurface application. The risk of volatility of ammonia is high if at least ½ inch of rain does not fall for several days after application.
Risk is greatest on a soil surface with abundant residue, soil pH greater than 7, high humidity and/or a light rain. No-till wheat growers should apply urea beneath the soil surface for greatest efficiency, possibility in a one-pass operation at planting.
Liquid nitrogen sources, such as 28 percent nitrogen liquid fertilizer (commonly called UAN, or “28”), also should be applied below the surface. If spring conditions prevent below-surface application, banding the 28 percent on the surface may delay volatilization several days, compared with broadcast application.
For broadcast urea application made to no-till, consider using a urease inhibitor with an effective rate of NBPT (such as Agrotain™ or Limus™) to help reduce volatilization losses. Use streamer bars or similar nozzles to apply UAN in-season prior to jointing if additional nitrogen is needed. Applications at later stages do not always result in more yield, although they may help enhance protein levels.
Foliar Nitrogen for Protein Enhancement
A foliar application of nitrogen immediately after flowering (post-anthesis) can be used to enhance the protein content of durum. North Dakota research has shown that the best chance of protein enhancement of durum with this technique is accomplished by waiting until just after flowering.
The recommended rate is 30 pounds of nitrogen per acre as UAN (10 gallons/acre of 28 percent) mixed with 10 gallons/acre of water. This application should be made in the cool of the day. Some leaf burning will result, but if the application is made immediately post-anthesis, no yield reduction has been recorded in any North Dakota study.
The addition of herbicides, fungicides and insecticides may increase the intensity of leaf burn and limit the efficacy of the pesticide application. Do not apply this nitrogen application with fungicide at flag-leaf or anthesis because the burning at this time will reduce yields and decrease the efficacy of the fungicide.
About a 0.5 to 1 percent protein increase has been achieved using the immediate post-anthesis method. The use of low rates of slow-release nitrogen products before or after anthesis has not been shown to increase grain protein effectively.
Sulfur
Sulfur is becoming more important than potassium or chloride in the state as a third major nutrient. The sulfur soil test is not a good predictor of possible sulfur deficiency. A more useful method to determine whether soils within a field likely will be sulfur deficient (Figure 3) is to consider which soils are sandy loam or coarser textured, with less than 3 percent organic matter on higher landscape positions. If rainfall is high before seeding, even durum grown on higher organic matter soils and soils with more clay can be susceptible to sulfur deficiency.
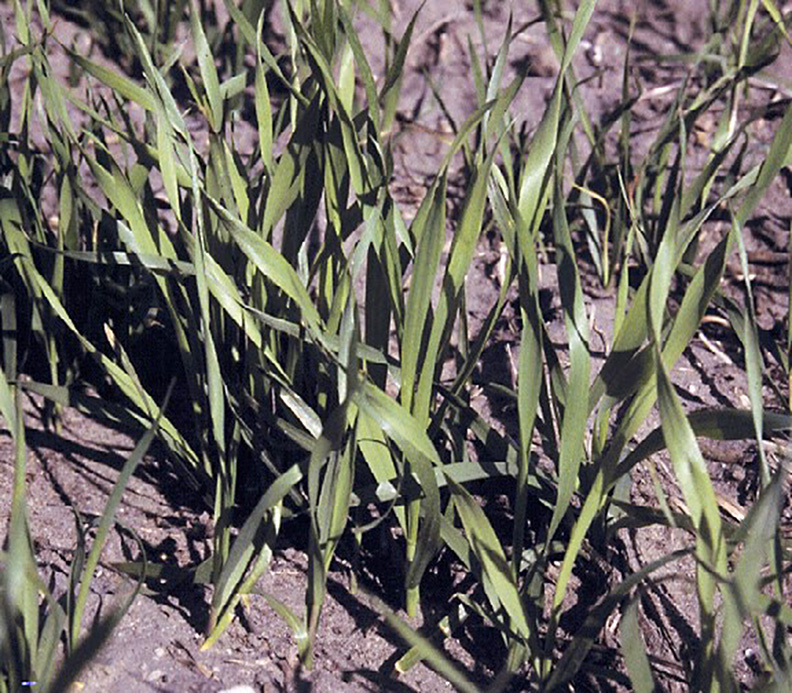
Figure 3. Sulfur deficiency in wheat in North Dakota. (D. Franzen, NDSU)
If soils with these properties are present, review fall and spring rainfall conditions. If normal to greater than normal rainfall or greater than normal winter snow was received on these soils in the fall and/or early spring, the stage is set for possible sulfur deficiency and a pre-emptive spring fertilizer application is recommended and should include a soluble sulfur fertilizer. Ammonium sulfate at rates of about 10 pounds sulfur/acre or gypsum at 20 pounds sulfur/acre are excellent sources of sulfur.
Elemental sulfur, even premium bentonite-blended forms, will not be nearly as useful in correcting a deficiency as the more soluble forms. Composite-blended granules of phosphate fertilizers that include sulfur could be used, but rates need to be high enough to supply the 10 pounds sulfur/acre needed as the ammonium sulfate portion of the fertilizer, or the application should be supplemented with a sulfate containing fertilizer.
Weed Management
(NDSU photo)
Weeds are pests that are present in every field and every season regardless of previous management. Weeds are controlled through chemical, cultural and physical methods. A broad array of herbicides are registered for use in durum. See the current “North Dakota Weed Control Guide” for details of products and their recommended rates and timing.
Herbicide-resistant weeds have become a major threat to the sustainability of herbicides as a weed control option. Because the development of herbicides with new sites of action has been slowed, delaying the evolution of herbicide-resistant/tolerant weeds to existing herbicides is of paramount importance.
Strategies to Minimize Herbicide-resistant Weeds
Weed resistance cannot be prevented, but it can be delayed, and no single strategy is likely to be totally effective. Herbicide rotations, tank mixing herbicides with different sites of action, and tillage can delay resistance by the length of time the selection pressure for a given herbicide is replaced by an alternative control method.
Resistance may occur first in fields where a single site-of-action herbicide is used repeatedly in a growing season or across several growing seasons. Integrated weed management uses multiple strategies to manage weed populations, including:
- Scout fields before and soon after herbicide application. Correctly identify weeds. Use effective herbicides, hand weeding, cultivation/tillage and other methods of weed control to kill weeds that escape or germinate after chemical application.
- Diversify crop sequences with different life cycles. For example, winter annual crops (winter wheat), perennial crops (alfalfa) and summer annual crops (spring wheat, corn or beans), which result in different planting and harvest times, enable more herbicide options and allow varied cultural practices to decrease the risk of the development of herbicide-resistant weeds. Consider weed biology and ecology. Use tillage, crop sequence, soil fertility, planting date, crop competition, weed seed longevity, cover crops and response to herbicides to increase success in weed management.
- Don’t forget the PRE. Apply effective PRE herbicides at full rates and include multiple sites of action. PRE herbicides will reduce weed emergence and allow flexibility in POST herbicide timing. Residual PRE herbicides applied to soil and early POST (if labeled) will suppress weed emergence until canopy closure. This is particularly beneficial for weeds with a long germination pattern (waterhemp). Use PRE herbicides that will control problem weeds effectively. Unfortunately, few PRE herbicides are registered for durum, so this strategy is more manageable in other crops of the rotation. One example could be the use of Treflan PRE in durum to give additional foxtail control and a different site of action (group 3) than POST herbicides (Discover and Tacoma, group 1 and Everest and Yarro,
group 2). - Apply effective POST herbicides. Apply herbicides that include multiple sites of action in tank-mix or sequential applications. Two or more herbicides in mixture must have activity against potentially resistant weeds to be effective. Herbicides in most commercial mixtures do not target the same weed species. Effective tank mixtures on weeds will reduce selection of herbicide-resistant biotypes more successfully than rotating herbicide sites of action. Antagonism may occur with some mixtures, especially between contact and systemic herbicides, especially with broadleaf and group 1 herbicides. Also, many herbicides for control of broadleaf weeds (for example, bromoxynil and tribanuron) antagonize the activity of group 1 herbicides for grass control (for example, Tacoma).
- Use high herbicide rates and effective adjuvants. Full rates kill weeds with low-level resistance, and dead plants cannot produce resistant progeny. Reduced rates allow plants with low-level resistance to survive, hybridize and produce progeny with elevated resistance. Hybrid plants (greater than 1 resistance gene) express a higher level of resistance and require even higher herbicide rates to kill the plant.
- Spray small annual weeds. Generally, small weeds (less than 3 inches) are more susceptible to herbicides than large weeds. Even weeds with low-level herbicide resistance are more susceptible at 1 inch than at larger growth stages.
- Practice zero tolerance. Scout fields after row closure and kill uncontrolled weeds. Seed from escaped weeds will contribute to the weed seedbank and will require diversified weed management strategies of mowing, cultivation/tillage and hand weeding to achieve near 100 percent weed control. Timely cultivation can improve weed control, and hand pulling is effective for single plants or small patches.
- Control weeds in field perimeters, drown-out and noncrop areas. Weeds surviving a partial herbicide dose on field borders can be a repository for the introduction of resistant weeds into a field. Control weeds in all areas of the field where the crop is not growing, including field edges, fence lines, waterways, ditch banks and areas where the crop has not been planted or has been destroyed.
- Rotate herbicides with different sites of action in consecutive years. Diverse crop rotations can introduce herbicides with different sites of action to delay herbicide resistance. A mix of dead plants, unaffected plants and plants showing intermediate responses indicate herbicide resistance has occurred.
- Clean tillage and harvest equipment to ensure weed seed will not be transported between fields. This is particularly important in crops that are harvested with a platform header-equipped combine.
- Evaluate weed management at the end of each season and revise the management plan to improve weed control the next year.
Disease Management
(NDSU photo)
Numerous diseases have the potential to reduce yield and quality of durum. In many cases, genetic, chemical and cultural methods are available to reduce the impacts of these diseases. Integrating multiple methods usually results in the best management of a disease.
The most common diseases impacting durum are tan spot, Septoria leaf blotch, bacterial leaf streak and Fusarium head blight. Leaf and stem rust are important diseases of durum, but most durum varieties in North Dakota have high levels of resistance. However, leaf and stem rust pathogens have the ability to evolve quickly, and new races could cause a shift toward susceptibility in the North Dakota varieties.
Many of the current durum varieties are susceptible to stripe rust (yellow rust). Stripe rust is favored by cooler temperatures and prolonged moisture periods, and occasionally occurs in the major durum production regions. Stripe rust causes the most damage when pustules develop early on the flag leaf and disrupt photosynthesis. The spores of wheat rust pathogens are carried by southerly winds into the state. Therefore, the earlier a rust disease is reported in North Dakota, the greater the chance of yield loss.
Fungal Leaf Spot Complex
The fungal leaf spot complex is associated with the pathogens that cause tan spot, Septoria and Stagonospora (Figures 4 and 5). These pathogens overwinter on small-grain residue and spores are released as conditions are favorable in the spring and summer (Figure 6). Spores are dispersed by wind and infect durum in a wide range of temperatures.
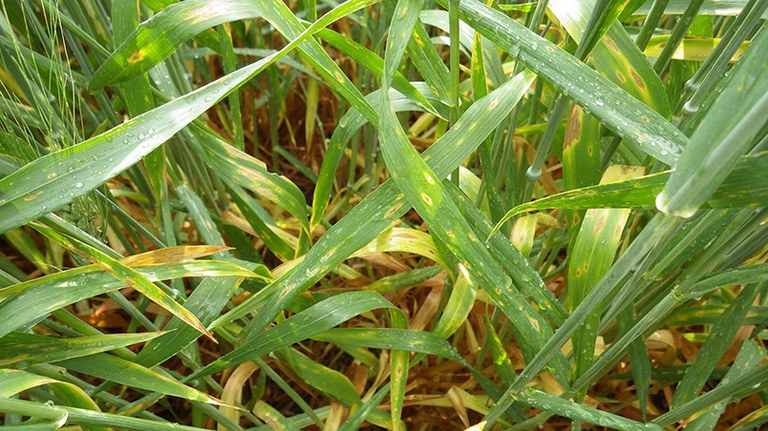
Figure 4. Development of tan spot on lower leaves. (A. Friskop, NDSU)
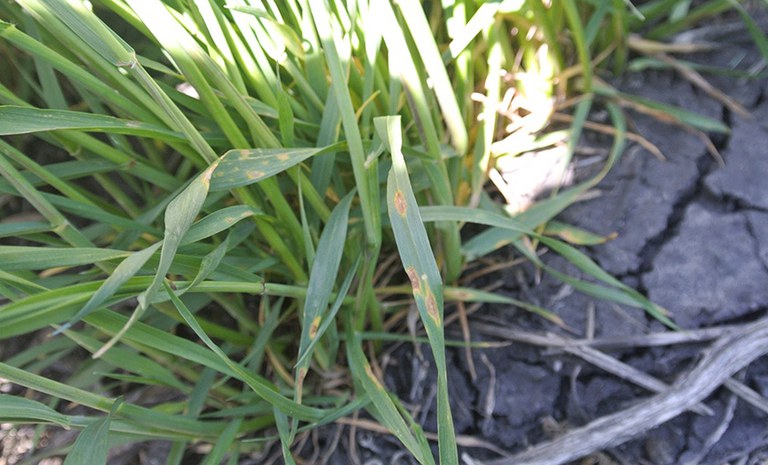
Figure 5. Septoria leaf blotch developing on lower leaves of durum. (A. Friskop, NDSU)
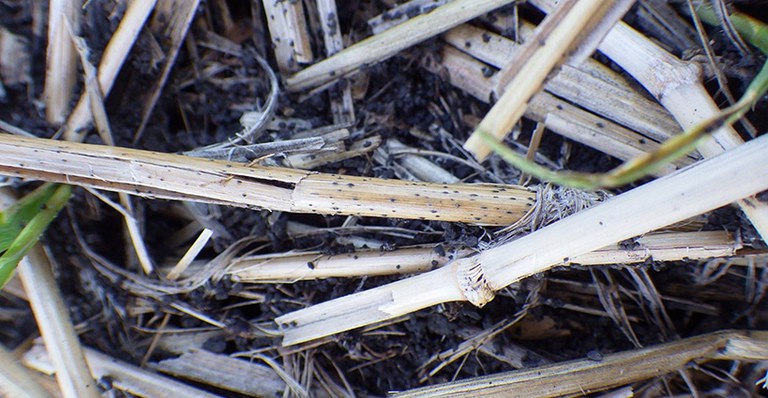
Figure 6. Overwintering structure of the tan spot pathogen on wheat residue. (A. Friskop, NDSU)
During wet growing seasons and prolonged moisture periods, large numbers of conidia form in the disease spots and can be carried by wind and rain splash to other wheat leaves to form new infections. Prolonged wet periods (24 hours or greater) can result in spore germination and infection on leaves of durum.
Crop rotations can reduce the initial inoculum of fungal leaf spot pathogens. Rotation of durum with any broadleaf crop will reduce the risk of infection by these three leaf spot fungi. Planting into the residue of corn, oats, millet and barley also poses little risk for these fungi. Tillage to bury infested residue or straw management at harvest to aid residue decomposition can be helpful in reducing inoculum levels but is not always an option in durum production areas.
Fungicides are available for early season and late-season management of fungal leaf spots. NDSU research has shown modest (2- to 4-bushel per acre) yield responses with the application of a fungicide to wheat for control of early season tan spot when: 1) wheat was planted into wheat residue, 2) a susceptible to moderately susceptible variety was grown and 3) when spring rains or dew favor disease development. Early season application is not recommended in the absence of disease or in an environment unfavorable to the development of disease.
Several fungicides are labeled for management of fungal leaf spots. Products containing active ingredients belonging to the FRAC 3, 7 and 11 have very good to excellent management of fungal leaf spots. Consult the most current edition of PP622, “North Dakota Field Crop Plant Disease Management Guide,” for an updated list of registered fungicides and their use rates.
Bacterial Leaf Streak
Bacterial leaf streak (BLS) is caused by the bacterium Xanthomonas translucens pv. undulosa and has been observed frequently in recent years in North Dakota. Yield losses due to BLS have been hard to quantify but are estimated to range from zero to up to 40 percent, depending on the stage of infection and severity. The causal bacterium can be seed-borne and can survive on crop debris. The bacterium is spread by splashing or wind-driven rain and enters the plant through wounds or the stomata.
Symptoms of this disease are most noticeable in areas that have had frequent storms associated with high winds and leaf damage. Early leaf symptoms of bacterial streak are characterized by translucent, water-soaked streaks. As the lesions of mature water-soaked streaks become dry and turn brown or necrotic. Additionally, the causal bacterium may be visible as a shiny glaze (clumps of dried bacteria) on the leaf surface within the chlorotic and necrotic lesions (Figure 7).
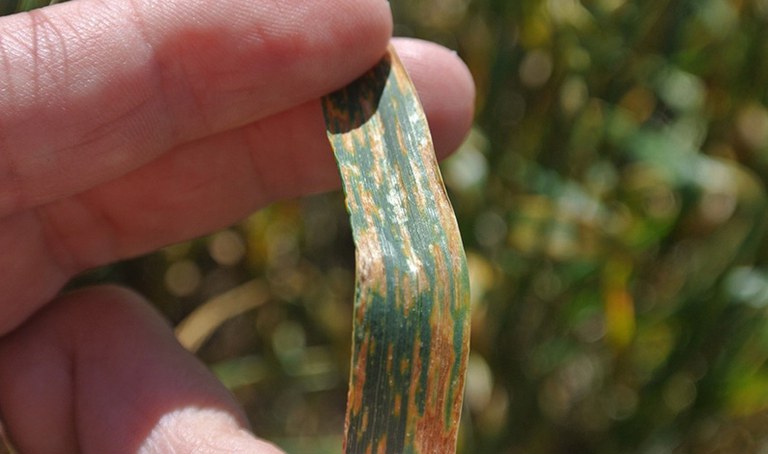
Figure 7. Bacterial leaf streak. Note the glossy appearance on the leaf’s surface. (A. Friskop, NDSU)
The primary means of managing BLS is through the use of clean seed, crop rotation and genetic resistance. The pathogen is seed-borne, so the use of clean seed can prevent infections and spread. However, because of the widespread prevalence of this disease in North Dakota in residue and soil, prevention of BLS through clean seed may have only limited impact. No effective chemical seed treatment is available to manage BLS on the seed.
Most durum varieties currently grown in North Dakota are susceptible to BLS (see the Durum Selection Guide for the most recent ratings, if available), but some varietal differences have been observed. Foliar fungicides are not effective against BLS, and antibiotic compounds that have known bactericidal properties have not been shown to manage this disease consistently.
Fusarium Head Blight
FHB is the disease that has had the most impact on the durum industry in North Dakota. Since the 1990s, the reduction of durum production in the northeastern part of the state can be attributed to an increase in the frequency and intensity of FHB.
FHB is a fungal disease that can occur on all small grains but most commonly is seen on spring and winter wheat, durum and barley. Although FHB can cause severe yield losses, the major impact of this disease on durum is on its quality.
Yield losses occur from floret sterility and when infection results in shriveled, light test-weight kernels. Quality reductions occur when the fungal pathogen produces mycotoxins (deoxynivalenol, or DON) in infected seed.
The primary symptom of FHB is premature bleaching of the wheat spike (head). The partly white and partly green heads are diagnostic for the disease in durum (Figures 8 and 9). Additional indications of Fusarium infection are pink to salmon-orange spore masses of the fungus often seen on the infected spikelets and glumes during prolonged wet weather.
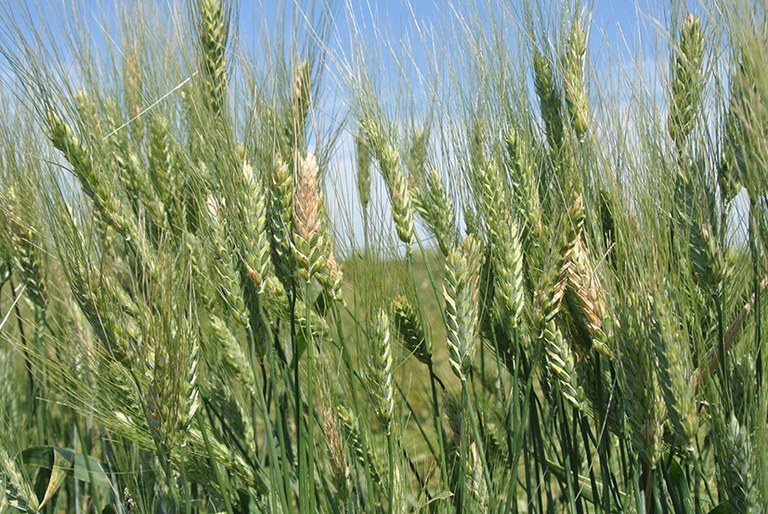
Figure 8. Fusarium head blight damage. (A. Friskop, NDSU)
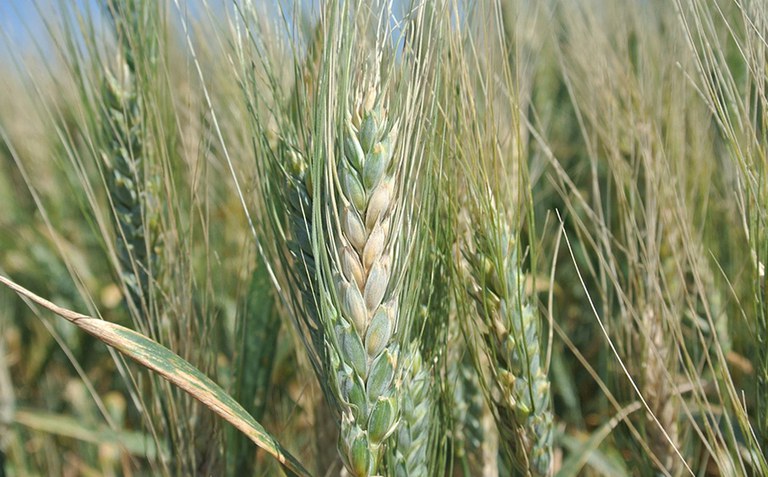
Figure 9. Fusarium head blight on a durum spike. (A. Friskop, NDSU)
Many infected wheat and durum kernels are shriveled, lightweight and dull grayish or pinkish. These kernels sometimes are called “tombstones” because of their chalky, lifeless appearance (Figure 10). If infection occurs late in kernel development, Fusarium-infected kernels may be normal in size but have a dull appearance or a pink discoloration and still have DON. Infected kernels of durum often lose their amber translucence and appear chalky or opaque.
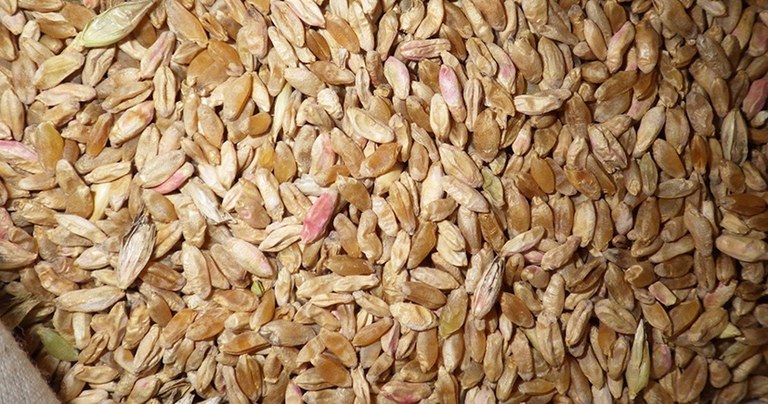
Figure 10. Kernels damaged by Fusarium head blight. (A. Friskop, NDSU)
FHB is best managed by integrating multiple management tools. The use of a single tool often fails when the environment favors severe disease. Management strategies to reduce FHB should include a combination of as many of the following practices as possible.
Genetic Resistance. None of the commercially available durum varieties have a high level of FHB resistance. Nevertheless, resistance differences occur among varieties, and variety selection has a significant impact on FHB severity. As mentioned under the section on variety selection, avoid varieties that are rated S or VS (susceptible or very susceptible) in the selection guide and consider using only the most resistant varieties in areas that are prone to FHB development (higher moisture and humidity areas). Often in research plots, the level of genetic resistance has more impact on DON levels than a fungicide. However, using varietal resistance and a well-timed fungicide results in the best management of FHB.
Tillage and Crop Rotation. Tillage practices that bury residue from small grains or corn can reduce the inoculum potential of the fungus. In minimum or no-till practices, effective spreading and distribution of chaff and other residue may allow faster decomposition of the chaff, reducing inoculum potential. Chopping or grinding corn residue to reduce the size of the remaining stalk pieces favors more rapid disintegration of host tissue. Crop rotation is effective in reducing FHB levels. Planting durum on last year’s broadleaf ground can reduce inoculum levels significantly. The greatest risk of Fusarium infection occurs when small grains are planted on last year’s small-grain or corn residue. Although tillage and crop rotation help reduce the inoculum level, they will not prevent the development of the disease if environmental conditions are favorable. Fusarium spores can be carried by wind from other fields and from previous residues that have not yet decomposed to initiate an infection.
Planting Date. Stagger the planting of durum fields and use varieties differing in days to maturity; this reduces the risk of a producer’s entire crop flowering or going through early grain fill during a period favorable for Fusarium infection.
Fungicide. A fungicide can reduce FHB damage, particularly if combined with genetic resistance. Reductions in FHB severity of 50 to 60 percent can be achieved when fungicides are applied at early flowering. Triazoles are the only recommended fungicide class for FHB and DON suppression. See NDSU Extension publication PP622, “North Dakota Field Crop Plant Disease Management Guide,” for an updated list of registered fungicides and their use rates. Application studies have shown that spray coverage and disease control with these fungicides is improved when the sprays are directed at an angle forward and backward toward the grain head, or with single nozzles directed toward the grain head, all at a 30-degree angle from horizontal. Ground and aerial application are effective in managing FHB and DON. Ground applications should use a water volume of 10 to 20 gallons per acre and aerial applications should use at least 5 gallons per acre.
Disease Forecasting. The NDSU small-grain disease forecasting system provides information for the risk of fungal leaf spot and FHB at the following website: . A multi-state FHB forecasting model for FHB also is available; it will provide FHB risk for the following three days.
Both forecasting systems are useful tools to indicate the possible need for a fungicide application. The forecasting systems are developed using weather parameters (humidity, temperature, precipitation and leaf wetness) to estimate risk. The grower must decide if the variety grown is susceptible to the leaf disease or FHB, if good yield potential is present to warrant fungicide use and if the weather site chosen is representative of the weather in the vicinity of the wheat field.
Integrated Management. Durum growers will manage several diseases during a growing season, and using an integrated management strategy is the best approach. Several of the aforementioned diseases can be managed by multiple tools, and employing several of them will reduce the development of diseases. Avoiding the reliance on one management tool will reduce the ability of a pathogen to adapt (host and fungicide resistance) and prolong the use of the most effective management tools.
Insect Pest Management
(NDSU photo)
A number of insects can cause damage to durum. Aphids, armyworms, cutworms and grasshoppers are examples of insects that are problematic to a wide range of crops. Information about these insects and treatment guidelines are found in the current “North Dakota Field Crop Insect Management Guide,”. Wheat stem sawfly and wheat midge are the two insects causing the most damage to durum and other classes of wheat in North Dakota.
Wheat Stem Sawfly – Cephus cinctus Norton (Hymenoptera: Cephidae)
Wheat stem sawfly is considered one of the most important insect pests of durum. Sawfly populations fluctuate across years and locations, with the greatest damage occurring in southwestern and west-central North Dakota.
Sawfly populations generally have increased since 2005. Recent surveys suggest yield losses due to this pest are in the range of 10 to 25 percent statewide, but losses of 100 percent have been reported in a single field that was heavily infested.
Wheat stem sawfly is a wasplike insect (Figure 11). The adult is about ¾ inch long and is relatively short-lived (seven to 10 days). The adult emergence occurs during a long period of time, usually about three weeks but sometimes as long as one month. First emergence is typically during mid- to late June in North Dakota.
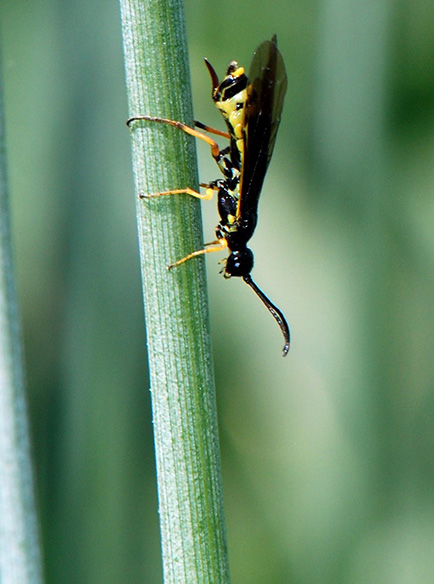
Figure 11. Wheat stem sawfly adult female. (P. Beauzay, NSDU)
Female sawflies deposit eggs into the elongating stems of host plants in early summer, and developing larvae feed on stem tissue and move up and down the length of the stem (Figure 12). Although several eggs may be laid within a stem, only a single larva survives to maturity.
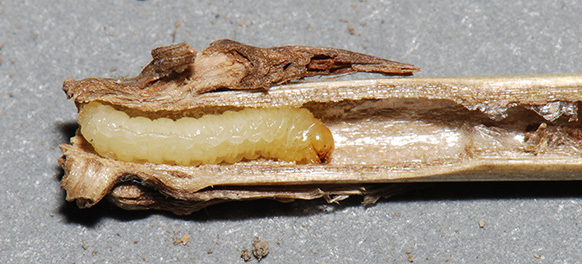
Figure 12. Wheat stem sawfly larva. (P. Beauzay, NSDU)
As the plant matures, and usually prior to harvest, the larva moves down to the base of the stem and chews a notch around the inside of the stem. The notch weakens the stem, which usually breaks. Much of the sawfly damage is associated with lodging and harvest losses, but significant losses in kernel numbers and size also can occur due to larvae feeding on the vascular tissues of the stem during grain filling (Figure 13).
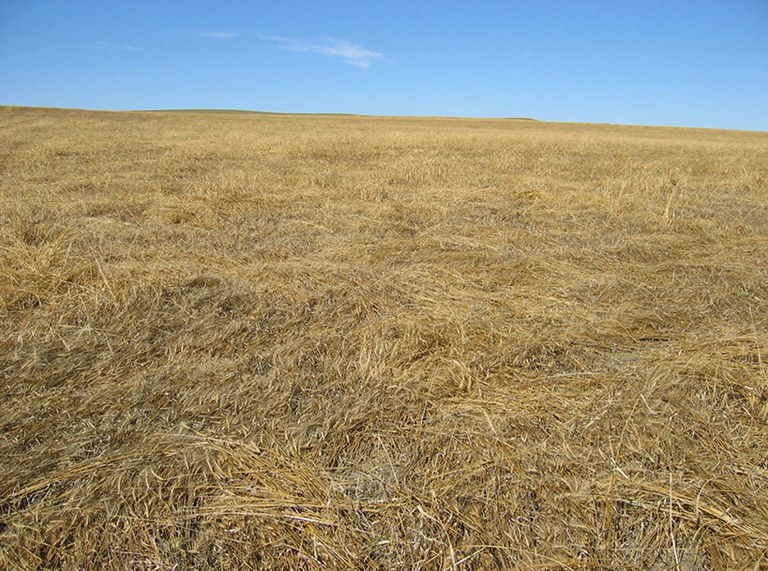
Figure 13. Lodging caused by wheat stem sawfly near Mott, N.D. (D. Barondeau, NDSU)
Spring wheat, winter wheat and durum wheat are the main cereal crops attacked by wheat stem sawfly, although infestations in other small grains such as barley, triticale and spelt have been observed. Barley suffers very little damage, and cultivated oats does not support wheat stem sawfly, although females do lay eggs in oats.
Several cultural control practices used singly or in combination may help reduce or minimize wheat stem sawfly infestations. Swathing, tillage, delayed planting and crop rotation all have been recommended, although each has an associated cost.
Swathing and using a stripper header are the only pest management practices that can be utilized in the current year of the infestation. Swathing sometimes is conducted on just the outer one or two swaths bordering the field if the infestation is heavy only in the field edges. Swathing prevents sawfly larvae from cutting the stems and reduces yield loss due to lodging.
The disadvantages of this technique are that it requires an additional field operation, and swathing may adversely impact parasitic wasps that attack sawfly larvae in the upper portions of the stems. If you decide to swath a durum crop, use a high swathing height (leave at least the lower third of the plant) to conserve the parasitoids that attack wheat stem sawfly.
To determine if you should swath a field, calculate the percent of plants infested by sawflies before harvest. The presence of wheat stem sawfly can be verified by splitting stems and looking for the S-shaped larvae inside the stems or by observing the presence of sawdustlike frass inside the wheat stem. Infested wheat stems often have a darkened area on the stem just below the nodes as a result of the internal feeding from sawfly.
If more than 15 percent of stems are infested by sawflies, the field should be swathed. Swathing sawfly-infested wheat is recommended as soon as kernel moisture drops below 40 percent to prevent infested stems from lodging.
Stripper headers may be used for straight cutting the crop. This header will pick most wheat stems off the ground. Stems that are not firmly attached will be brought into the combine, while stems still firmly attached to the ground will have grain stripped from the stem.
Fall and spring tillage has been used to expose overwintering sawfly larvae to cold and dry conditions to increase larval mortality. Nevertheless, tillage for sawfly control runs counter to the current reduced/no-tillage recommendations and usually does not increase the mortality sufficiently to reduce the infestation level the following year.
Delayed planting (after May 20) can be partially effective if it delays the crop sufficiently so it has not reached the stem elongation stage when female sawflies are ready to lay eggs. This practice may result in reduced yield, however, because of the negative effect of late planting on grain filling and yield potential.
Rotation with a nonhost crop can reduce populations within a field. However, sawflies can fly considerable distances, so re-infestation from nearby fields, grass borders or Conservation Reserve Program land is possible in subsequent years. Crop rotation also can decrease the negative impacts of diseases as well as increase soil fertility benefits. It is highly recommended for fields where sawfly damage was observed the previous year.
Breeding solid-stem spring and winter wheat cultivars has imparted good levels of sawfly resistance. Unfortunately, no solid-stemmed durum varieties are available.
Insecticides generally have not been effective against the wheat stem sawfly. The egg, larval and pupal stages are well-protected inside the plant stem, and the adult emerges during a long period of time, reducing the chance of exposure to a single insecticide application.
Biological control of wheat stem sawfly is common and parasitism levels can be as high as 88 percent, with an average of 35 percent. In North Dakota, the most important species in wheat fields is Bracon cephi, a parasitic wasp. These parasitic wasps attack and kill larvae of wheat stem sawfly in the stem. Any use of insecticides will have a detrimental impact on parasitic wasps.
Wheat Midge – Sitopdiplosis mosellana (Géhin) (Diptera: Cecidomyiidae)
Although the level of infestation has been declining, the wheat midge still causes economic losses in some locations and years. In 1996, the wheat midge infestation was commonly found east of the Missouri River in the northern parts of the state. However, wheat midge has moved slowly westward and is distributed in the northwestern, west-central, north-central, and northeastern areas of North Dakota.
A contributing factor to the recent outbreaks has been late planting; any factor that combines heading wheat with the presence of the midge increases the risk of infestation. The adult midge is active from late June to early August. Peak activity is from late June to mid-July. A model using daily temperatures to calculate degree-day (DD) accumulations allows for a more accurate prediction of local adult emergence.
Wheat is attractive for egg laying by midge from the time the head emerges from the boot through mid-flowering. Insecticide management are only effective against the adult wheat midge (Figure 14). However, control of the orange larvae, which feeds on the developing kernels and can cause severe kernel damage (Figure 15), has not been demonstrated, because the larvae are protected inside the glumes during foliar insecticide applications.
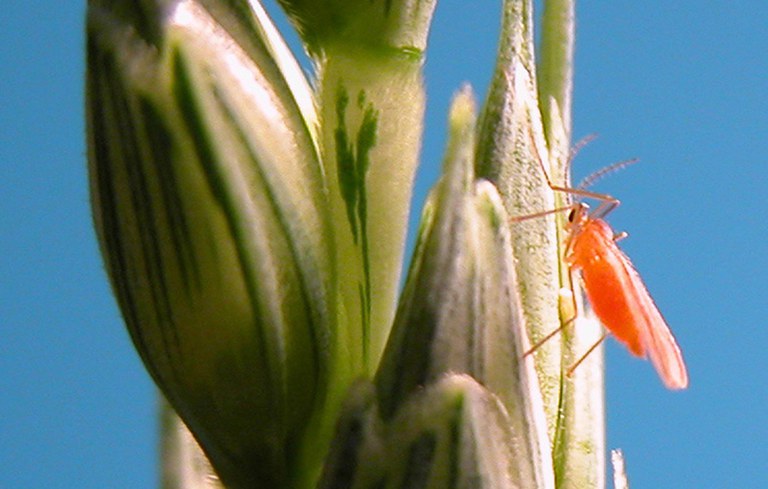
Figure 14. Adult wheat midge. (Extension Entomology, NDSU)
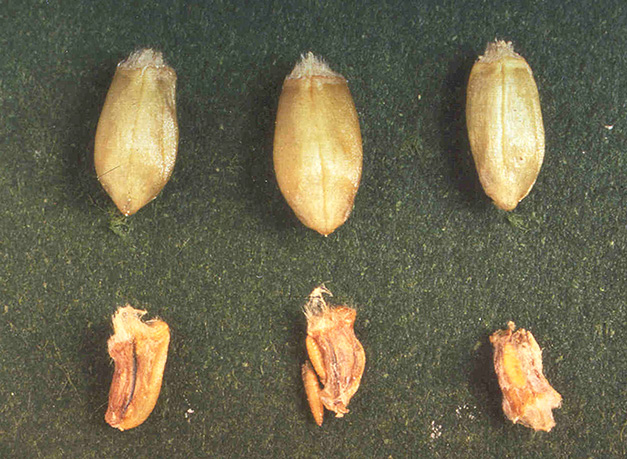
Figure 15. Comparison of healthy (top) and damaged (bottom) wheat kernels from wheat midge feeding injury. (Saskatoon Research Centre, Canada)
Based on North Dakota field observations, midge larval infestations were the greatest when heading occurred during peak female emergence (1,475 degree-day accumulations). When using 40 F as a base temperature for wheat development (normally wheat development is monitored at 32 degrees as the base), heading occurs around 1,000 to 1,100 DD accumulations.
Using this information, the following midge activity is expected based on degree-day accumulations at the time of wheat planting: 1,300 DD accumulation – 10 percent of wheat midge females have emerged; 1,475 DD accumulation – 50 percent of wheat midge females have emerged and 1,600 DD accumulation – 90 percent of wheat midge females have emerged.
A wheat growth and midge emergence model is available through the North Dakota Agricultural Weather Network (NDAWN) website.
The delay planting date does not work for durum wheats, only HRSW.
To determine the level of infestation, durum heads should be scouted at dusk (9 p.m. and later when temperatures are above 60 F and wind speed less than 6 mph). The orange-colored adult midge can be seen laying eggs on the wheat heads. Plants are susceptible as the head emerges from the boot.
Insecticide treatment is warranted when producers observe one or more midge for every seven or eight durum heads. For rates of registered insecticides that can be used to control the wheat midge, refer to the current “North Dakota Field Crop Insect Management Guide,”.
Pheromone traps and sticky traps also are used to monitor for adult wheat midge in durum fields. These traps can alert a producer to the presence of midge and their relative population densities, but it does not provide information about the need for an insecticide treatment. Pheromone traps and lures can be purchased from commercial insect trapping suppliers, such as Great Lakes IPM.
Resistant Wheat Varieties. The resistant gene Sm1 is the first gene that was identified as being resistant to the wheat midge due to antibiosis. However, this gene Sm1 is only available in hard red spring wheat varieties in Montana and Canada, such as ‘Egan’ hard red spring wheat. Future breeding efforts will focus on placing the Sm1 gene into other classes of wheat.
Parasitic Wasps. They also provide biological control of wheat midge. One of the most common parasitic wasps in North Dakota is Macroglenes penetrans. Survey work indicates that the average parasitism rate of wheat midge was 22 percent and ranged from 0 to 100 percent in fields.
Populations of parasitoids fluctuate and tend to follow the populations of wheat midge by a one-year lag period. Extension recommends avoiding any late insecticide applications, after mid-flowering, to minimize the negative impacts on parasitic wasps that are active at that time.
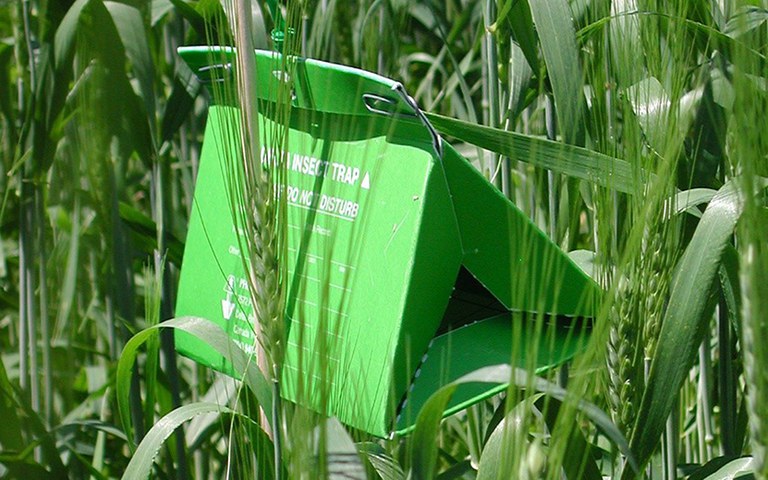
Figure 16. Pheromone traps used to monitor adult wheat midge. (J. Knodel, NDSU)
An annual risk map for wheat midge and parasitism level is available for producers. It is based on a soil survey of overwintering wheat midge larvae (cocoons) that the NDSU Extension Service conducts in the fall. Counties surveyed estimate the risk for wheat midge. They include 21 counties in the northern half of North Dakota.
The risk map is based on population densities of wheat midge from unparasitized cocoons found in the soil samples each year. The parasitism rates also estimate the levels of natural bio-control of wheat midge. The annual risk map for wheat midge and map for parasitism are available for producers.
Drying and Storage
(NDSU photo)
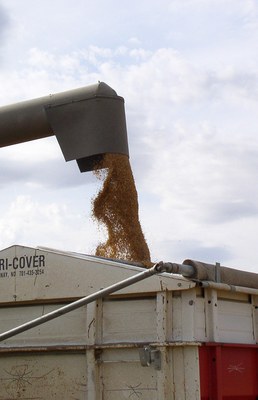
After you have invested money and effort in producing the grain, make sure you protect that investment by drying and managing the grain properly.
Clean Bins Before Harvest
Grain and fines (small pieces of broken grain, weed seeds and chaff) remaining from previous crops almost always contain stored grain insects. To reduce insect problems in the new crop, avoid mixing old and new grain. Also, clean bin walls and floors, and the area outside of bins to remove old grain dust, fines and kernels. The space under perforated floors typically contains material conducive for insects, but it is very difficult to clean. Fumigate the underfloor area if an insect infestation occurred previously.
Consider using a bin spray and applying a coarse spray of an approved insecticide to run off at least two weeks before placing grain in the bin. Pay close attention to areas that might hide insects, such as under false floors and in vents. Cracks around doors and vents may serve as sources of infestation.
Manage Fines
Fines and foreign material such as weed seeds cause problems in grain storage because they are more susceptible to mold and insect attack than are whole kernels, they restrict airflow during aeration, and they tend to concentrate under fill sprouts during grain handling. Select and use grain harvesting and handling equipment to minimize the amount of fines in stored grain, and consider using a grain cleaner to remove fines before grain is stored.
Research has shown that in addition to improving grain storability, cleaning scab-infected grain over a gravity table reduces deoxynivalenol (DON) levels in the cleaned grain.
Fill bins in a way to prevent concentration of fines at the center. Either use a grain spreader to distribute fines uniformly throughout the bin, or do not use a spreader and periodically withdraw fines from the center as the bin is filled (Figure 17). An alternative is to remove some grain after the bin has been filled, but because the grain unloading occurs in a funnel shape, the width of center fines removed is narrow.
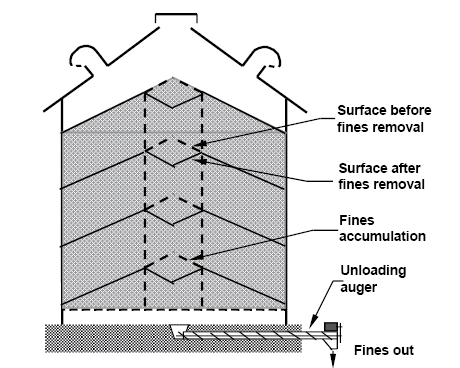
Figure 17. Removal of accumulated fines during bin filling. (K. Hellevang, NDSU)
Control Moisture
Molds and insects need moisture to live and reproduce, so make sure grain is dry before it is stored. The maximum recommended storage moisture content for durum wheat is 13.5 percent (wet basis). If grain is too wet when it is harvested, you can dry it with unheated (natural) air if your bin is equipped with a perforated floor and a large enough drying fan.
The recommended airflow rates for natural-air drying durum wheat are 0.5 cubic feet of air per minute per bushel of grain (cfm/bu) for up to 16 percent moisture grain, 0.75 cfm/bu for up to 17 percent moisture grain and 1 cfm/bu for up to 18 percent moisture grain (Table 1).
Table 1. The recommended airflow for natural-air and low-temperature durum wheat drying and drying times, assuming air at 70 F and 60 percent relative humidity.
|
Moisture content |
Minimum Airflow |
Drying Time |
|
16 |
0.50 |
42 |
|
17 |
0.75 |
31 |
|
18 |
1.00 |
25 |
Drying times will be longer with cooler temperatures. Drying time is related to the airflow rate, so increase the airflow rate to reduce the drying time. A typical airflow rate is 0.75 cfm/bu, which permits drying up to 17 percent moisture durum in a reasonable time. In general, operate natural-air drying fans 24 hours/day until all grain in the bin is dry unless fog is occurring or rain is falling, or the average daily temperatures drop below about 40 F.
No drying will occur if the average [(maximum + minimum) ÷ 2] equilibrium moisture content (EMC) of the air exceeds the grain moisture. So do not operate the fans if the EMC continues to exceed the grain moisture for several days. The fan heats the air 3 to 5 F, which reduces the relative humidity about 3 to 10 percent. The increase in temperature and reduction in humidity cause grain to dry an additional 0.75 to 1 percentage point.
Adding supplemental heat to increase the air temperature about 5 F will permit you to continue drying the grain while outdoor temperatures average above 40 degrees. Table 2 lists the grain moisture contents (EMC) that can be attained based on the ambient temperature and relative humidity when using natural-air drying.
Table 2. Equilibrium moisture content (% wet basis) for durum wheat exposed to air at various temperatures and humidities.
Grain moisture will be a little less due to the fan heat.
|
Temperature |
Relative humidity (%) |
|||
|
20 |
40 |
60 |
80 |
|
|
40 |
7.9 |
11.1 |
14.0 |
17.3 |
|
50 |
7.7 |
10.8 |
13.6 |
16.9 |
|
60 |
7.5 |
10.5 |
13.2 |
16.5 |
|
70 |
7.3 |
10.2 |
12.9 |
16.1 |
|
80 |
7.1 |
10.0 |
12.6 |
15.7 |
If drying is not completed in the fall, run fans as needed to keep grain at 20 to 30 F during the winter, and resume drying during the spring when the outdoor air temperature averages above 40 F. Figure 18 illustrates the natural-air drying process.
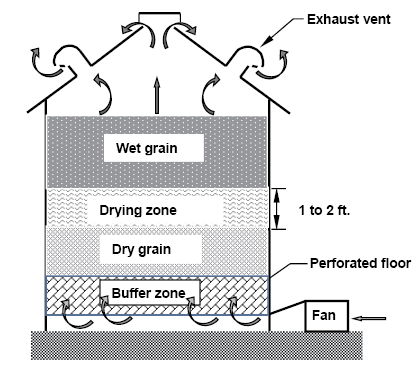
Figure 18. Illustration of a natural-air drying bin. (K. Hellevang, NDSU)
Durum wheat also can be dried in high-temperature dryers designed for use with corn and other grains, but you might have to reduce the drying air temperature to prevent grain damage. Keep grain temperature below 140 F for grain used for milling to limit the potential for the effect of high temperatures on the chemical structure of the grain.
The typical maximum drying air temperature for drying milling wheat is 150 F for 16 percent moisture content and 130 F for 20 percent moisture content wheat. The allowable temperature will vary, depending on dryer design.
Aerate to Control Grain Temperature
Dry grain should be cooled to less than 60 F as soon as possible after harvest by operating aeration fans during cool weather. In late summer, this might mean running fans only at night.
Do not worry too much about high nighttime relative humidity during aeration cooling because the air relative humidity is reduced as the air cools the grain. In addition, grain temperature changes much faster than the moisture content changes, so little grain is affected in the amount of time required to cool the grain.
Cool the durum whenever the average outdoor temperature is 10 to 15 degrees cooler than the grain temperature. The goal is to cool the grain to below 50 F as soon as possible.
In late fall or early winter, use aeration fans to cool grain to 20 to 30 F for winter storage. If grain is not stored at less than 20 F during winter, you shouldn’t need to run fans to warm the grain in the spring. If you do run fans in the spring, start in late winter or early spring and do not warm grain above 40 F.
Cooling grain limits mold and insect activity, and it reduces moisture migration. Moisture migration can result in rewetting and eventual spoilage of grain at the top center of inadequately cooled bins (Figure 19).
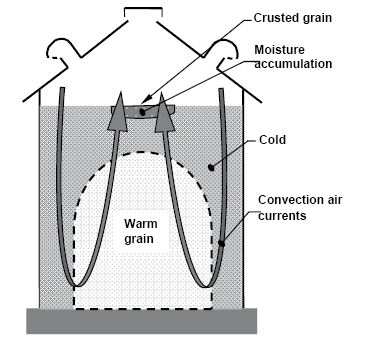
Figure 19. Moisture migration in grain that has not been cooled adequately. (K. Hellevang, NDSU)
You can estimate the number of hours a fan must be operated to cool a bin of grain by dividing 15 by the airflow in cfm/bu. For example, in a storage bin that has an airflow of 0.2 cfm/bu (a typical value for farm bins), cooling the grain takes about 75 hours (15 ÷ 0.2), or approximately three days, of fan operation. Figure 20 illustrates how grain cooling occurs and how to check for completion of cooling.
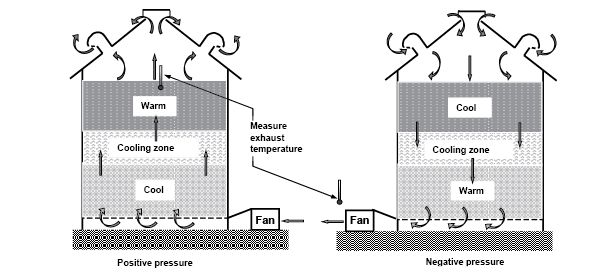
Figure 20. Movement of cooling zones during grain aeration. (K. Hellevang, NDSU)
Check Stored Grain Regularly
At least every two weeks until the grain has been cooled for winter storage and in warm weather, measure grain temperature and moisture, and look for moldy, discolored or crusted kernels, and signs of insects. During the winter when grain temperature is near 30 F, checking the grain at least every three to four weeks should be adequate.
Temperature cables can make checking grain temperature much easier, but they are not a substitute for examining the grain (Figure 21). The grain temperature can be much different just a few feet away from the cable.
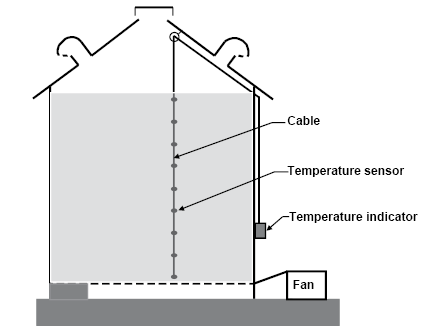
Figure 21. Permanently installed grain temperature cables. (K. Hellevang, NDSU)
In addition, start the fan briefly and smell the first air to leave the bin for musty or sour odors. If you detect problems, run aeration fans to cool the grain. If aeration doesn’t control the problem, unload the bin and clean, dry, feed or sell the grain.
Wear a mask designed to filter mold spores, especially if you know the grain is moldy, to avoid health problems caused by mold spores. The mask normally will have a rating of N-95 or N-99.
Storage of Scab-infected Grain
University of Minnesota research on the storability of grain infected by Fusarium head blight indicated that infected grain deteriorated slightly faster in storage than did grain that had been cleaned on a gravity table to remove scab-infected kernels. But the differences in storability between cleaned and uncleaned grain were relatively small.
The fungus species that causes scab infection and produces DON remained viable during storage at 18 and 20 percent moisture, but that fungus species died during storage at 16 percent moisture. This means that DON production during storage is unlikely for wheat stored at less than 16 percent moisture.
Published with support from Barilla.


