Insulating to Reduce Heating Costs (AE1368, Revised Jan. 2019)
Availability: Web only
Photo by iStock
Where to Focus First
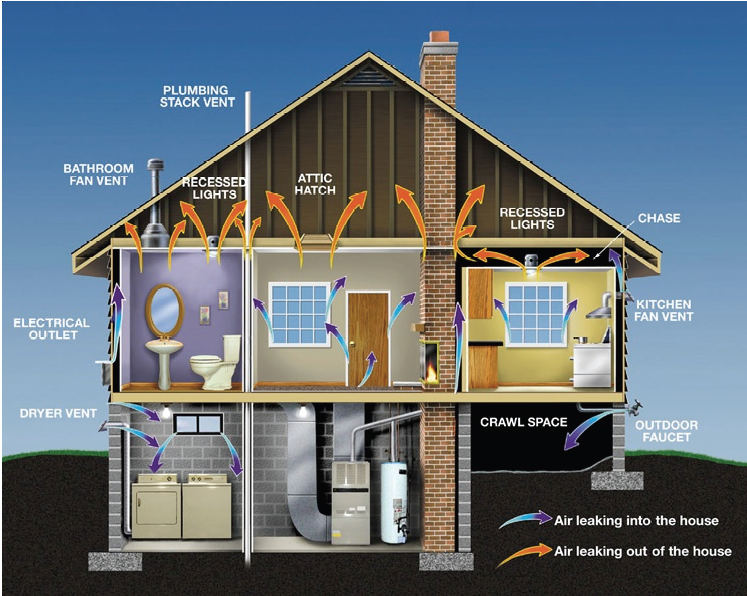
Air leaks are areas in the home where air can pass directly from one room to another or to or from the outside with little resistance. A gap around a door is an example, but homes have many more places that allow heat to escape.
Depending on the construction of the home, homeowners generally should concentrate on the air leaks or infiltration first, and then insulate areas that are below recommended levels.
Although all building materials have some insulation value, the term “insulation” usually refers to materials with a relatively high resistance to heat flow that are designed specifically for that purpose. R-value is a term that describes the ability of a material to resist heat flow. The higher the R-value, the better the insulation.
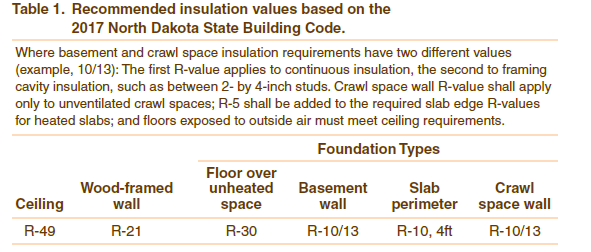
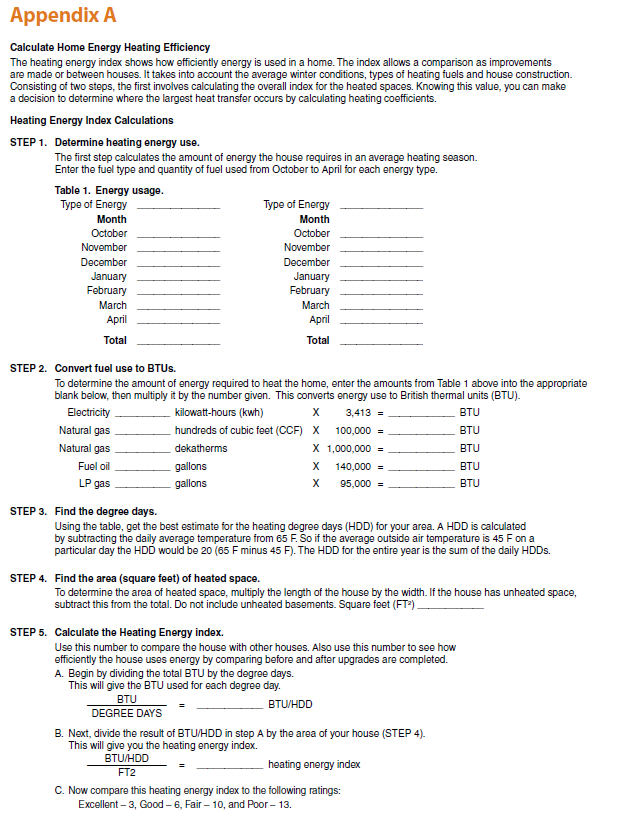
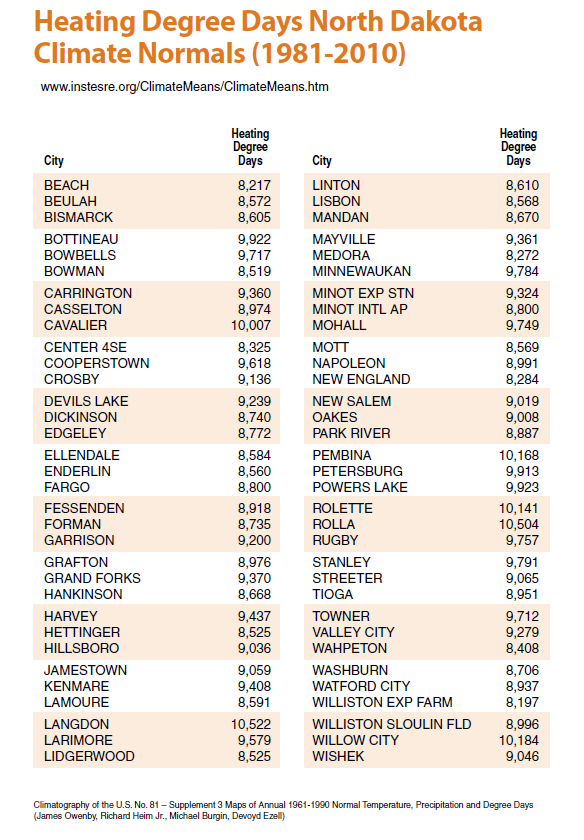
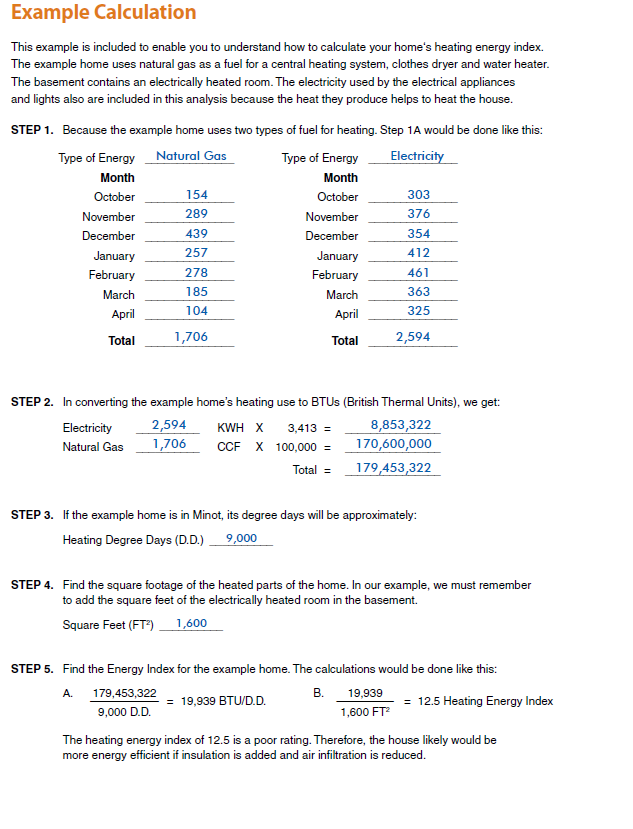
Determining what areas in the home are in greatest need of additional insulation or energy efficiency upgrades will take a little investigation. Using the recommendations from Table 1, check to see how much insulation you should have in each area of your home and determine where additional insulation would be most beneficial. For example: Well insulated walls and 16 inches of insulation in the attic, but no insulation on your foundation, concentrate on the foundation. Another method for determining if your house is inefficient is to compare energy use; refer to Appendix A.
How Many Inches of Insulation Do You Need?
The installed insulation R-value depends on a variety of factors, including the material used, the density and the evenness of the insulation. For example, to achieve the recommended R-value of R-49 in an attic, you need about 16 to 20 inches of loose-fill cellulose or fiberglass insulation (Figure 1).
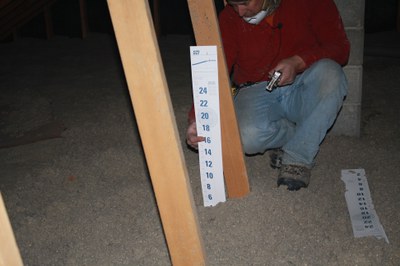
Figure 1. Measuring attic insulation thickness.
Comparing Insulation Costs
R-value is the ability of a material to prevent heat transfer. Thicker materials do not always have higher R-values. The R-value of a 6-inch rigid piece of polystyrene has an R-value of 30, while a 6-inch fiberglass blanket will have an R-value of about 21. Does that make the polystyrene a better buy? Not necessarily. The fiberglass may be less expensive or easier to install, or have better properties for the particular application. To determine a cost per R-value, simply divide the cost of the insulation by the R-value. Then figure in the cost of installation and other associated costs.
Insulation Materials
Cellulose or wood fiber insulation is made from used newsprint, other paper feedstock or wood. Chemicals are added to provide fire resistance. Fiberglass insulation is made from glass heated and drawn out to form long fibers. While it can cause skin irritation, fiberglass is noncorrosive, has no objectionable odor and does not burn. Rock wool or slag wool is similar to fiberglass in the manufacturing process and properties.
Polystyrene insulation comes in either an expanded or extruded form. Expanded polystyrene (EPS), or “bead board,” is less expensive but has a lower R-value per inch. It also absorbs more moisture than extruded polystyrene. Extruded polystyrene (XPS) is fine-textured and moisture-resistant. It comes in a variety of colors, including blue, green and pink. Both expanded and extruded polystyrene degrade through time with exposure to sunlight, so they need a protective covering. They are also flammable and will release toxic substances while burning, so they need to be covered with gypsum board or other fire protection.
Polyurethane insulation is a cellular plastic that has a high R-value per inch. It typically is applied as a foam or rigid board. A similar type to polyurethane is polyisocyanurate. Both are flammable and release toxic substances while burning.
Spray polyurethane foam insulation comes in two basic types, based on how densely it is applied. When applied in densities of .5 pound per cubic foot, it is considered open-cell foam, and it is vapor-permeable, has a lower R-value and is less expensive than denser applications. If applied at 2 pounds per cubic foot and more than 2 inches deep, it is considered a vapor retarder. Two-pound foam also is known as closed-cell foam, and it has an R-value close to R-6 per inch. It also is more costly than open-cell foam.
Forms of Insulation
The form of the insulation refers to the shape it takes as it is applied. Fiberglass and rock wool insulation generally come in batts or blankets. A batt is a precut section of insulation generally 4 or 8 feet long, while a blanket is a much longer roll – up to 100 feet or more.
Batts and blankets may be faced or unfaced. Faced batts have a paper or foil backing that should be installed toward the heated living space. The backing, a vapor retarder, limits moisture from entering the insulation and reducing its effectiveness. The vapor retarders often are referred to mistakenly as vapor barriers. While they do reduce the amount of vapor that passes through the material, they are not a complete barrier. Unfaced batts may be used with a vapor retarder or to increase insulation levels where the retarder already exists. Common thicknesses range from 1 to 9 inches and widths of 16 or 24 inches to match stud spacing.
Loose-fill insulation comes in bags and can be blown in with a machine or poured. Common loose-fill materials include cellulose, rock wool, vermiculite, polystyrene beads and fiberglass. While most commonly used in ceilings, loose-fill insulation applications include filling cores in concrete blocks and insulating stud wall cavities.
Rigid-board insulation may be made from cellulose fiber, fiberglass, polystyrene or polyurethanes. A common size for rigid-board insulation is 4 feet by 8 feet, with thicknesses ranging from ¼ inch up to 4 inches. Rigid boards may be used on the inside or outside of walls and, in some cases, on exterior below-grade walls.
Most building codes require that polystyrene and polyurethane boards be covered with a 15-minute, fire-rated thermal covering if used on the inside of a house. This type of covering will provide a thermal barrier that will keep the temperature rise of the insulation below 250 F for at least 15 minutes in case of a fire.
Some covering materials with the 15-minute rating are at least ½-inch exterior-grade plywood treated with fire retardant, ½-inch-thick cement plaster and fired-rated drywall or gypsum board. They commonly are used in remodeling construction, especially for basement walls.
Sprayed-in-place insulation is applied during construction to a stud wall cavity. Spray-on insulation contains an adhesive that sticks to the surface being insulated. The most common materials are cellulose, polyurethane and fiberglass. Polyurethane insulation has the ability to expand when applied, which makes it capable of getting into cracks and voids other insulations would miss, which significantly reduces air infiltration. Polyurethane commonly is used to insulate the rim joist in homes.
Doing it Yourself or Choosing an Insulation Contractor
After you determine if you need more insulation, the next decision to make is if you are going to hire a contractor to perform the installation or do it yourself.
The overriding concern is that while some insulating jobs are done easily, others require special skills or equipment. Insulating an easily accessed attic with blankets of fiberglass or your exterior foundation may be relatively simple. Insulating the wall cavity in living spaces may be quite involved.
If you decide to have the work done commercially, carefully choose a qualified, licensed and reputable contractor for the job. Consult the local chapter of the National Association of Home Builders, your local utility or a trusted real estate agent. Put together a list of three to four contractors for comparison. Start by asking each contractor for references. Reputable installers gladly will provide references.
Other places to research an installer are the Chamber of Commerce, Better Business Bureau and state regulatory agency. Once you’ve checked their references, ask the contractors for a detailed estimate. Never assume that specific tasks are going to be performed unless those tasks are stated in writing. Be sure to compare estimates equally; one estimate may require the homeowner to perform cleanup while another may not. Choose the contractor who best fits your needs and budget.
Applying Insulation
In northern climates, installing a vapor retarder on the warm side of the insulation is important to prevent moisture from migrating into the insulation and reducing its effectiveness.
Attic
Begin in the attic by attempting to locate air infiltration areas. Sealing leaks should be accomplished before insulation is installed or added. Look for gaps around plumbing or heating penetrations. Also take note of interior walls that extend into the attic. If the tops of these walls are not sealed, warm air can enter the walls and escape from the living space. The walls act like funnels for heat loss.
Recessed lighting also presents a problem for insulating. The lights extend into the attic, creating possible areas for air infiltration, as well as reduced insulation surrounding the lights. Modern recessed lights are sealed to prevent air infiltration. Insulated boxes can be constructed to surround recessed lights. Do not forget to insulate the access area into the attic.
Run weather-stripping around access doors and cover the door with insulation. Commercial tents can be purchased that fit over attic access doors or one can be made easily with rigid insulation.
Once the air leaks are sealed, begin the work of insulating. Batt and loose-fill insulation are the most common materials used to insulate attics, depending on the construction. Some attics have a floor over the top of the ceiling joists, but most are open with exposed joists. If flooring is in place, loose-fill insulation can be blown under the floorboards. However, removing the flooring can make insulating easier and allow the homeowner to use all types of insulation.
While putting loose-fill insulation over the floor might be the easiest installation method, it prevents storing anything in the attic, so most homeowners would object to this. An option is to place rigid-board insulation on top of the attic floor and cover it with plywood. If attic storage cannot be given up, concentrate the storage next to the attic door to minimize the insulation losses.
If the attic does not have any insulation, buy insulation batts or blankets wide enough to fit between the ceiling joists. If you already have insulation up to the top of the joists, you can place additional material at right angles to the joists to minimize heat loss due to seams. Be sure to buy the insulation without paper or foil backing.
If adding batts or blankets, decide what thickness should be used. This depends on a number of things: the cost of the project, the free space in the attic and the current R-value. The Department of Energy recommends houses in North Dakota have an attic insulated with an R-value of 49. This is the least amount of insulation you should strive to have in place.
The quantity of insulation required is calculated by dividing the R-value needed by the insulation R-value. Using the recommended R-values per inch for fiberglass insulation in Table 2, an R- value of 49 would require at least 16 inches of insulation. To determine the amount or square feet to buy, multiply the length of the attic by its width. If the attic consists of several oddly shaped areas, figure each area separately and add the totals.
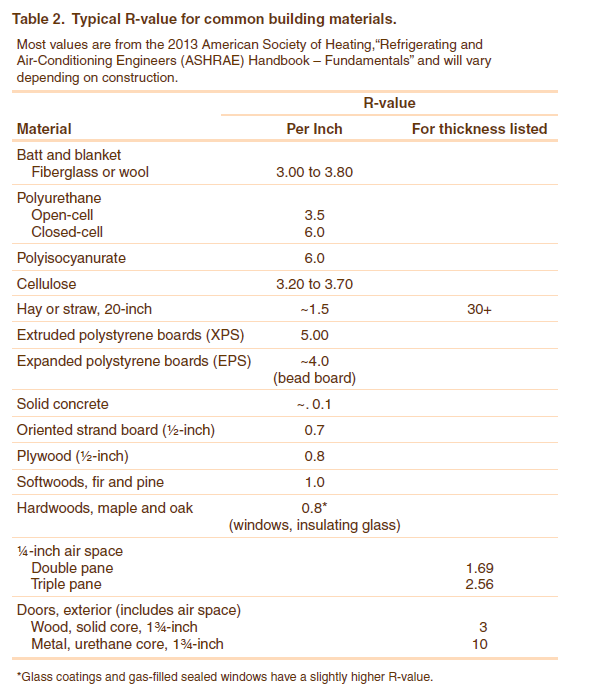
To reduce the potential for moisture problems in the attic, provide 1 square foot of air vent for each 300 square feet of attic floor. Place one-fourth at each eave and half at or near the peak.
If working in an attic without a floor, use temporary flooring to avoid stepping between joists and possibly falling through the ceiling. A few planks or a piece of ¾-inch plywood works well.
Be sure to leave clearance between the insulation and the roof near the edge of the attic floor (Figure 2). This clearance is necessary so air from the soffit vents can enter the attic and enable moist attic air to leave. This will prevent moisture problems in the attic.
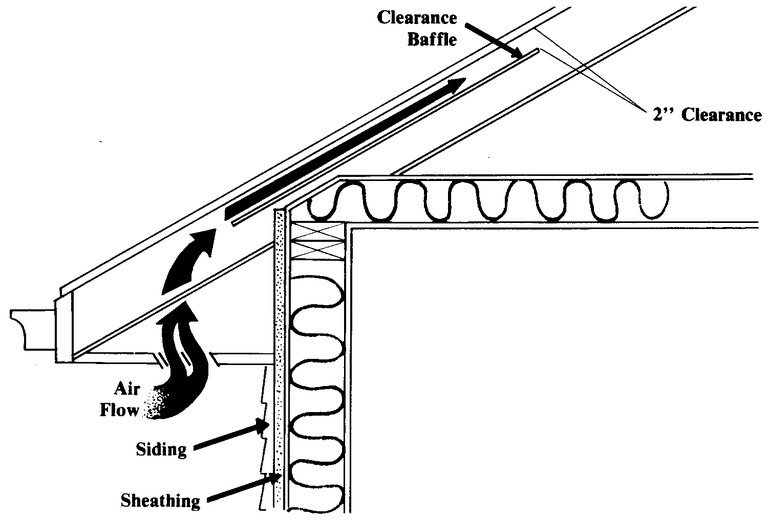
Figure 2. A well-insulated attic also must be a well-ventilated attic. If you insulate with loose fill, place a baffle as shown to prevent insulation material from falling into the soffit vents. (NDSU)
If you use loose-fill insulation, you will need to prevent the material from falling down into the soffit and covering the vents. You can do this by using a baffle made of plastic or rigid insulation. Baffles also can be purchased at a building supply store.
In many homes, getting adequate insulation depths at the attic edge and still maintaining a minimum 2-inch clearance below the roof is difficult. In this case, you can cut rigid insulation into pieces to fit snugly between the rafters. Lay these pieces on top of the insulation at the edge of the attic. The rigid insulation has a higher R-value per inch than other materials, and a piece of it placed here will insulate well and still give enough clearance for ventilation.
Adding insulation to a cathedral ceiling generally requires a contractor. The contractor will add insulation over the roof, then reroof or add insulation to the inside ceiling and refinish it (Figure 3).
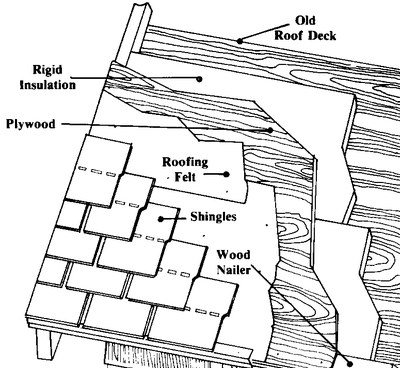
Insulating outside a cathedral ceiling
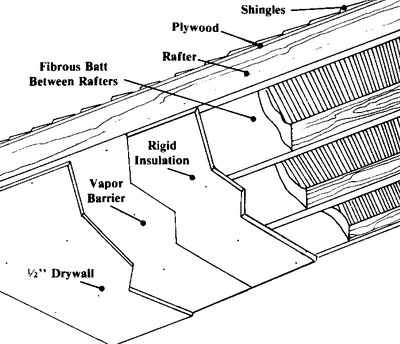
Insulating inside a cathedral ceiling
Figure 3. Insulating cathedral ceilings. Both the exterior and interior of a cathedral ceiling can be insulated. Exterior insulation is applied to the top of the roof and a new roof is installed over the insulation. To insulate the interior, furring strips are installed on the ceiling and the insulation is placed between the strips. (NDSU)
Walls
Insulating walls is best accomplished during renovations. If siding is to be replaced, rigid-board insulation can be applied to increase the R-value. Interior walls can be insulated after removal of wall coverings. Insulate the wall cavities by using the same methods used to insulate an attic.
If adding insulation without major renovations, loose-fill and foam insulation are the common forms. For both, a hole must be drilled into each wall cavity to add insulation. While the hole may be drilled from the inside, it most often is drilled from the outside. The holes can be hidden by removing a piece of siding, drilling the holes and then replacing the siding, which leaves no visible evidence of the work.
Applying loose-fill insulation requires drilling a hole at the top or bottom of the cavity and blowing insulation into the space. Problems exist with loose-fill insulation not completely filling the space due to obstructions, such as wiring and plumbing. Foamed-in-place insulation requires a series of holes drilled into the wall, with spacing and sequence depending on the construction.
While foam insulation costs are higher than for loose-fill insulation, foam insulation will not settle. Due to the difficulty of insulating behind existing walls, this is generally best left to the professionals.
Knee Walls
Knee walls are found in houses with partially finished attics. The knee wall is the short wall that reaches from the sloped ceiling to the floor, Figure 4. Not only are air leaks common in these areas, but they frequently are not insulated properly. The knee walls generally have exposed studs behind them and can be insulated with batts or blankets.

Figure 4. Insulating attic knee walls. Seal all air leaks first. Then insulate the back side of the knee wall and attic floor behind the knee wall (A) or insulate the sloped area above the ceiling behind the knee wall (B).
To insulate the knee wall portion of the wall and ensure the insulation does not move, you should attach the insulation to the studs or enclose both the living space side and the attic side of the knee wall.
Make sure the vapor retarder-backed insulation is next to the living space. If the studs are covered on the backside, you can insulate the knee wall by drilling a hole in the covering near the top of the wall and filling the cavity with blown insulation.
The sloped area above the ceiling is more difficult to insulate. The problem develops when trying to add insulation and allow the roof deck to be ventilated properly. This often requires the removal of the roof deck or drywall on the inside of the attic. Insulate the floor behind the knee wall and the attic above it the same way you would a regular attic.
Crawl Spaces
Use a 6-mil polyethylene vapor barrier on top of any bare soil to prevent moisture from getting into the crawl space. Extend the barrier at least 6 inches up exterior walls and seal it to the wall.
If the crawl space contains air ducts or water pipes, assure any wall vents are closed and then insulate the exterior wall to at least an R-10 with rigid foam insulation. The crawl space must remain above 32 degrees to prevent pipes from freezing. Frequently, these crawl spaces are being treated as minibasements to minimize moisture problems. Fiberglass batt insulation is not recommended in crawl spaces due to the installation difficulty.
Basement
Either the inside (Figure 5) or outside of a heated basement can be insulated. If finishing the basement, insulating the interior wall surfaces is the easiest but riskier method due to potential moisture problems. If the basement already is finished, or if you don’t plan to finish it, insulate the exterior wall surface.

Figure 5. Recommended method for insulating the interior of a basement wall.
A basement insulated on the outside of the walls has more heat storage than those insulated on the inside. The concrete stays warmer and will release heat to the house if the home heating system temporarily fails. Insulating the outside of the walls also keeps the footing warm, limiting the potential for soil movement due to freezing.
Batt and blanket insulation is becoming less common in basement insulation due to moisture problems. Moisture can enter the insulation from either side, reducing its R-value and creating the potential for mold growth. Rigid foam insulation is becoming the insulation of choice for basements.
Extruded polystyrene rigid insulation is the most common basement wall insulation due to its higher R-value and better moisture resistance. Simply glue rigid insulation to the wall and finish the wall with a 15-minute fire-rated thermal covering. Rigid insulation is used to insulate the outside of a basement wall both above and below the ground level.
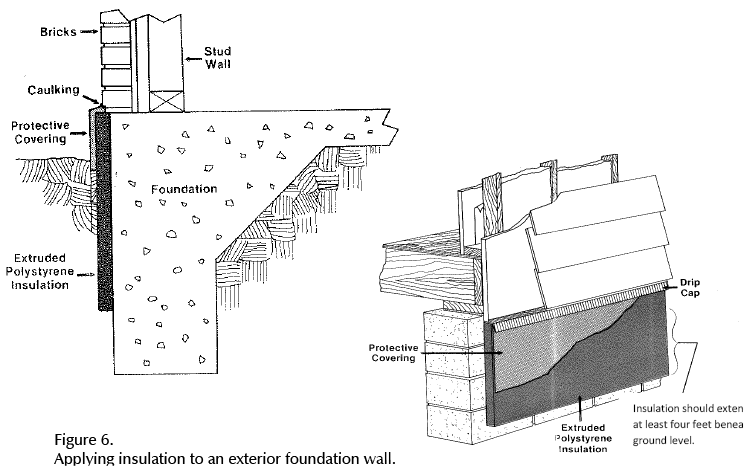
Remove the soil from the outside foundation wall to a depth of at least 4 feet, apply waterproofing, if not already present, and glue the rigid insulation to the foundation with construction adhesive. Make sure to cover any exposed above-ground insulation to prevent degradation by the sun and other elements, Figure 6.
An often overlooked area for air infiltration and poor insulation is the rim joist. This is the area where the wall framing meets the foundation. Cut rigid insulation to fit these areas and caulk the seams to ensure the least amount of air infiltration possible (Figure 7).
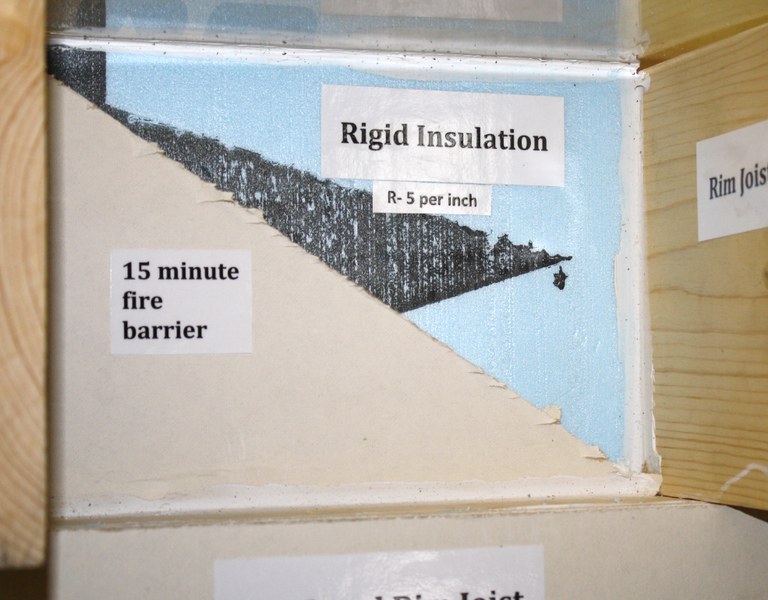
Figure 7. Insulating the rim joist and sealing air leaks with rigid insulation or expanding spray foam. Insulation needs to be covered with a 15-minute fire barrier. Photo courtesy of the Family Handyman Magazine.
Cover the insulation with a 15-minute fire barrier. Expanding spray foam works well in rim joists as long as it is applied to an appropriate thickness. Make sure to check local and state building codes to determine what is required in your area.
Applying Insulation
Here are some general insulation installation tips:
• Use a utility knife or large shears to cut batts or blankets to fit snugly between joists and sills.
• Use insulated boxes around recessed light fixtures. Check local building codes for other restrictions and regulations.
• When using batts and blankets, place long runs first. Use the remaining pieces to fill in the smaller areas.
• Adhesives, vapor retarders and some insulation are flammable. Be sure to keep open flames away.
• Repair any roof leaks or damage before insulating.
• Make sure the attic has adequate ventilation to prevent the buildup of moisture. Often moisture freezes during the winter, then drips into the living space at the first thaw.
• Attach a piece of rigid or batt insulation to attic access doors and make sure the door is weather-stripped.
• Wear a dust mask, long-sleeved shirt and gloves when handling insulation. Fibers and chemicals can be transferred to clothing, so wash the clothing separately.
More information is available.
Additional Resources
ASHRAE 2013. ASHRAE Handbook – Fundamentals. American Society of Heating Refrigeration and Air-Conditioning Engineers Inc., Atlanta, Ga.
ICC 2009. International Energy Conservation Code. International Code Council Inc., Falls Church, Va.
USDOE 2005. Your Home: Knee Wall Insulation and Air Sealing. U.S. Department of Energy, Energy Efficiency and Renewable Energy. Accessed April 10, 2008.
Published with support from the Office of Renewable Energy and Energy Efficiency North Dakota Department of Commerce
Carl Pedersen, former NDSU Extension energy educator, contributed to this publication.(Revised January 2019)

