Freezing Vegetables (FN187, Aug. 2016)
Availability: Web only
Fresh, tender vegetables right from the garden are best for freezing. If vegetables cannot be frozen immediately after harvesting, store them in the refrigerator to preserve freshness until they can be prepared and frozen.
Not all vegetables freeze well. For example, cabbage, green onions, lettuce and other salad greens, radishes, cucumbers and tomatoes (except as juice or to use in cooking) do not freeze well. Uncooked potatoes often develop an uncharacteristic sweet flavor when frozen.
Contact your local office of the NDSU Extension Service for information on recommended varieties of vegetables for North Dakota to assure a good crop to fill the freezer.
Containers for Freezing
Choose containers that are made for freezer storage, and label with contents and date. Containers should be moisture-vapor resistant, durable and leak-proof. These preserve the quality of the vegetables by keeping moisture in and air out. Loss of moisture causes brownish-white spots on food known as freezer burn. Freezer burn actually does not spoil the food but can cause toughness and often results in off-flavors.
Plastic freezer bags and rigid freezer containers are convenient for freezing vegetables. Plastic sandwich bags, bread wrappers and cartons from dairy products such as cottage cheese, sour cream or milk are not suitable for long-term freezer storage.
Blanching
Blanching is scalding the vegetables in water or steam for a short period of time. It is a very important step in freezing vegetables because it slows or stops the action of enzymes. These enzymes are essential for growth and maturation of the plant. If the enzyme action is not stopped before freezing, the vegetables may discolor, toughen or develop off-colors, so they may be unappetizing in a few weeks. Proper blanching also brightens color and helps prevent loss of nutrients.
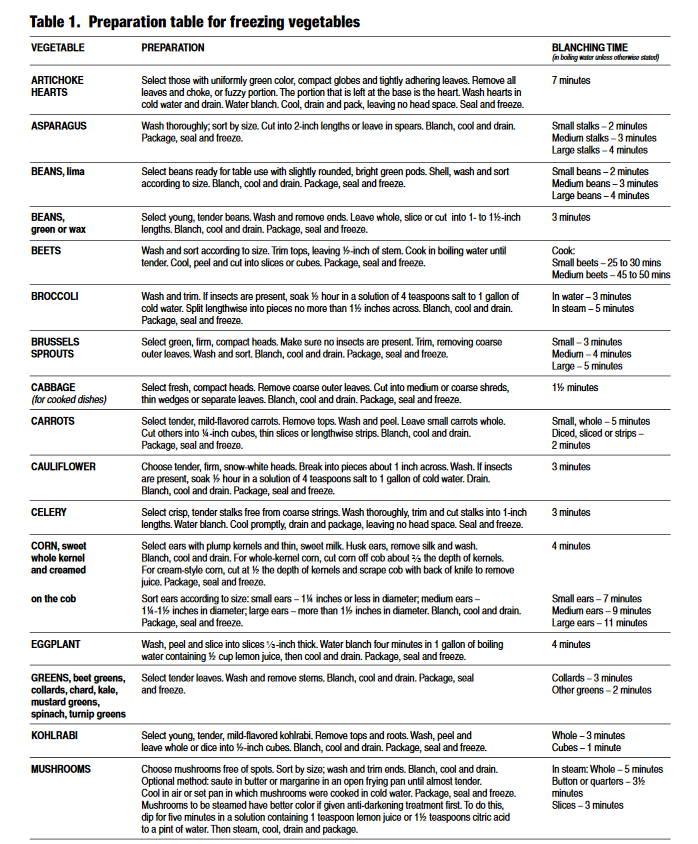
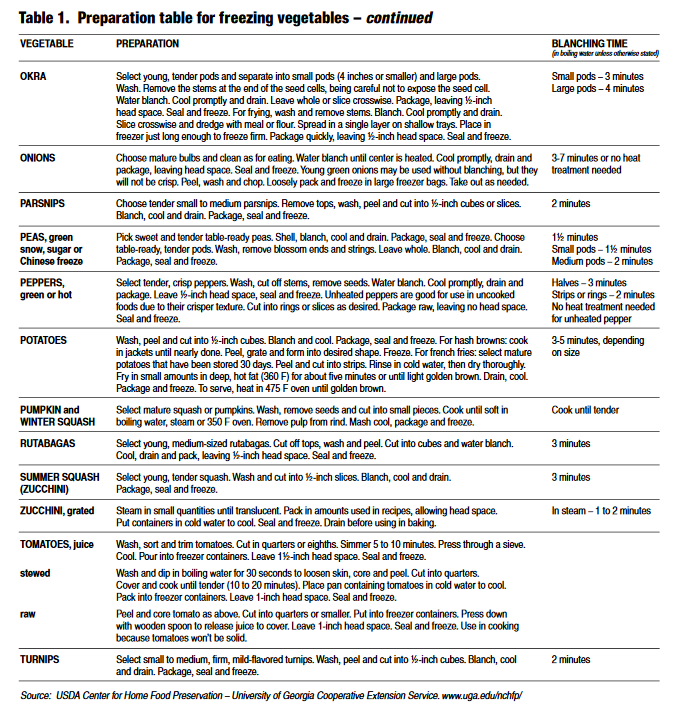
Blanching times vary with the size and kind of vegetable. The times recommended are just long enough to stop or destroy the enzymes. Be sure to follow the recommended blanching times. In underblanched vegetables, enzyme action continues. Overblanching vegetables can lead to changes in color, flavor and nutrients. Overblanched vegetables have a “leftover look” when served.
Blanching in boiling water
Use a blancher, which has a blanching basket and cover, or fit a wire basket into a large kettle with a cover. Use at least 1 gallon of water for each pound of vegetables. Put the vegetables into the basket and lower the basket into the boiling water. Cover. Using a high heat setting, water should return to boiling in about one minute. Use an accurate timer and blanch for the time specified for individual vegetables. If boiling is not resumed in a minute, you are blanching too large a quantity at one time.
Blanching in steam
Put 1 to 2 inches of water in a kettle and bring to a rolling boil. Suspend a thin layer of vegetables in a wire basket or cheesecloth over the rapidly boiling water. Cover, keep the heat on high and steam blanch vegetables the time recommended in Table 1.
Blanching in the microwave
Microwave blanching may not be effective, since research shows that some enzymes may not be inactivated. This could result in off-flavors and loss of texture and color. Those choosing to run the risk of low-quality vegetables by microwave blanching should be sure to work in small quantities, using the directions for their specific microwave oven. Microwave blanching will not save time or energy.
Cooling
After vegetables are heated, they should be cooled quickly and thoroughly to stop the cooking. After heating, plunge the basket of vegetables immediately into a large quantity of cold water. Change water frequently or use cold running water or iced water. If ice is used, you’ll need about 1 pound of ice for each pound of vegetables. It takes about as long to cool the vegetables as it does to heat them. When vegetables are cool, remove from water and drain thoroughly.
Methods of Packing Vegetables
When using rigid containers, leave a half-inch of head space. Food expands when it freezes and the top may pop off the container if it is too full. When using freezer bags, press air out of the unfilled part of the bag, seal and freeze. If the bag has a twist closure, be sure to twist the bag and fold it back in a gooseneck before securing the twist. If this is not done, air will rush back into the bag.
Vegetables can be packed a number of ways.
Solid pack: Put drained vegetables into freezer containers. Pack tightly to cut down on the amount of air in the container or bag. Seal and freeze.
Loose pack: This enables you to pour out as much as you want from a large package. Spread the drained vegetables in a single layer on a tray and freeze. As soon as they are frozen, pour into rigid freezer containers or freezer bags, seal and return to freezer. Remove as you need them.
Dry pack: After you have blanched, cooled and drained the vegetable, package it quickly. Remove as much air as possible. Allow proper head space and seal.
Tray pack: After you have blanched, cooled and drained the vegetable, spread in a single layer on shallow trays or pans. Place in the freezer just long enough to freeze firm. After the first hour, check often. Long exposure will result in loss of moisture. Package quickly, leaving no head space, then seal. Tray-packed vegetables remain loose and can be poured from the container and the package re-closed.
Freezing Vegetables
Put the packaged vegetables in a freezer as soon after packing as possible. Put no more unfrozen food into the home freezer than it will freeze within 24 hours. This is about 2 to 3 pounds per cubic foot of freezer capacity. Overloading slows the rate of freezing and foods can lose quality. To promote rapid freezing, leave a small space between packages so air can circulate freely. After the vegetables are frozen, packages may be stored close together. Maintain freezer temperature at 0 F or lower.
How to Use Frozen Vegetables
Most frozen vegetables should be cooked without thawing them first. Corn on the cob is an exception — it should be thawed partially so the cob is heated through by the time the corn is cooked. This takes about 10 minutes.
Do not overcook vegetables. Cook only until tender. Most vegetables have been partially cooked when blanched, so less cooking time is required than for fresh vegetables. Cook in a small amount of water or use steam.
Note: The microwave oven does an excellent job of cooking frozen vegetables. Follow the manufacturer’s recommendations for times and power selections.
Storage Life
For best quality, use frozen vegetables within 12 months.


For information about food preservation, contact your local office of the NDSU Extension Service.
Revised from a publication written by former NDSU Extension Service specialists Karen Heller, Food and Nutrition Specialist, and Joye M. Bond, Nutrition Specialist

