
Dry Bean Production Guide (A1133-20, Revised Dec. 2019)
Introduction
Known as a “nutritional powerhouse,” dry beans (Phaseolus vulgaris L.) are a human food high in protein, phosphorus, zinc, iron, vitamin B1 and fiber, among many other nutritional traits. Dry beans are an important staple food in many areas of the world, especially in Central and South America, and Africa.
They are the most important legume worldwide for human consumption. Different cultures have developed a multitude of end products made with dry bean.
Dry bean is a major cash crop in the Northarvest Bean Growers Association growing region of North Dakota and Minnesota and has been grown on a large scale since the 1970s. The region is the largest producer of dry beans in the U.S. Most of the production is in the eastern half of North Dakota, with the major production area in the northeastern quadrant.
Pinto is the most important market class in North Dakota, based on acreage and value, followed by navy and black bean. These three market classes account for approximately 95% of the total acres of production. Kidney, pink, small red, cranberry and others are grown on limited acres.
Dry beans are a food crop that requires the producers to provide special cultural management and attention. Proper management is essential from cultivar selection, field selection and planting through harvest, plus marketing for maximum profitability as a human food product. We recommend obtaining a marketing contract.
Cultivar Selection
Information about dry bean cultivar performance can be accessed on the web at www.ag.ndsu.edu/varietytrials/dry-bean. The site includes variety trial data from NDSU Research Extension Centers, and other North Dakota and Minnesota research locations.
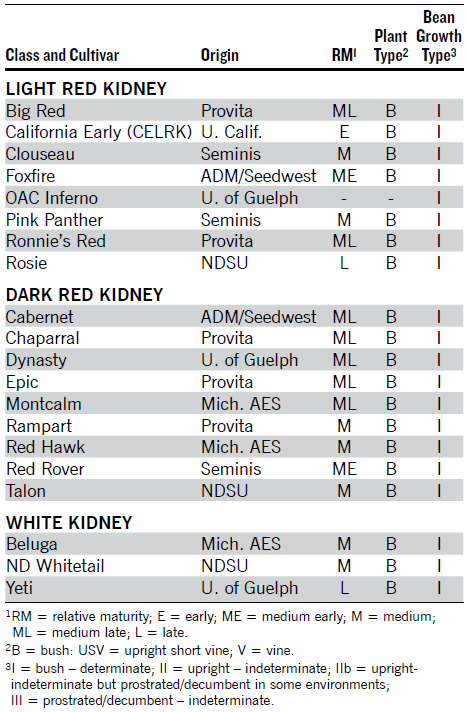
When selecting a high-yielding and good-quality cultivar, use data that summarize several years and locations. Choose a high-quality cultivar that, on average, performs the best at multiple locations near your farm during several years. Tables 1 through 4 provide information about selected bean cultivars.
Table 1. Selected pinto bean cultivar descriptions.
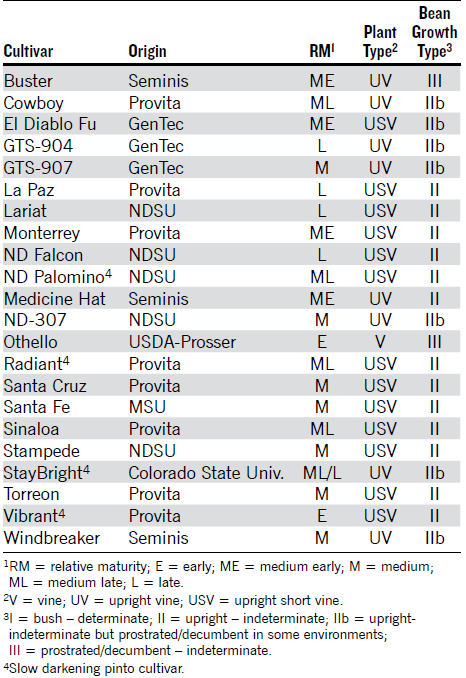
Table 2. Selected navy and black bean cultivar descriptions.
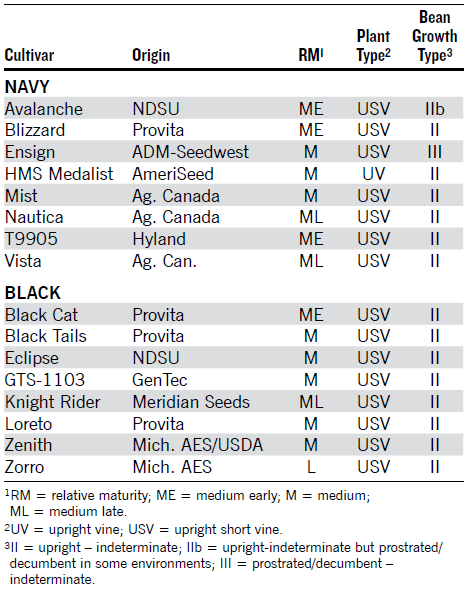
Table 3. Selected small red, pink, great northern and cranberry bean cultivar descriptions.

Table 4. Selected light red, dark red and white kidney bean cultivar descriptions.
Dry Bean Types and Development Stages
Two basic plant growth habits are found in dry edible bean: determinate (bush) or indeterminate (vining or trailing). Cultivars may be classified according to plant growth habits (Tables 1 to 4). For example, navy beans may be the bush or vining type.
With the determinate habit, stem elongation ceases when the terminal flower racemes of the main stem or lateral branches have developed. With the indeterminate habit, flowering and pod filling will continue simultaneously or alternately as long as temperature and moisture availability permits growth to occur. The growth of the plant will terminate after a killing frost.
In addition to the distinction between determinate and indeterminate plant habits, four plant growth types have been identified. These are: Type I – determinate bush; Type II – indeterminate upright short vine, narrow plant profile, three to four branches; Type III – indeterminate, prostrate vine; Type IV – indeterminate with strong climbing tendencies requiring trellis systems for optimal production. Most cultivars in the U.S. belong to the first three plant growth types. These refined growth types have become useful in the identification and classification of newer upright bean cultivars.
The development of new cultivars that combine upright architecture (Type II) and competitive yields have allowed many growers to switch their harvest operation from conventional to direct harvest (two- or three-step vs. one-step operation). This allows for faster harvest, along with a reduction in time, equipment and labor. In addition, it allows for a better harvest timing among different crops, which is crucial in this region.
About 50% of the growers direct combine all their fields and 20% of the growers do not direct combine at all. In other cases, farmers direct combine some and conventionally harvest the remaining of their bean acres (“2018 Dry Bean Grower Survey,” NDSU publication E1902).
However, seed losses during harvest in many cases may be higher with direct harvest because of pods located close to the ground and increased shattering. Fifty-five percent of the growers report yield losses between 1% and 5%, and 33% of the growers report losses of 6% to 10%. This compares with 80% of the growers reporting 1% to 5% yield loss with conventional harvest methods.
These direct-combine seed losses can be minimized by choosing the appropriate cultivar and having the optimal setup in the harvest equipment. In addition, the environmental conditions at the time of harvest (soil conditions, plant and seed moisture and temperature, among others) are also important factors that influence the amount of seed losses.
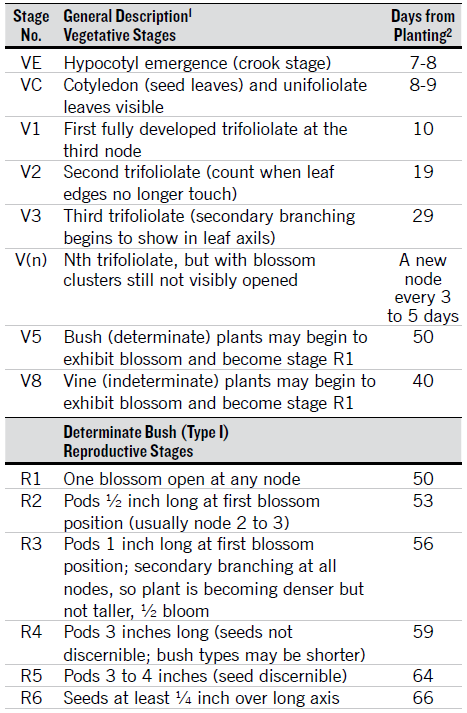
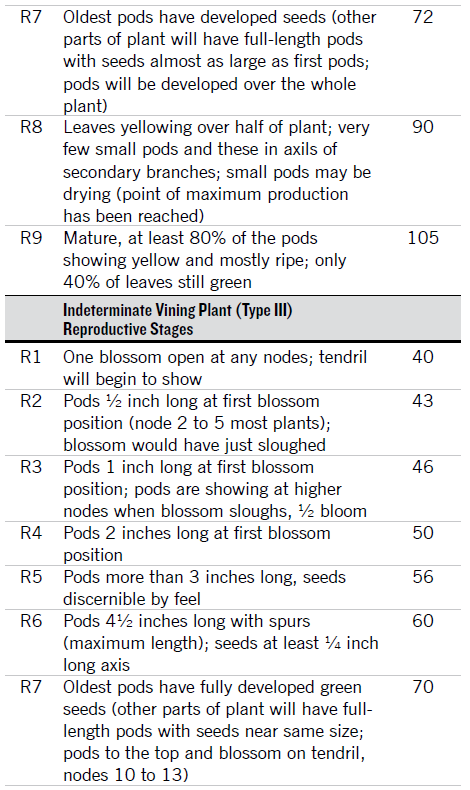
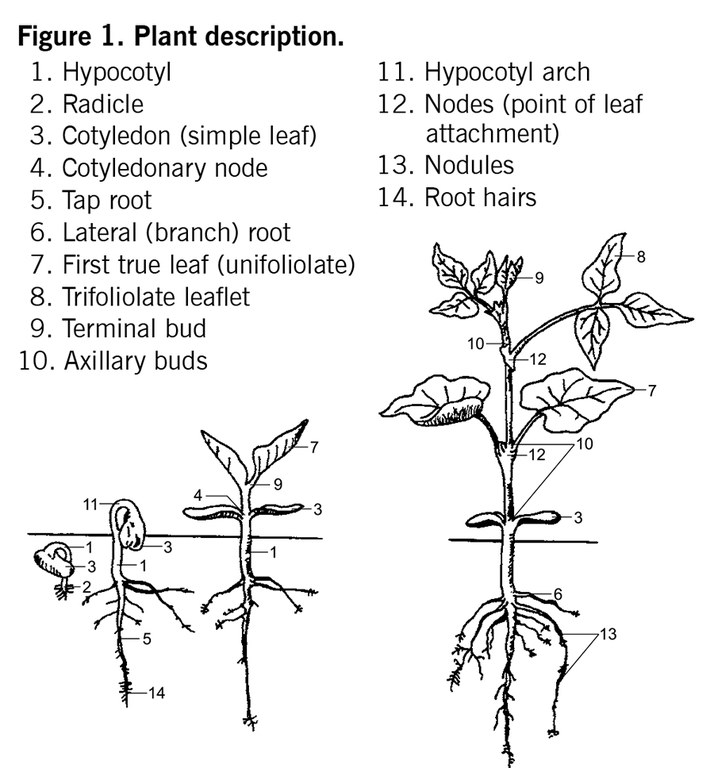
Plant development for determinate and indeterminate plant types has been divided into vegetative (V) and reproductive (R) stages, as indicated in Table 5. Vegetative stages are determined by counting the number of trifoliolate leaves (V1 to Vn) on the main stem beginning above the unifoliolate leaf. Reproductive stages are described with pod and seed characters in addition to nodes. The first pod developing on the plant is described and followed to maturity.
At the time of first flower (reproductive stage indicated by R), secondary branching begins in the axis of lower nodes, which will produce secondary groups of flowers and pods. Following the main stem, which is readily discernible on determinate and indeterminate plants, is important. A node is counted when the edges of the leaflets no longer touch.
A bean plant may have the same number of nodes at two locations but differ in height because of the stem length between nodes. The average days from planting to reach a certain growth stage and days between stages are very broad and will vary from year to year and cultivar to cultivar. Flower color varies among cultivars. Beans normally are self-pollinated, with less than 1% natural out-crossing.
Immature pods of most cultivars are green, turning yellow and then light brown or tan as they mature. An exception is black beans, in which some cultivars may have light purple pods. Pods of the navy beans are more cylindrical, compared with the longer, wider and more flattened pod typical of the pintos.
The pods of dry beans are very fibrous, compared with the pods of snap beans. A satisfactory dry edible bean cultivar bears its pods without touching the soil, ripens uniformly and does not shatter appreciably at maturity.
Table 5. Stages of vegetative and reproductive development in determinate bush (Type I) and indeterminate (Type III) dry beans.
Plant Population
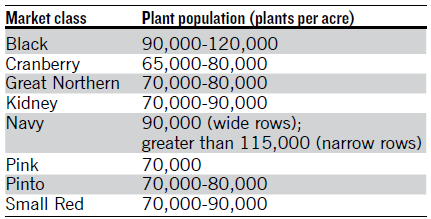
Seed size (Table 6) and established plant populations (Table 7) vary significantly among dry bean market classes. Pinto bean cultivars range from 1,200 to 1,600 seeds per pound. Pinto bean planting rates are recommended to establish early season plant populations of 70,000 to 80,000 plants per acre.
In some instances, reduced yields were observed when pinto plant populations were below the recommended density. For example, averaged across two years at Carrington, yield with plant populations at 58,000 plants per acre was 1,580 pounds per acre, compared with 75,000 plants per acre yielding 1,730 pounds per acre.
Seed size (Table 6) and established plant populations (Table 7) vary significantly among specialty dry bean market classes.
The traditional recommendation by NDSU for black and navy bean plant density has been 90,000 plants per acre. Recent research with black beans in eastern North Dakota averaged across eight site-years has indicated only a 3% seed yield increase with 140,000 plants per acre, compared with 100,000 plants per acre.
Navy bean seed yield with 28-inch row spacing had similar yield among plant populations of 93,000, 117,000 and 140,000 plants per acre in a three site-year NDSU study. However, in the same study comparing 14-, 21- and 28-inch rows, the highest navy seed yield was obtained with plant populations greater than 115,000 plants per acre in 14-inch rows.
Table 6. Seeds per pound for dry bean market classes.
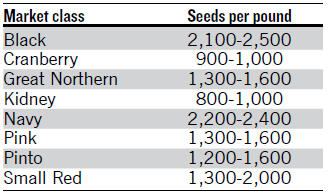
Table 7. Recommended plant populations for specialty market classes.
To obtain desired plant populations, overseed live seed by at least 10% to compensate for losses during emergence. Planting rates should be adjusted for low-germination seed lots or cool, wet planting conditions.
Recommended dry bean planting depth is 1½ to 2½ inches. Growers should test their planter on a hard surface and in the field at normal planting speeds to ensure proper seeding rate and depth.
Row Spacing
According to the NDSU Extension and Northarvest Bean Growers Association grower survey (2018), most pinto, black and navy beans are grown in 21- to 30-inch rows. Also, the majority of black and navy beans are grown in 22-inch rows.
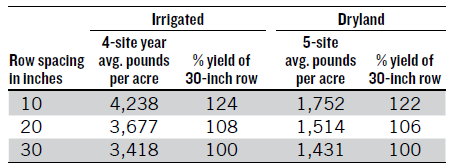
NDSU studies with pinto beans indicate narrower planted rows provide a yield advantage in dryland and irrigated production (Table 8). Also, an NDSU three site-year study with navy bean indicated as rows narrowed from 28 inches to 14 inches, seed yield increased.
However, the same study with black beans indicated no yield difference among 14-, 21- and 28-inch rows. Additional information on black and navy bean row spacing and plant population is available in the NDSU Extension “Black and Navy Bean Response to Row Spacing and Plant Population in Eastern North Dakota” (A1921).
Table 8. Pinto bean yield for four plant populations averaged across several North Dakota locations.
Growing dry beans in narrow rows poses several risks. The more closed canopy increases the potential for disease such as white mold. Narrow rows do not allow between-row cultivation. Also, challenges increase with direct harvest of narrow rows, including increased potential for seed loss.
Soil, Tillage Systems and Requirements for Plant Establishment
Dry beans are adapted to a wide range of soils. Dry beans are not sensitive to soil type as long as the soil is reasonably fertile, well-drained and free of conditions that interfere with germination and plant emergence, such as salinity.
Growing the crop on a well-drained soil is essential because beans are extremely sensitive to standing water or waterlogged conditions. Tile drainage will reduce saturated conditions in the root zone, which will improve plant development.
The majority of dry bean acres are tilled conventionally; however, dry beans can be grown successfully in conservation tillage systems. For example, five site-years of research at Carrington indicate similar seed yield with strip tillage (2,590 pounds per acre), compared with yield with conventional tillage (2,620 pounds per acre).
Winter rye can be used as a cover crop during the prior fall and spring before dry bean plant establishment for benefits including reduction of soil erosion, soil water management, weed suppression and long-term improvement in soil productivity. Termination timing of rye is based on bean planting date and benefits of extending rye growth, while maintaining adequate soil moisture for bean seed yield. A three-year study at Carrington indicates that with marginal spring soil moisture, rye needs to be terminated two to four weeks before bean planting to maintain yield similar to a conventional bean production system.
Dry bean is a warm-season crop. The optimum average growing temperature is 65 to 75 F but dry bean is adapted to a fairly wide range of temperatures. Dry bean is not tolerant to frost or prolonged exposure to near-freezing temperatures at any stage of plant growth.
Dry beans should be planted when soil temperatures are consistently in the mid 60s F. Typical planting dates in North Dakota generally range from the last 10 days in May to the first 10 days in June. Six site-years of planting date research conducted by NDSU with pinto, black and navy beans indicated no yield advantage with early planting (“Impact of Planting Dates on Dry Edible Bean”, NDSU Extension publication A1806).
Hail Damage
The amount of crop damage caused by hail will depend on the intensity, size of hail stones and duration, as well as plant type and stage of development. Determinate (Type I) cultivars are likely to suffer greater losses than the indeterminate (Types II and III) cultivars because Types II and III can recover and compensate to a greater degree than can Type I.
Severe hail damage can delay plant maturity. The earlier the stage of development at which the injury occurs, the greater the time available for recovery, resulting in less yield reduction. Hail will not directly affect seed quality unless a strike occurs on the pod.
Crop Rotation and Disease Management
Many of the pathogens causing disease on beans are soil-borne and residue-borne. A three-year crop rotation helps reduce inoculum of most pathogens, and a four-year rotation may be recommended if white mold is severe in a field.
However, crop rotation is not a “cure-all” because many pathogens produce spores that are air-borne and may blow in from nearby fields. Field-to-field spore dispersal (and in some cases much greater distances) is most notable of the pathogens that cause white mold and rust. Consequently, field selection is also important; if possible, avoid planting next to a field that was infected severely with rust last year.
Crop rotation may be an effective management tool for disease management. In some cases, a disease such as rust may infect only dry beans, so rotation to any other crop is effective. In other cases, a disease, such as soybean cyst nematode (SCN), may occur on just one other crop.
In the situation of SCN, soybeans and dry beans are susceptible, and rotation to any other crop is effective. However, a pathogen may have an extremely wide host range, such as with Sclerotinia sclerotiorum, which causes white mold on many broadleaf crops and many broadleaf weeds.
The three most important diseases to consider when selecting a crop rotation are white mold, SCN and Rhizoctonia root rot.
White mold
Dry bean, sunflower, canola and lentil are among the most susceptible crops to white mold. White mold also attacks soybean, safflower, mustard, alfalfa, field peas and potatoes. Flax and buckwheat are considered only marginally susceptible.
Regardless of which plant/crop is infected with Sclerotinia, the pathogen produces the same survival structures, called a sclerotia. As a result, an epidemic of white mold on sunflowers can result in an epidemic in dry beans in future years.
Similarly, the pathogen can cause severe white mold on a number of different broadleaf weeds, making good weed control important for management of white mold. Members of the grass family, including small grains, corn and millet, are not susceptible to white mold and are good rotational crops for dry bean disease management.
Rhizoctonia root rot
Rhizoctonia solani causes a root rot of dry bean. Specific Anastomosis groups (strains) of Rhizoctonia solani can cause disease on sugarbeet and soybean. Including these crops in a rotation may lead to the buildup of Rhizoctonia inoculum. One of the Rhizoctonia strains that attacks dry bean, sugarbeet and soybean also attacks flax and lentil.
Soybean cyst nematode
The parasitic worm Heterodera glycines attacks soybean and dry edible bean. SCN eggs may survive in cysts in the soil for many years, and eliminating the nematode using crop rotation is not possible.
If a susceptible crop is planted into a field with SCN, nematode egg levels can increase dramatically in one growing season. Rotation away from soybean and dry beans with any other crop (small grains, corn, sunflower, canola, etc.) will reduce the egg levels in the soil and the likelihood of yield loss.
The benefit of crop rotation for even one year is notable, but greater reduction in eggs levels are seen with two years. If soybean are included in a dry bean rotation, using a SCN-resistant soybean cultivar is critical.
Dry Bean Fertility
Dave Franzen, NDSU Extension Soil Specialist
Dry beans are responsive to fertilizer when soil fertility levels are inadequate to support yield levels possible with existing soil moisture and growing season climatic conditions. Soil testing is recommended to determine the probability of crop response to fertilizer amendments. If soil levels are less than adequate, dry beans may respond to nitrogen (N), phosphorus (P), potassium (K) and zinc (Zn) in many northern Plains soils.
Soil test cores should be taken at zero to 6-inch and 6- to 24-inch depths. N is analyzed at both core depths, and P, K and Zn are analyzed on the zero to 6-inch depth.
Salt levels at both depths may be analyzed if a reason exists to suspect a salt problem. Soil pH may be determined on the surface and subsurface depth if iron chlorosis problems are anticipated.
Phosphorus
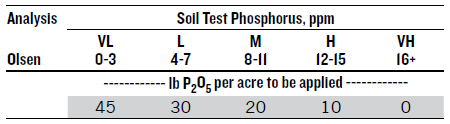
Soils with soil test levels indicating medium levels and lower would be expected to respond to P fertilizer. Phosphorus fertilizer may be broadcast or banded. Banded rates of P in the very low or low range may be reduced by one-third from Table 9 recommendations because the broadcast recommendations also include extra buildup fertilizer useful in long-term fertility programs.
Reducing the rates will not result in long-term improvement of soil P fertility but may increase short-term profitability in the current crop year. Phosphorus should be applied as recommended in Table 9.
Table 9. Phosphorus recommendations for dry beans.
Recent studies at the Carrington Research Extension Center, for multiple years, showed that low rates of in-furrow or near-furrow 10-34-0 (2 to 3 gallon per acre) have minimal effect on stand and substitute for higher recommended rates of broadcast fertilizer. This is contrary to previous findings and may be the result of newer cultivars, compared with those used in the past. Using a low rate of 10-34-0 will have substantial economic benefits for farmers whose fields test in the low to very low P categories.
Additional dry bean P starter fertilizer details are available in the NDSU Extension publication “Pinto Bean Response to Phosphorus Starter Fertilizer in East-central North Dakota” (A1883).
Potassium
Potassium (K) seldom is required in most northern Plains soils; however, a soil test should be analyzed to determine the probability of response. Soils with medium K level or lower may respond to K fertilizer.
Lower K levels sometimes may be found on sandy ridges within the region. The rate of K recommended at different K soil test levels is shown in Table 10.
Potassium fertilizer may be broadcast or banded. Banded K should not be placed with the seed. At least 1 inch of separation between seed and fertilizer is required.
Table 10. Potassium recommendations for dry beans.

Nitrogen and Inoculation
Many legumes have the ability to fix N from the air without the use of commercial fertilizers if inoculated with N-fixing bacteria. The N-fixing bacteria for dry bean is called Rhizobium phaseolus, and it is specific for dry beans. Inoculants used for soybeans or peas are different and will not infect dry bean roots.
Unfortunately, the relationship between dry bean and Rhizobium phaseolus is not strong. Dry, hot weather, short periods of soil water saturation and cold weather all will result in sloughing off of nodules, so achieving high dry bean yields consistently using inoculation for an N source may be difficult.
In the last 20 years, researchers in North Dakota and Minnesota have conducted more than 30 site-years of N-rate trials on dry beans. Using an N cost of 30 cents per pound of N and a dry bean price of 20 cents per pound, the return to N in inoculated trials was mostly negative for N rates in excess of 40 pounds/acre.
From these data, inoculated trials did not benefit from N rates greater than 40 pounds/acre, including trials where yields increased up to 100 pounds of N/acre. Fertilization at rates more than 70 pounds/acre provided little economic advantage. Risks of later maturity, and increased incidence and severity of white mold disease would favor 70 pounds/acre rates vs. higher N rates.
The most economical N rate was not related to yield potential. Therefore, no scale of yield potential is made in dryland dry bean N recommendations for maximum economic production. In years when environmental conditions favored higher yields, the conditions also favored increased organic matter mineralization and more efficient uptake of N by the dry beans.
N recommendations for dryland dry edible beans:
- Inoculated: 40 pounds/acre less STN (soil test N) to a depth of 2 feet
- Non-inoculated- 70 pounds/acre less STN
Irrigated Production
Most irrigation is sited on well-drained, coarser-textured soils. Inoculation has not been found adequate for supporting higher yields of dry beans produced under irrigation.
Therefore, supplemental N is very important to achieve the high yield potential in irrigated fields. Not only is supplemental N encouraged, but split applications of N are also encouraged to increase N efficiency and prevent N leaching.
The formula for N recommendations under irrigation is:
N rec = YP X 0.05 – STN-PCC
- Where YP is the yield potential based on past history of the grower or field.
- STN is the soil test N acquired in fall or spring to a depth of 2 feet.
- PCC is the previous crop credit from a previous legume, sugarbeet tops or another N source such as a cover crop.
A small preplant application of N is advised, usually less than 40 pounds of N/acre. The first supplemental N application can be a side-dressed ammonia, UAN or urea application before vining. Subsequent applications can be made through the irrigation system and completed before top pod fill begins.
Zinc
Dry bean is one of only a few crops in the region to respond regularly to Zn fertilizer in low-zinc soils. Soils with soil test levels below 0.8 parts per million (ppm) may respond to fertilizer zinc application.
Zinc deficiency may be seen as bronzing, browning and death of leaf tissue, stunting and poor vining. Zinc deficiency may be treated by foliar sprays of zinc sulfate, zinc chelate or ammoniated zinc solutions. Zinc deficiency may be prevented with preplant or planter treatments of zinc sulfate, zinc chelates or ammoniated zinc solutions.
A treatment of 3 to 5 pounds/acre of actual Zn preplant incorporated as zinc sulfate may improve soil Zn availability for several years. Studies have shown that greater water solubility of the Zn source is important for Zn utilization by plants.
A liquid starter such as a zinc chelate or ammoniated zinc complex can be applied. Product rates as low as 1 pint/acre have shown effectiveness.
Most grower rates range from 1 to 1.5 quarts/acre. Zinc diluted with water and applied with the seed is preferred versus mixing with another liquid fertilizer, in order to minimize stand loss
If the starter band is separated from the seed by at least an inch, the liquid Zn fertilizer may be applied with the liquid starter fertilizer, provided that a jar test shows that they are compatible when mixed together.
Iron Chlorosis
Dry beans generally are more resistant to iron deficiency chlorosis (IDC) than soybean, but it still can be seen in some fields under certain conditions. Iron chlorosis appears as interveinal yellowing of upper leaves in response to low available soil iron due to high levels of carbonate minerals with or without high levels of soluble salts.
Soil pH levels higher than 7 may be accompanied by high levels of calcium/magnesium carbonates in the soil. Carbonates dissociate in moist soils to form bicarbonate, which lowers the dry bean plant’s ability to take up soil iron. Wetter soils contain higher levels of soluble bicarbonate than dry soils.
Wetter soils also may contain higher levels of salts due to shallower soil water tables. The combination of high levels of soil carbonates and salts has been shown to increase the level of iron chlorosis symptoms in soybean.
A similar relationship also is likely for dry beans. Iron chlorosis may be minimized by planting cultivars showing tolerance and having a higher tolerance to salt. Iron sprays have performed inconsistently in the past but if used, they should be applied early in the season for best results. Late-season spraying after about the third trifoliolate leaf would reduce effectiveness.
Iron sprays of ferrous sulfate or iron chelates have been used with limited success. Application of iron amendments with postemergence herbicides is not recommended. If a field has shown a history of IDC in dry beans, avoid the field entirely or grow an IDC-tolerant cultivar and maybe plan to in-furrow apply an ortho-ortho-EDDHA iron chelate (for example, Soygreen) to help iron nutrition.
Additional dry bean plant nutrition details are available in the NDSU Extension publication “Fertilizing Pinto, Navy and Other Dry Edible Bean” (SF720).
Salts
Dry beans are very sensitive to salt damage. Levels of salt (EC, electrical conductivity) higher than 0.5 millimho per centimeter (mmho/cm) as a 1:1 soil water extract begin to reduce yield. Salt levels are reduced by lowering water table levels. This is difficult to do in exceptionally wet years.
Soil salts can be reduced through tile drainage, but in many areas of eastern North Dakota, the effect of sodium within inclusions in the field may be enhanced and certain areas rendered unproductive. In the absence of tile drainage, lower salt levels are achieved by continuously cropping and introducing deep-rooting crops into the rotation.
The use of cover crops before or after seeding in the rotation, or a roadside buffer of alfalfa strips also may be helpful. See the NDSU Extension publication “Managing Saline Soils in North Dakota” (SF1087) for more information.
Weed Control
Joe Ikley, NDSU Extension Weed Specialist
The weed control suggestions in this production guide are based on the assumption that all herbicides mentioned will have a registered label with the Environmental Protection Agency. Herbicides that no longer are registered or have not received registration for dry edible bean should not be used.
Dry beans treated with a nonregistered herbicide may have an illegal residue that, if detected, could cause condemnation of the crop. Nonregistered herbicide use is illegal, and a user could be subject to a heavy fine even without detectable residue.
For additional information, see the “North Dakota Weed Control Guide” at www.ag.ndsu.edu/weeds/weed-control-guides/nd-weed-control-guide-1.
Photographs at the end of this publication provide examples to identify the most common weeds.
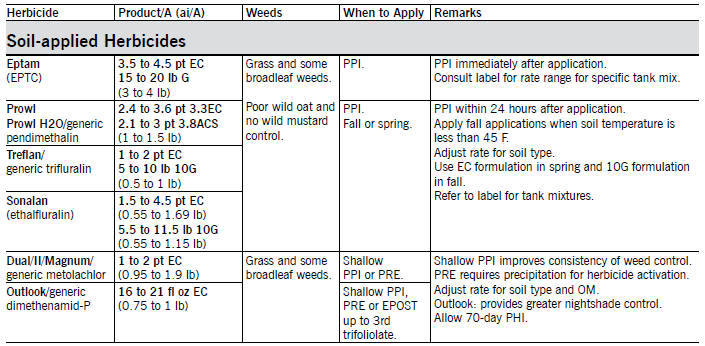
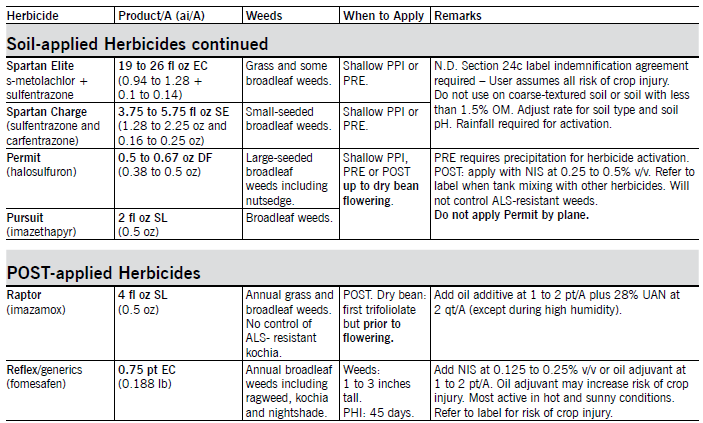
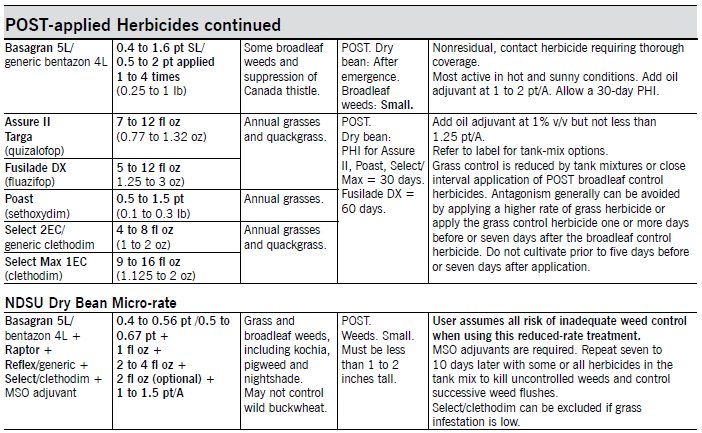
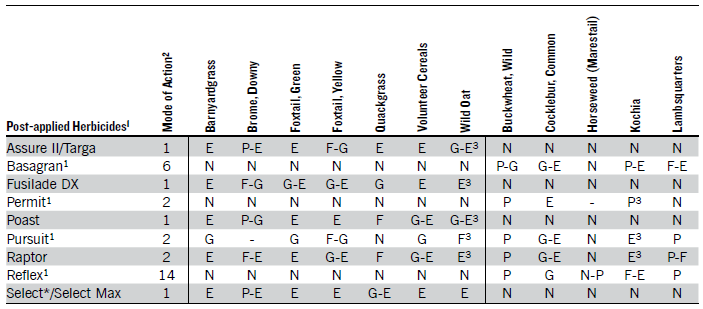
Table 11. Herbicide weed control guide for dry edible beans.
Navy beans generally are less tolerant to herbicides than other dry bean classes or soybean. A rotary hoe used before or soon after weed emergence and before crook stage or after emergence up to first trifoliolate leaf stage may supplement weed control with herbicides.
Eptam (EPTC) plus Prowl, Sonalan or Treflan (or generic equivalent) controls many grass and broadleaf weeds. Incorporate 4 to 6 inches deep immediately after application.
Dual (S/metolachlor), Outlook (dimethenamid) {or generic equivalents of these products} applied PPI (preplant incorporated) or PRE (pre-emergence) controls annual grasses and some broadleaf weeds. PPI may provide more consistent weed control because PRE requires rainfall for activation.
Outlook can be applied in sequential treatments for improved nightshade control. Outlook PPI or PRE provides greater nightshade control than Dual but may degrade in soil before nightshade emergence ceases. Apply Outlook EPOST (early postemergence) up to third trifoliolate dry beans to reduce late nightshade emergence.
Pursuit (imazethapyr) applied PPI, PRE or POST controls many broadleaf weeds. Pursuit can be applied only PPI within one week of planting or PRE up to three days following planting. Do not apply POST (postemergence) to ‘Domino’ black bean. Do not apply after crop begins to flower or when cold and/or wet weather are present or predicted to occur within one week of application.
Do not use oil additives or liquid fertilizer. Apply with NIS (nonionic surfactant) at 0.25% v/v to dry beans with at least one trifoliolate leaf. Refer to label for additional information on application use and restrictions, including crop rotation restrictions. User assumes all risk of liability for injury.
Reflex (fomesafen) applied POST with NIS at 0.25 to 0.5% v/v or oil adjuvant at 0.5 to 1% v/v controls many broadleaf weeds. Oil adjuvant may increase weed control but also increases the risk of dry bean injury. NDSU research has shown good to excellent kochia control when applied at high spray volumes (greater than 17 gpa), with oil adjuvants (especially MSO type), at labeled rates, and to kochia less than 2 inches tall.
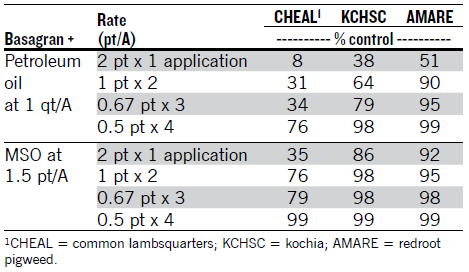
Basagran (bentazon) at 0.5 to 1 qt/A applied POST controls many annual broadleaf weeds and suppresses Canada thistle. NDSU research has shown greater broadleaf weed control, especially for kochia, lambs¬quarters, redroot pigweed and wild buckwheat, by applying Basagran as split treatments twice each at 1 pt/A, three times each at 0.67 pt/A or four times each at 0.5 pt/A, compared with one application at 2 pt/A.
Make applications seven to 10 days apart, depending on the weed growth rate, growing conditions, size of weeds at application, degree of weed control from first application and sequential flushes. The first application must be made to small weeds (1 inch).
For Canada thistle suppression, apply Basagran at 1 qt/A when plants are 8 inches tall to bud stage. Make a second application at 1 qt/A seven to 10 days later.
Sequential micro-rate applications will provide greater broadleaf weed control than from a single application at full rates and can be used in all crops where Basagran is labeled. Apply with an oil additive at 1 qt/A (1 pt/A by air). Do not reduce the amount of oil adjuvant with the micro-rate.
MSO (methylated seed oil) adjuvant has shown greater enhancement of Basagran than petroleum oil (COC) adjuvants (Table 12). Basagran is safe for dry beans at all stages. The total maximum seasonal use rate is 4 pt/A, so the micro-rate can be increased if weeds are large at application or if sequential applications are delayed due to rain or wind.
Table 12. Weed control from Basagran applied one to four times (NDSU data).
Basagran commonly is combined with fertilizer micronutrients that may cause incompatibility problems resulting in zinc precipitation. Chelated zinc materials have greater incompatibility problems than unchelated material. Recommendations to prevent precipitation are to fill the sprayer with water, add Basagran and thoroughly agitate, then add zinc fertilizer material.
The NDSU dry bean micro-rate concept is based on the sugarbeet micro-rate and substitutes additional weed management for reduced herbicide rates. Application to small weeds is essential for success. The micro-rate can be applied more than once in dry beans to control emerging weed flushes, but applying a foundation herbicide treatment (DNA [Group 3] or acetanilide [Group 15]) may require only one POST application. MSO adjuvant is required for optimum weed control. The POST grass herbicide can be excluded if grass populations are low.
Weed control from the micro-rate is best when the temperature plus humidity is greater than 140. Increasing spray volume and using AMS may help improve weed control when the value is below 140. Research also has shown control of wild mustard, nightshade, buckwheat, ragweed and cocklebur from the micro-rate.
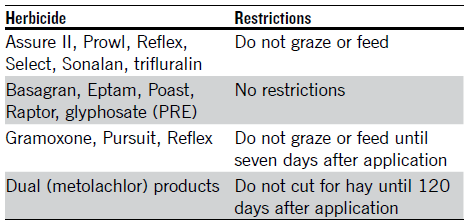
Table 13. Grazing restriction for dry beans.
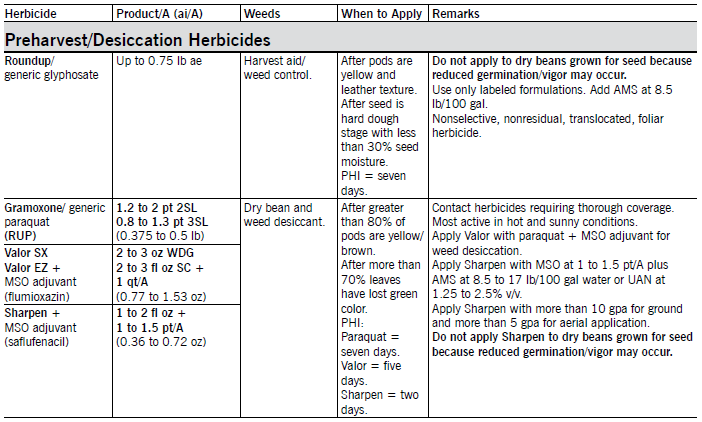
Herbicide Carryover
Besides carryover potential there are also grazing restrictions for certain herbicides used in dry beans (Table 13).
The persistence of phytotoxic levels of an herbicide for more than one year can be a problem with some of the herbicides used in North Dakota. Herbicide residues are most likely to occur following years with unusually low rainfall because the chemical and microbial activity needed to degrade herbicides is limited in dry soil.
Crop damage from herbicide residues can be minimized by applying the lowest herbicide rates required for good weed control, using band rather than broadcast applications and mold-board plowing before planting the next crop. Mold-board plowing reduces the phytotoxicity of some herbicides by diluting the herbicide residue in a large volume of soil. Mold-board plowing is effective in reducing the residual effects of trifluralin, Sonalan, Prowl, Nortron SC, atrazine and metribuzin.
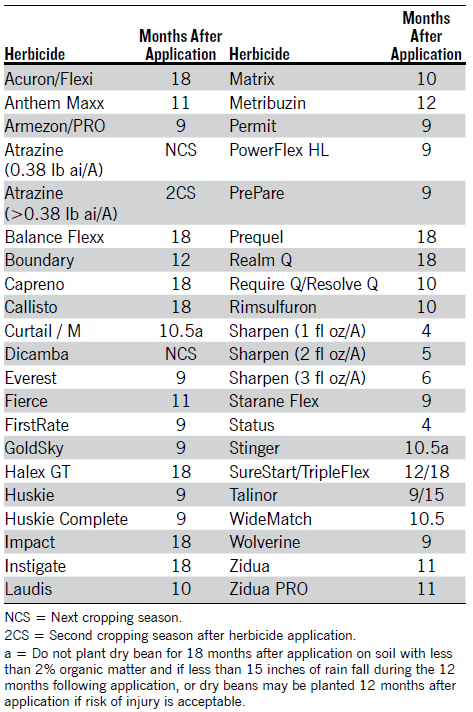
Rotation restrictions for planting dry beans after use of herbicides are provided in Table 14.
Table 14. Rotation restrictions for planting dry beans.
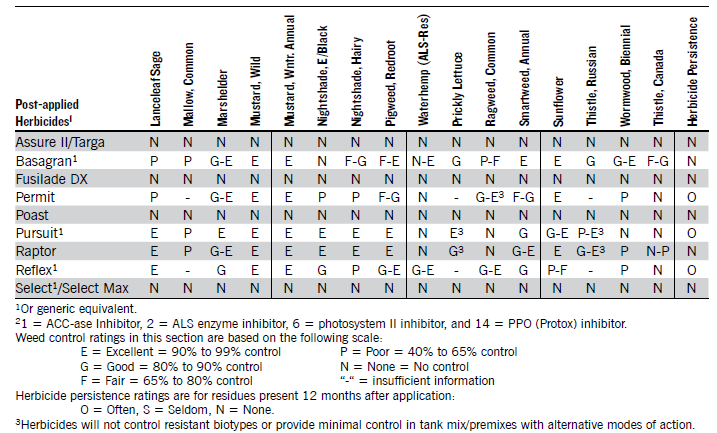
Relative Herbicide Effectiveness on Weeds
The ratings in Table 15 show relative herbicide effectiveness at labeled rates. Under favorable conditions, control may be greater than indicated, and under unfavorable conditions, herbicides may give erratic results. Dry and cool weather increases herbicide persistence, while wet and/or warm weather reduces herbicide persistence.
Table 15. Relative herbicide effectiveness on weeds and persistence in soil.

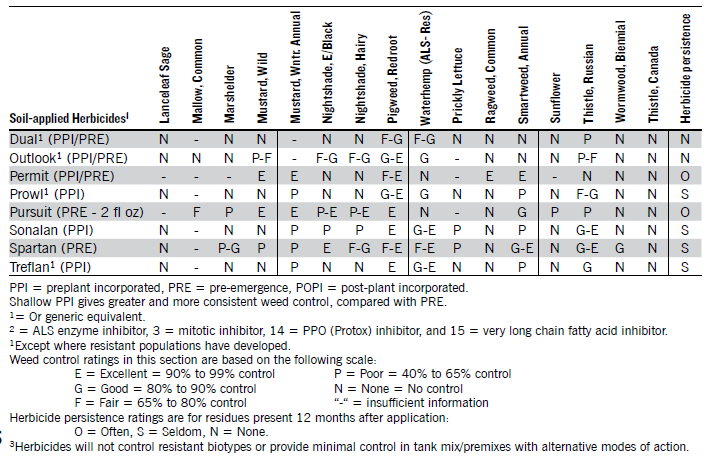
Table 16. Relative herbicide effectiveness on weeds and persistence in soil.
Disease Identification and Management
Principles of Disease Management
Many pathogens can cause diseases in dry edible bean. Diseases can reduce yield and quality, and add to production costs. Disease management tools and strategies are available and can reduce the potential impact of diseases.
This section describes the general principles of disease management, followed by discussion of the most problematic diseases in the North Dakota and Minnesota production regions. Photographs at the end of this publication provide examples to identify common diseases in dry edible beans.
1. Assess your greatest threats.
While many diseases impact dry edible bean, each disease is not a threat in every year and every location. Try to determine which diseases are more likely to cause you problems. Proactive management of the most likely disease threats in each field may reduce the chances of yield and quality losses due to disease.
Field history: If you consistently have problems with a specific disease on a specific field (for example, root rots) or have had a recent outbreak of a disease on your farm (for example, anthracnose or white mold), put greater emphasis on managing that disease when preparing for the season (for example, plant a cultivar resistant to that specific disease of concern or budget for a fungicide application).
Environment: Although climatic trends exist, nobody can predict the weather accurately and consistently in an upcoming growing season. However, assessing your local environmental conditions, and responding appropriately to them, is very important. For example, if rain and cool temperatures are forecast as your beans begin to flower, a foliar fungicide for white mold may be very important. If heavy dews and fog occur frequently, you should look for rust and prepare to respond with a fungicide if it is found.
Adapt: Every year is different, and the greatest disease threats can change quickly. For example, frequent thunderstorms may create conditions favorable for bacterial blight outbreaks, even if the month before had been hot and dry.
2. Keep pathogens and beans separated.
Certified disease-free seed: Certified seed must meet certain quality standards with regard to seed-borne pathogens. You have no guarantee that seed is actually pathogen free; however, planting certified seed is the best way to minimize the introduction of bean pathogens on the seed. This is particularly important for the pathogens that cause bacterial blights and anthracnose.
Crop rotation and geographic separation: A rotation of three or four years out of beans is recommended, and longer rotations may be beneficial in some cases. Avoid planting next to last year’s bean field, especially if disease pressure was severe. Some pathogens overwinter and can be blown in the wind to adjacent fields the following season.
Avoid cultivating or moving through a field when plants are wet: This helps prevent the spread of pathogens, especially those that cause bacterial blights and anthracnose.
3. Identify the disease or pathogen.
Active scouting and correct identification of diseases in the field is critical to mitigate outbreaks. This is true not only in the current growing season, but in future growing seasons in that field as well.
Scout: You have no substitute for proper scouting (walking the fields). Many diseases are not seen unless you are examining leaves actively by hand
Identify: Take advantage of many knowledgeable Extension agents, the NDSU diagnostic lab, crop consultants or seed company agronomists. Additionally, diagnostic tools designed for growers in North Dakota and Minnesota are available. As examples, NDSU Extension’s publication “Dry Edible Bean Disease Diagnostic Series” (PP1820) is designed specifically to help aid identification of diseases in our region. Similarly, the NDSU Extension Pest Management App has images and diagnostic information, along with data on labeled fungicides for disease management.
As an example of the importance of proper identification, if you misidentify halo blight (a bacterial disease) as rust (a fungal pathogen) and select a fungicide to manage rust, you will not manage halo blight and will add significant production costs needlessly.
4. Strengthen the bean plant.
Plant disease-resistant cultivars: Genetic resistance is a cost-effective way to manage diseases.
Manage fertility: Provide adequate soil fertility (based on soil test results) and adequate trace minerals such as zinc. Avoid excess nitrogen levels that stimulate lush plant growth, which can enlarge the canopy and provide a microclimate conducive to disease development.
Control weeds: Weeds can be hosts to pathogens that cause diseases on dry bean.
Control volunteers: Volunteer bean plants often harbor pathogens, which limits the effectiveness of your rotation to reduce inoculum and may facilitate pathogen race changes (for example, rust).
5. Attack the pathogen.
Scout fields for disease: For many diseases, early detection is critical for effective management.
Foliar fungicide selection: Fungicides may aid in disease management by limiting new infections; however, fungicides are not all equally effective on all pathogens. For example, some fungicides are effective on rust but have minimal efficacy on white mold, and vice versa. Match the more effective fungicide with your target disease.
Foliar fungicide timing: The timing of an application is critical and different for every disease. For example, an application to manage white mold should occur at the beginning of flowering (R1), while an application to manage rust should occur shortly after pustules are first identified. An application later than these two recommended times greatly reduces the efficacy of the application and increase the likelihood of a disease epidemic.
Seed treatments: Fungicide seed treatments may limit damping off and root rots and aid the establishment of a robust stand. The use of seed treatments is particularly important in fields with a long history of bean production.
6. Stay engaged and adapt.
Disease prevalence, pathogen races, management tools and information strategies change constantly. Staying engaged will help you manage the most critical diseases with the most current and effective tools.
White Mold
White mold is a very common and yield-limiting disease affecting dry bean production in the Northarvest growing region. Nearly complete yield loss can occur in severe cases and if no management tools are used.
It can be especially devastating when cool, wet weather occurs at flowering. Infected plant tissues will turn tan to dry-bone color, may be covered with “white mold” and will shred toward the end of the season.
Within diseased tissues, the causal fungal pathogen produces hardened fungal structures called sclerotia. Sclerotia have a black exterior and a white to pinkish interior, and they take on the shape of the plant tissue in which they are produced.
When white mold-infested tissue shatters or decays, sclerotia are released into the soil, where they serve as resting structures for initiating new disease outbreaks in future growing seasons. Sclerotia can survive in the soil for many years.
When the soil surface is wet in the spring and summer, sclerotia will form tiny mushroomlike bodies (apothecia) that liberate wind-dispersed ascospores. Ascospores do not directly infect living tissue; rather, they colonize bean blossoms and use them as an energy source to become established on the plant.
As a consequence, dry edible beans often are considered at risk for white mold only after flowering, and similarly, fungicide applications are recommended only during flowering. Once the pathogen has colonized bean dead flower tissues, it easily can invade healthy green tissue and quickly damage the plant.
In wet weather, infected tissues are tan and soft with tufts of fluffy white fungal growth. Eventually, sclerotia will form, leaves of infected plants turn yellow and infected branches or the whole plant may wilt.
In dry weather, affected stems have a bleached or whitish appearance. The epidermis of such tissues peels easily and appears shredded, and sclerotia may be found inside. Infected seeds are discolored, chalky and lightweight, and sclerotia may be found in the pod.
White Mold Management
Crop rotation: Avoid short rotations or rotations with other susceptible crops, especially sunflower, canola and soybean. Although crop rotation is important, it should be used in conjunction with other management tools because the sclerotia can survive for several years in the soil.
Foliar fungicides: Many foliar fungicides are available and can provide some management of the disease. However, management of white mold is simply that; fungicides can reduce disease severity sharply but do not provide complete control of white mold.
Because the pathogen uses flower petals as a food source, early flowering is generally the best time to apply fungicides, but the initial application can be delayed if weather does not favor disease development at flowering. Dry beans are at highest risk of white mold when the soils are moist going into flowering and cool, wet weather occurs during flowering.
However, white mold also can develop in the absence of significant rainfall if soils have been sufficiently moist to facilitate the development of the mushroomlike apothecia and temperatures are cool with heavy dew in the mornings. Additionally, the microclimate within the canopy will impact disease; high canopy density within the rows and a densely closed canopy favor infection and disease development.
A second application may be recommended 10 to 14 days after the first application if conditions favoring the disease (cool and wet) persist. Although additional applications may limit additional infections, the most devastating lesions occur in the early flowering stages, and preventing them is critical. Good canopy penetration of the fungicide is required to ensure flowers and lower stems are protected.
Biological control: Commercial production of a fungus that attacks sclerotia, Coniothyrium minitans, also is available. Coniothyrium minitans needs to be incorporated in the soil, preferably late in the fall.
Cultural control: Increasing row spacing may help enhance drying and subsequently help the crop escape severe infection in years when conditions are marginal for white mold development.
Weed control: Many broadleaf weeds are hosts to the pathogen. Effective weed control every year in each field is important for limiting the buildup of the pathogen for future bean crops.
Rust
Rust is a common disease and can lead to partial or complete crop failure. The rust fungus forms discrete pustules, which are filled with cinnamon-brown spores (urediniospores). On the upper side of the leaves, pustules will appear small (1/16 inch) and may be surrounded by a yellow halo. On the underside of the leaves, the pustules will appear slightly larger and be more raised, and the dusty spores are rubbed off easily with a finger.
These spores may be wind-blown for many miles. Infection is favored when free moisture (dew or fog) occurs frequently. The infection cycle can repeat every 10 to 14 days, and a significant epidemic can result very quickly if the disease goes unmanaged. Pustules break through the leaf surface, opening the interior of the plant to desiccation. Large numbers of pustules result in plants drying out and dying, even when soil moisture is good.
Late in the season, the cinnamon-brown spores will be replaced with black spores (teliospores). Both spore types overwinter on bean debris and can lead to infections the next spring. The rust life cycle also includes an inconspicuous sexual stage that can result in new races.
Rust Management
Resistance: Resistance is an effective and inexpensive way to manage rust, but the pathogen races causing rust can change and should be monitored. For context, rust epidemics caused millions of dollars in yield losses to dry edible beans in the Northarvest region in the 1990s. However, when pathologists and breeders incorporated the novel and effective resistance gene Ur-3 into cultivars, rust was widely managed throughout the region.
In 2008, a new pathogen race that overcame Ur-3 (race 20-3) first was identified in North Dakota and it spread throughout the growing region in subsequent years. As a result, rust became a major threat in the region again.
Pathologists and breeders actively monitor the pathogen for race changes, and identify and incorporate new resistance genes into cultivars. Consult the most up-to-date information when selecting a cultivar for rust resistance.
Destroy volunteer beans: Destruction of volunteer bean plants will reduce early season rust pressure and slow the development of new rust races.
Scout: Foliar fungicides can be used to manage rust effectively, but they are most effective shortly after rust is found. Scouting should be done regularly, with an emphasis on looking for “hot spots” (localized areas of infections).
When a rust outbreak begins, symptoms are observed most readily in the lower-middle canopy and on the underside of the leaves. Monitor fields carefully, paying particular attention to areas prone to long periods of heavy dews or fog (for example, near tree lines or low-lying areas).
Foliar fungicides: Many foliar fungicides are labeled for rust management. Protectant compounds can delay the onset of rust if applied before infection, but in general, FRAC 3, FRAC 11 and some FRAC 7 fungicides are more effective, particularly once rust infection occurs. Consult the most up to date information to select an efficacious fungicide.
Foliar fungicide timing: The most effective timing for a fungicide application for rust is usually soon after the disease is identified. Research results at NDSU indicated that preventive applications (before detection) and late applications (applied several weeks after the epidemic began) were less effective. Once the crop is at growth stage R7 (striping in pintos), fungicides no longer provide economic benefits.
Crop rotation: Use crop rotation and avoid planting next to a field that was severely diseased last year.
Additional resources: Additional information on rust can be found in the NDSU Extension publication “Dry Edible Bean Rust” (PP1601).
Root Rots
Several pathogens, including Fusarium, Rhizoctonia and Pythium, can cause root rots. Root rots can occur individually or in combination, and cause many symptoms, including damping off, cankers browning and wilting.
Damage from Fusarium is common in dry bean, particularly in drought years. Fusarium produces symptoms with indistinct brown lesions and occasionally a more general browning of the roots.
Rhizoctonia is most common in warm, moist soils, and when dry bean is grown in rotation with sugarbeet or soybean. Rhizoctonia causes more distinct lesions that are chocolate-colored to dark red.
Pythium is most common in wet soils, causing a soft brown rot resulting in a hollow tap root. Plants with root rot may be stunted with yellow leaves. Infected plants form fewer pods and smaller seeds.
Root Rot Management
Crop rotation: Longer rotations may help reduce inoculum. If Rhizoctonia is present, avoid sugarbeet and soybean in close rotation. Root rot is less severe following wheat.
Seed: Plant high-quality seed.
Seed treatments: Most dry bean seed comes with a fungicidal seed treatment, which will aid in disease management.
Resistance: Some cultivars may be more resistant to root rot pathogens than others.
Anthracnose
Anthracnose can reduce yield and quality. The pathogen that causes this disease survives in seeds and plant residues, and an epidemic can begin from either source. Infections occurring early in the growing season usually result in greater yield and quality losses. As such, infections occurring from infected seed are particularly devastating. Anthracnose can develop at any time during the growing season if cool, wet weather occurs.
Anthracnose symptoms initially are observed as linear, dark lesions on the veins on the underside of leaves. These lesions eventually can be seen on the upper side of the leaves and on petioles and stems. Symptoms may mimic other biotic or abiotic ailments, so accurate identification is important.
Infection on pods produces reddish-brown circular cankers 1/8 inch or greater in diameter. Larger areas of pods can be destroyed when these cankers merge. Under moist conditions, the center of these cankers is filled with beige to pink masses of spores.
Anthracnose symptoms on pods are similar to those produced by bacterial blights. Symptoms on infected seeds can range from light discoloration to the presence of cankers similar to those produced on the pods.
Importantly, symptomless infections also can occur. This is particularly important in seed because healthy-looking seed actually may be infected with the anthracnose pathogen. Planting infected yet symptomless seed may initiate an epidemic during the growing season.
Once infection begins, the spores of the pathogen can be moved easily in the field by splashing water and machinery. Long-range spread occurs through infected seeds, infected plant material blowing in the wind, equipment carrying the sticky spore masses, and wind-driven rain.
Anthracnose Management
Clean seed: The most effective way to manage the disease is to prevent its introduction in your fields by planting certified disease-free seed. The use of bin-run seed greatly increases the anthracnose risk.
Seed treatments: Some fungicide seed treatments reduce seed-to-seedling transmission of the anthracnose pathogen, but none provides complete control and none eradicates the anthracnose pathogen in seed because the embryo or inner cotyledon may be infected.
Cultural methods: If you have an infected field, work infected fields last, and wash your implements thoroughly before entering other fields. Avoid cultivating when the canopy is still wet.
Crop rotation: A minimum of a three-year crop rotation is recommended if anthracnose is identified.
Resistance: Cultivars with resistance to anthracnose may be available. Consult the most current information on cultivars.
Scout: Monitor fields for the presence of anthracnose and do not plant saved seed from anthracnose-infected fields.
Foliar fungicides: When applied preventatively at flower initiation and again 10 to 14 days later, foliar fungicides can reduce the incidence of diseased pods and reduce anthracnose-related seed quality losses, but none provides complete control. Consult the most current information on fungicides for management of anthracnose.
Resources: Additional information on rust can be found in the NDSU Extension publication “Anthracnose of Dry Beans” (PP1233).
Bacterial Blights
Multiple bacterial blight diseases occur in North Dakota and Minnesota: common blight, halo blight, bacterial brown spot and bacterial wilt. Common blight is the most prevalent of the bacterial blights, but others can be severe periodically. Bacterial blights cause leaf and pod lesions, defoliation and shrunken, discolored seed.
All pathogens are seed-borne and can survive on bean residue. The pathogens causing common blight, halo blight and bacterial brown spot are favored by wet weather and are spread by splashing rain. An epidemic of these diseases may occur when weather events (for example, hail or high winds) cause small wounds in the leaves, which allow the bacteria to enter the leaf.
Bacterial wilt can begin from seed-borne infection or through wounds in stems or leaves. Secondary infection occurs similarly to other bacterial pathogens. Bacteria wilt spreads quickly within a plant, and during periods of high temperature and moisture stress, will cause the plant to wilt and eventually die in severe infections.
Common blight lesions on leaves begin as small, greasy green spots, which later develop into large brown areas surrounded by a narrow lemon-yellow border. Veins near the lesions are darkened. Infected pods develop greasy green lesions with brick red margins. Pod lesions exude yellow ooze in wet weather. Seeds may be shriveled and discolored.
Halo blight first appears as small water-soaked or greasy green spots, which develop into small dead spots. Nearby veins may be darkened. During cool weather, the lesions are surrounded by light green halos up to ½ inch or more in diameter.
Pod lesions are similar to those of common blight except that they exude a creamy white ooze in wet weather. Occasionally, halo blight infections may become systemic, causing stunted, yellow and malformed leaves. Whole plants also may be stunted.
Brown spot first appears as small water-soaked spots. These spots remain small, turn a reddish brown and are surrounded by a narrow, light green halo. Nearby veins may be darkened. Pod lesions are similar to those produced by halo blight.
Bacterial wilt often causes whole planting wilting, particularly under hot and dry conditions. Foliar symptoms include interveinal necrotic lesions, sometimes with yellow borders, similar to those of common blight. If the plant survives long enough to produce seed, the seed often is stained different colors (commonly yellow, purple or orange).
Bacterial Blights Management
Clean seed: Plant high-quality certified seed.
Crop rotation: Use a three- to four-year crop rotation.
Resistance: Breeders and pathologists actively work to develop dry edible beans that are less susceptible to bacterial blights. Consult the most current information on cultivars to help manage bacterial blights.
Fungicides: Fungicides do not work on bacteria. Cupric hydroxide (copper) compounds have been used in a program approach (multiple applications) in the central Great Plains under irrigated conditions and have shown good results in that environment. These products often have to be applied multiple times for disease management. North Dakota trial results have been inconsistent and additional research is being conducted. Additional products, such as hydrogen peroxide sanitizers, have shown similar efficacy in some studies.
Soybean Cyst Nematode
The plant-parasitic nematode soybean cyst nematode (SCN) can infect and cause yield loss on dry edible beans. SCN occurs in multiple areas in the growing region and continues to spread.
SCN survives in eggs, often protected inside a cyst. After eggs hatch, the nematode goes through a series of molts. In the life cycle, second-stage juveniles infect the root to form adult females. Female worms feed on the root, mate and expand in size as eggs inside develop.
Each female contains approximately 200 eggs. Only once the female worm has expanded is she visible with the unaided eye and appears as a tiny, white, lemon-shaped cyst. Through time, the female turns brown and dies, making visual identification again nearly impossible.
Under ideal conditions, the life cycle can repeat approximately every 24 days. In our growing region, the life cycle is thought to usually repeat two or three times in the season.
SCN is spread in soil by any means soil moves. Commonly, SCN is moved within fields, among fields and long distances in soil on equipment. SCN also is moved easily by tillage, floodwaters, wind, birds and any human or animal that moves soil.
Soybean Cyst Nematode Management
Limit soil movement: Cleaning soil off equipment before movement into adjacent fields can help limit the spread of SCN and other pathogens and pests. This is particularly important when equipment is moved long distances. Make sure that any equipment purchased from areas outside the growing region are cleaned in the area where they are purchased.
Soil sampling: Soil sampling is the more effective way to test for the presence of SCN. Similarly, it is the only way to determine the level of infestation (egg counts).
Soil sampling for SCN is different than soil sampling for fertility. In fields where the possibility of SCN occurring is not known, focus sampling on areas where SCN is most likely to be introduced, such as field entrances (via equipment), shelter belts (via wind), low spots (via flooding) or areas where SCN is likely to be established, such as alkaline areas or unexplained low-yielding spots.
Genetic resistance: Breeders and pathologists are working actively on incorporating resistance into dry edible beans. Additionally, susceptibility to SCN varies among market classes, with kidney bean allowing the highest reproduction of SCN (they are the most susceptible) and black bean allowing the lowest (less susceptible). Consult the most current cultivar information when considering genetic resistance.
Crop rotation: Soybeans and dry edible beans are the two crops grown in our region that are hosts to SCN. We recommend rotation to other crops for at least two consecutive years.
Weed control: Several weeds in our region allow SCN to reproduce and increase, making weed control critical for disease management.
Control volunteers: Volunteer dry edible beans and soybeans will allow SCN to increase.
Seed treatments: Nematicide seed treatments may be available. Limited efficacy data on dry edible beans exists.
Nonparasitic Disorders
Baldhead
Seedlings have no growing point. Cotyledons may or may not be attached; often they are broken. A few weak stems may develop from the axils of the cotyledons. Roots may be damaged and grow poorly.
The problem is caused by mechanically damaged seed. Damage may be more severe on navy than pinto beans. To help prevent baldheads, purchase high-quality seed. Seed producers should thrash full windrows, harvest when pods are limber and use low cylinder speeds. Carefully handle seed during conditioning and shipping.
Bronzing
Upper leaf surfaces are covered with small golden-brown spots that make the leaf appear bronze. Bronzing is caused by ozone from industrial or urban pollution or meteorological phenomena.
Chimera
Genetic abnormalities may occur in plants, resulting in variegated leaves with patches of green, yellow and/or white tissue. Some branches or the entire plant may be affected. Pods also may be affected. Cool temperatures (below 61 F) for long periods during germination may increase the frequency of leaf variegations.
Sunscald
Small brown patches appear between the main veins. These expand, developing into large areas of dead tissue between apparently sound green veins. Sunscald is most likely to occur when warm, sunny and windy weather follows cool, cloudy and humid weather.
Insect Management in Dry Edible Beans
Janet Knodel, NDSU Extension Entomologist
In North Dakota and Minnesota, the most problematic insect pests of dry edible beans are potato leafhoppers, seedcorn maggots and grasshoppers. Spider mites also are damaging to dry edible beans during hot, dry conditions, which favor mite populations.
Occasionally, various caterpillars infest beans and can cause severe defoliation. For example, thistle caterpillar infestations defoliate young plants, particularly in areas of fields where Canada thistle has been treated with herbicides recently. This may prompt an insecticide treatment to reduce economic densities of caterpillars.
Estimating Insect Feeding Injury
In dry edible beans, field scouting to assess insect populations is based on the number of insects per foot of row, number of insects per plant or the level of defoliation. Scout a minimum of five sampling sites per field by walking an “M” pattern throughout field, and examine 10 or more plants per sampling site for insect pests or defoliation levels.
Insects per foot of row are determined by shaking plants over the row space on which a strip of cloth has been laid. Count the total number of insect pests per foot of row that falls on the cloth.
The percent of defoliation is estimated visually by the amount of leaf loss on the lower, middle and upper canopy on randomly selected plants throughout the field and calculating an average defoliation from the whole plant.
The growth stage of the plant is important. Under most conditions, moderate defoliation early in the season has little effect on final bean yield. As plants reach the flowering and pod filling stages, defoliation poses a greater threat to yield and seed quality.
For insecticides registered for dry edible bean, consult the bean section of the latest version of NDSU Extension’s “North Dakota Field Crop Insect Management Guide” (E1143) at www.ag.ndsu.edu/publications/crops/north-dakota-field-crop-insect-management-guide.
Photographs at the end of this publication provide examples to identify insects and their damage.
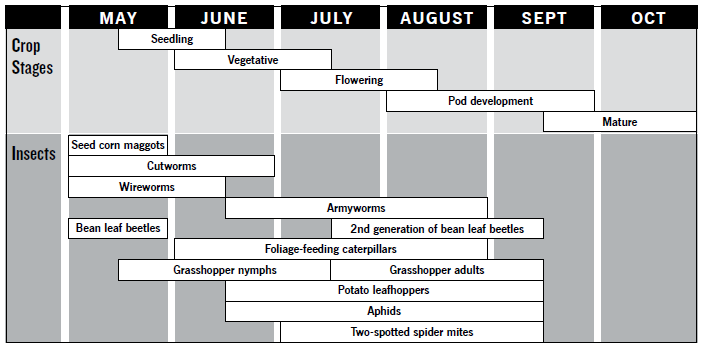
Table 17. Growing season calendar indicating time of occurrence of dry edible bean insect pests.
Bean Aphid
(Hemiptera: Aphidae: Aphis fabae Scopoli)
The bean aphid has not been a major pest in North Dakota and Minnesota. It is nearly black and c inch long. Bean aphids feed along stems and on the underside of leaves. Aphids feed by sucking sap from plants, causing stunting and curling of leaves.
Infestations may result in a buildup of honeydew on leaf surfaces, promoting the growth of a black, sooty fungus. Bean aphids also vector the bean common mosaic virus and bean yellow mosaic virus.
Threshold
No economic threshold has been established in our area. In other areas of dry bean production, an average of 30 or more aphids per plant is recommended as the action threshold.
Armyworm
(Lepidoptera: Noctuidae: Mythimna unipuncta [Haworth])
Armyworms are greenish brown with pale and dark longitudinal stripes. Fully grown larvae are smooth, striped and almost hairless.
Armyworms feed for three to four weeks. When fully grown, larvae are 1½ to 2 inches long. Armyworm larvae have six growth stages, or instars. The final instar lasts about 10 days, and they consume large amounts of plant material during that time.
Armyworms are inactive during the day, resting under plant trash and clumps of grass or lodged plants. They feed at night or on cloudy days, crawling up on plants and consuming foliage. Due to their habit of feeding at night, armyworms may go undetected until significant damage has occurred.
Armyworms do not overwinter in the region. Moths migrate from southern states in late spring and early summer. This helps explain the sporadic infestations that occur.
When moths arrive, they prefer to lay their eggs in moist, shady areas, usually where grasses have lodged. Infestations that develop in bean fields often are due to grassy weed problems.
Armyworms are more of a problem in small grains and corn. Damage to dry beans can occur when the armyworms’ usual host plants become exhausted due to feeding or dry conditions. When their food is depleted in the hatching site, armyworms may move in large numbers or “armies,” eating and destroying plants or crops in their path.
Threshold
Control of armyworms is recommended when 25% to 30% of the foliage is destroyed or if significant injury to pods is evident, or you find an average of four or more armyworm larvae per row foot.
Bean Leaf Beetle
(Coleoptera: Chrysomelidae: Cerotoma trifurcata [Förster])
Bean leaf beetles are uncommon in North Dakota and Minnesota. This beetle can vary from yellow to reddish brown, and usually has four spots with a central triangle and a black border on the wing covers.
Adults emerge from overwintering sites and move into bean fields as the seedlings emerge. The white larvae develop in the soil, feeding on the roots and nodules.
Feeding injury to leaves appears as small, round holes between the leaf veins. New adults emerge in late July and August, and feed on foliage and pods causing defoliation.
Defoliation appear as small round holes between the leaf veins. The chewing injury on pods results in scarring and secondary infections by fungi and bacteria, causing rotting and discoloration. Pod injury results in reduced yield and seed quality when populations of bean leaf beetle reach economic thresholds.
Threshold
No local control guidelines have been developed. However, treatment is recommended at 50% defoliation at the seedling stage, 25% defoliation at the pod set/filling stages or 10% of the pods are damaged.
Cutworms
(Lepidoptera: Noctuidae)
Several cutworm species affect regional crops. The dingy cutworm, Feltia jaculifera (Guenée), overwinters as a partially grown larva and is one of the first cutworm species to cause problems during crop emergence from early to mid-May.
Dingy cutworm females lay eggs on sunflower heads from mid-July through September. Dry beans and other crops following sunflower in rotation are at greatest risk of injury by dingy cutworm.
Redbacked cutworm, Euxoa ochrogaster (Guenée), and the darksided cutworm, Euxoa messoria (Harris), overwinter as eggs, which hatch in mid to late May. Eggs are laid in the fall and survive in weedy and reduced-tillage areas. Feeding injury by these cutworms normally occurs in late May to early June.
Most of the damage by cutworms occurs when bean plants are in the early stages of development. Damage consists of young plants being chewed off slightly below or at ground level. Some cutworm feeding injury may occur on foliage.
Cutworms primarily feed at night. When checking bean fields for cutworms during the day, dig down into soil an inch or two around recently damaged or wilted plants to find the gray to brown larva.
Threshold
Treatment is warranted when one or more cutworms are found per 3 feet of row and the larvae are small (less than ¾ inch long), or 5% of the plants are damaged by cutworm7s.
Foliage-feeding Caterpillars
Green Cloverworm, Cabbage Looper, Velvetbean Caterpillar, Thistle Caterpillar and Alfalfa Webworm
These caterpillars (larvae) are sporadic and populations typically are low in North Dakota and Minnesota, with minimal treatment necessary. To find these caterpillars that blend in with the bean foliage, place a dropcloth between two rows of plants and vigorously shake plants over the cloth to dislodge caterpillars from the plants. Then count the number of larvae to arrive at an estimate of the number per row feet.
However, the threshold used for all foliage-feeding caterpillars is based on defoliation. When estimating defoliation, remember to look at the lower, middle and upper canopy of foliage and calculate an average for the whole plant. Foliage-feeding caterpillars often caused the most damage only to the upper foliage of beans.
■ Green Cloverworm (Lepidoptera: Erebidae: Hypena scabra [Fabricius])
These caterpillars are green with two narrow, white stripes down the side. When mature, the caterpillars are 1¼ inches long. These caterpillars have only three pairs of fleshy prolegs on the abdomen, plus the pair on the posterior end.
Green cloverworm caterpillars move by arching the middle of the body, or “looping.” Young worms scrape leaf tissue, creating a transparent skin, or “window,” on the leaf surface. Older cloverworms eat holes in the leaves.
■ Cabbage Looper (Noctuidae: Trichoplusia ni [Hübner])
These caterpillars are light to dark green, with lighter-colored stripes along the sides and top running the length of the body. When mature, the caterpillars are 1½ inches long. These caterpillars have only two pairs of fleshy prolegs on the abdomen, plus the pair on the posterior end.
Cabbage loopers move by arching the middle of the body, or “looping.” Cabbage loopers feed on leaves on the interior and lower portion of the plant. As defoliation occurs, caterpillars feed higher in the plant. Feeding injury is similar to what the green cloverworm causes.
■ Velvetbean Caterpillar (Noctuidae: Anticarsia gemmatalis Hübner)
This insect does not overwinter in our area. Instead, moths migrate from southern locations.
These caterpillars have dark lines bordered by light-colored, narrower lines running the length of the body. The background color ranges from a pale yellow green to brown or black. Mature larvae are about 1 inch in length.
Velvetbean caterpillars have four pairs of fleshy prolegs, which help distinguish them from green cloverworm and the cabbage looper caterpillars. Young velvetbean caterpillars feed on the underside of the leaves in the upper portion of the plant. Older larvae consume the entire leaf except for the leaf veins.
■ Thistle Caterpillar (Nymphalidae: Vanessa cardui [Linnaeus])
This caterpillar is the larva of the Painted Lady butterfly. This butterfly does not overwinter in the region but migrates from southern locations each spring.
Thistle caterpillars are brown to black, with yellow stripes along each side of the body. They are covered with scoli (fleshy structures) that give the caterpillar a prickly appearance. Fully grown larvae are about 1½ inches long. The caterpillars feed on the leaves, webbing them together at the feeding site.
■ Alfalfa Webworm (Crambidae: Loxostege cereralis [Zeller])
These caterpillars are 1 inch long when fully grown and feed for about three weeks. They are greenish to nearly black, with a light stripe that runs down the middle of the back. They have three dark spots, each with hairs, on the side of each segment.
Infestations are characterized by light webbing over the leaves. The larvae feed beneath the web, consuming the leaves. These larvae move very rapidly, forward or backward, when disturbed.
Threshold for foliage-feeding caterpillars: Control of these different caterpillars normally is not warranted until greater than 25% to 30% of the foliage is destroyed. This usually requires an average infestation of 10 to 15 larvae per foot of row.
Grasshoppers
(Orthoptera: Acrididae)
In the northern Plains, the grasshopper egg hatch normally begins in late April to early May. Most grasshoppers emerge from eggs deposited in uncultivated ground.
Bean growers should expect to find grasshoppers feeding first along bean field margins adjacent to these sites. Later infestations may develop when grasshopper adults migrate from harvested small-grain fields.
Grasshoppers will attack leaves and pods. Due to these migrations, bean fields become sites for significant egg laying.
Thresholds
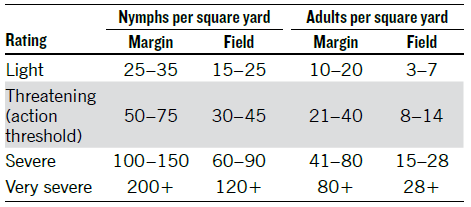
“Threatening” is considered the action threshold for grasshoppers. Because estimating the number of grasshoppers per square yard is difficult when population densities are high, pest managers can use four 180-degree sweeps with a 15-inch sweep net, which is equivalent to the number of adult (or nymph) grasshoppers per square yard.
Table 18. Grasshopper rating and number of nymphs and adults.
Potato Leafhopper
(Hemiptera: Cicadellidae: Empoasca fabae [Harris])
Potato leafhoppers are a key pest of dry edible beans. They do not overwinter in our area. Adult leafhoppers migrate from southeastern states during the spring and early summer.
Large numbers of adults may appear early in the season if weather conditions favor their migration into North Dakota and Minnesota. Adult potato leafhoppers can move from cut alfalfa fields, a preferred host, to dry bean fields quickly.
The adult is 1/8 inch long, wedge-shaped and pale green. Adults are very active, jumping or flying when disturbed. Nymphs resemble the adults but are smaller and wingless. Adults and nymphs will run backward or sideways rapidly.
Females lay eggs inside the stem. Nymphs hatch from the eggs in seven to 10 days, and usually complete their growth in two to three weeks on the leaf where they hatched, feeding on the underside of the leaf. Because nymphs are not as mobile as adults, they are regarded as the more damaging life stage to the bean plant.
Adults and nymphs feed on plant sap and inject a toxic saliva during feeding. Foliage becomes dwarfed, crinkled and curled. Small triangular brown areas appear at the tips of leaves, gradually spreading around the entire leaf margin. This feeding injury caused by leafhoppers is referred to as “hopper burn.”
Scouting should begin early June. Examine five sets of 20 trifoliolate leaves on randomly selected plants throughout the field. Potato leafhoppers typically are found on the underside of leaves.
When counting leafhoppers, cup your hands under the leaves and leafhoppers will move to the upper leaf surface for easier counting. Count and record adults and nymphs per trifoliolate leaf and calculate an average numbers of leafhoppers (adult and nymph) per trifoliolate leaf.
Threshold
The threshold for spray decisions is an average of 0.5 leafhopper per plant in unifoliolate stage beans. On plants with one or more fully expanded trifoliate leaves, treat when one leafhopper per trifoliolate leaf is found. Do not let infestations and damage progress to the point that yellowing of foliage is observed easily.
Seedcorn Maggot
(Diptera: Anthomyiidae: Delia platura [Meigen])
Larvae of the seedcorn maggot attack bean seeds, which weakens seedlings and even may prevent germination. The yellowish-white maggot is found burrowing in the seed or emerging stem.
Flies emerge in the spring when soil temperatures reach 50 F. They deposit eggs in soil with abundant organic matter and decaying crop residue, or on the seed or seedling.
Seedcorn maggots are usually most severe in wet, cold springs and on high organic-matter soils. Tillage performed just prior to planting has been shown to attract flies to these sites for egg laying.
Thresholds
When conditions are wet and cool or planting into high crop-residue conditions, insecticide seed treatments provide the best defense against infestation and injury.
Two-spotted Spider Mites
(Acari: Tetranychidae: Tetranychus urticae Koch)
Spider mites are small, and a hand lens is required to see them. A quick sampling procedure to determine whether mites are present is to hold a piece of white paper below the leaves and gently beat them to dislodge the mites. The mites appear as tiny dust specks; however, they will move after being knocked off the leaf.
Mites feed on the individual plant cells, removing the green chloroplast, which results in small yellow spots (stippling) on leaves. As feeding activity increases, leaves become yellow, bronzed or brown and eventually shed from the plant. Mite webbing may be present on plants as mites balloon on webs to disperse among plants and between fields.
Mites usually become a problem when hot, dry weather occurs. Infestations typically are noted first near field edges. Dry conditions stress the plants, whether mites are present or not.
If conditions continue, treating for mites is no guarantee plants will recover. In addition, products labeled for mite control often do not give adequate control, and the population of mites may rebound quickly to pretreatment levels or higher.
When rain and humidity are present, natural reductions in mite populations occur due to infection by fungal pathogens. Conditions that are good for the development of pathogens are temperatures cooler than 85 F, with at least 90% relative humidity for 12 to 24 hours.
Threshold
Deciding whether to treat is difficult. No specific threshold has been developed for two-spotted spider mites in dry edible beans. Sample plants at least 100 feet into the field and walk in a “U” pattern, sampling two plants per location at 20 different locations. A general action threshold is to treat when the lower one-fourth to one-third of the canopy has mite damage symptoms (yellowing canopy) and/or mites present.
Spider mites are difficult to control and may require two applications of insecticide using different modes of action. Remember to use an organophosphate insecticide (for example, Dimethoate) rather than a pyrethroid insecticide to avoid flaring mite populations. However, the only exception is the active ingredient bifenthrin (a pyrethroid), which does not flare mite populations and provides control of mites.
Reasons for the increase in mite populations from some pyethroids include: disruption of the natural enemies that control spider mites (predatory mites), increased movement of mites out of fields and increased reproductive rates of female mites. Early detection facilitates timely and effective rescue treatments.
Insecticides provide short-term protection, maybe seven days, from the spider mites. Fields will need to be monitored continually for resurging populations. The efficacy of an insecticide can be improved significantly with sufficient water coverage (greater than 18 gallons per acre [GPA]) by ground and 3 to 5 GPA by air and application at high pressure to penetrate foliage.
For insecticide-resistance management of mites, do not apply the same class of insecticide (or mode of action) more than twice, and alternate the class of the insecticides (or mode of action) to prevent buildup of insecticide-resistant mite strains.
Wireworms
(Coleoptera: Elateridae)
Wireworms are most likely to be a problem when dry edible beans follow pasture, land in the Conservation Reserve Program or grassland. Infestations often are found in coarse-textured soils (sandy loam) where moisture is abundant, perhaps in low spots of fields.
Threshold
No easy way exists to estimate wireworm infestations. The following are two methods used:
1) Soil sampling: Sample 20 well-spaced 1-square-foot sites to a depth of 4 to 6 inches for every 40 acres being planted. If an average of one wireworm per square foot is found, treatment would be justified.
2) Solar baiting: In September, establish bait stations for two to three weeks before freeze-up. Place bait stations randomly through the field but representing all areas of the field. You should have 10 to 12 stations per 40 acres. Place 1 cup of wheat and 1 cup of shelled corn in a 4- to 6-inch-deep hole. Cover the grain with soil and then an 18-inch-square piece of clear plastic. Dig up the grain and surrounding soil after one to two weeks or leave until spring. If an average of one or more wireworm larvae is found per station, treatment would be justified.
Seed Treatment: Insecticide seed treatments should be applied as commercial or on-farm application for managing wireworms in dry edible beans.
Irrigation and Water Use
Tom Scherer, NDSU Extension Agricultural Engineer
For maximum yield potential, dry beans will use about 14 to 18 inches of soil moisture during the growing season, depending on the cultivar. With good management, irrigation can supplement rain to provide optimum soil moisture conditions throughout the growing season.
For those years where the growing season-available water (soil moisture plus rain) is less the 14 to 18 inches, each additional inch of water provided by irrigation will result in an additional 150 to 300 pounds of yield, depending on bean class and cultivar.
Daily dry bean water use or evapotranspiration (ET) depends on the stage of growth, local weather conditions, available soil moisture, disease pressure and soil fertility. Plant architecture (Type I, II, III and IV) also will affect the daily dry bean water use. Generally, the larger, bushier dry bean types will use more water than the shorter, narrow types.
The frequency and amount of irrigation depends on the growth stage of the beans (which determines the daily crop water use), the water-holding capacity of the soil in the root zone and the prevailing weather conditions.
Dry Bean Rooting Depth and Water Use
Beans are shallow rooted. Typically, in deep soils, roots grow laterally 8 to 12 inches and downward to a depth of 3 feet or more.
Root distribution is concentrated near the soil surface. About 90% of the roots will be found in the top 2 feet, which is considered the effective rooting depth for irrigation purposes. During the course of a growing season, only about 10% of the water used by the beans will be drawn from the soil below 2 feet.
Average bean water use rates will increase from about 0.05 inch per day soon after emergence to more than 0.25 inch per day during pod development (Figure 3). The bean water use amounts include the evaporation from the soil surrounding the plants. Water use is a depth measurement because the assumption is that the beans remove soil water from under every square foot of soil surface in the field.
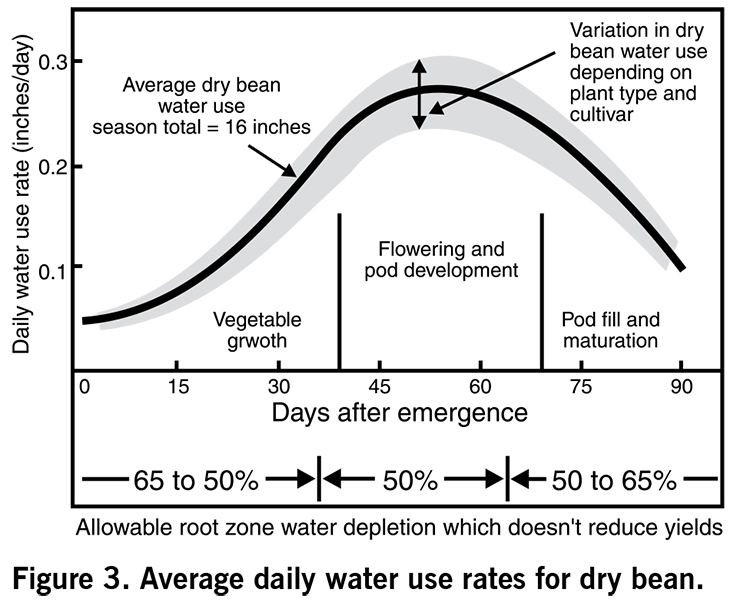
Water-holding Capacities of Soil
The depth and water-holding capacity of the soil have a great influence on when and how often irrigation is required. Soil texture determines the amount of available water in the root zone (Table 19), although other factors such as organic matter and soil compaction will modify these numbers. Note that the greater the water-holding capacity of the soil in the root zone, the less frequent the irrigation applications should be.
Knowing the soil texture and water-holding capacity of the dominant soil type in a field and using that information to make irrigation decisions is important. However, if different soil types are in the same field, irrigation scheduling should be adjusted based on the most drought-prone soil type.
Table 19. Approximate available soil water-holding capacities for various soil textural classifications.
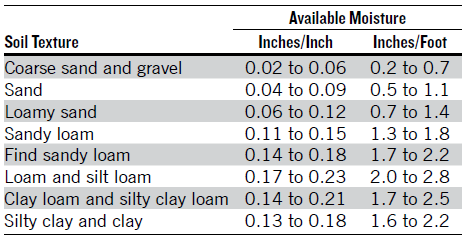
Irrigation Water Management
Having a soil profile that is near field capacity at planting, which occurs naturally with normal fall and spring rainfall, together with some winter snowmelt, is highly desirable. Stored soil moisture lower in the root zone serves as a supplement during high water-use periods.
Beans planted on shallow soils (12 to 18 inches of top soil) underlain by coarse sand and gravel will have a reduced root zone. That means less soil moisture is stored and available to the plants. Sometimes, this requires applying less per irrigation (0.75 inch) more frequently, compared with deeper soils with greater water-holding capacity.
During the period prior to flowering and the period after the majority of the pods are full, dry beans are relatively drought-tolerant. They can withstand 50% to 60% soil water depletion without a significant impact on yields (Figure 3). However, during the flowering and pod-development period, soil moisture levels in the root zone should not be depleted more than 50% (preferably 40%) to achieve maximum yields.
The first irrigation should be applied when the soil moisture is between 50% and 60% depleted after emergence. With normal rainfall, this should be when the beans are almost at flowering. After flowering, irrigate before the soil moisture profile reaches 50% depletion.
Beans will mature properly if ample moisture is available during the vegetative growth stage (pre-flowering) and if the last irrigation occurs when the first pods are filling. Late-season irrigations can delay maturity. If the beans are starting to dry, irrigation will not be needed because the beans no longer are removing much water from the soil profile.
Most center pivots should be set to apply from 0.75 to 1 inch of water per revolution, which could take from 2½ to 3½ days. During flowering, monitoring the soil moisture profile frequently is critical because keeping up with the dry bean water use during periods of high temperatures and wind may be difficult. However, if white mold is a concern with rainfall/irrigation occurring during flowering, another strategy could be to fill the soil profile with water prior to flowering and avoid irrigation until pods are set.
Some tips for good irrigation management of beans:
• Irrigations may need to be scheduled to minimize disease problems rather than maximize yield.
• Maturity may be delayed up to 15 days by letting the soil get too dry after planting, and yield potential also will decrease.
• Avoid excessively dry soil levels during the flowering stage. The shock of watering dry soil can cause flowers to fall off the plant.
• Do not irrigate when lower foliage on the plant is still wet from rainfall or irrigation.
• To avoid aiding the development of white mold, do not use light, frequent irrigations. Set your pivot timer to apply 0.75 to 1 inch each irrigation event. A wet soil surface contributes to white mold development, especially during flowering.
• Late-season irrigations may delay the final maturity date.
Irrigations can be terminated when at least 80% of the pods show yellowing and are mostly ripe. Another indicator is when 50% of the leaves are yellowing on the plant.
Irrigation Scheduling
Determining when to start and stop an irrigation system is a very important part of irrigation water management. Soil in the root zone is the reservoir that stores water for a crop’s use.
Soil moisture levels in the root zone are the criteria used to determine when to start and stop irrigations. Several soil moisture monitoring tools are available to estimate the soil moisture level at a particular time and location in the field.
Soil moisture estimates can be done several ways. The “soil feel” method is the most widely used. It involves using a soil probe to obtain a soil sample from specific depths in the root zone, and the amount of soil moisture is estimated by squeezing the soil in the palm of your hand. Accuracy of the soil feel method improves with experience.
Soil moisture also can be measured using tensiometers, soil moisture blocks and other devices. When these are used, typically a measurement site may have two sensors, one at 12 inches and one at 18 to 24 inches below the soil surface. The soil moisture level is estimated by reading a gauge on the device or with a portable meter. These devices only indicate the soil moisture status at that particular location.
Measuring soil moisture for irrigation scheduling requires a high level of dedication by the irrigation manager during the growing season. Informed irrigation decisions require reading soil moisture measurements two or three times per week. Measurements must be taken at several locations in the field and the readings recorded.
Another form of irrigation scheduling requires daily bean water-use estimates. This method, sometimes called the “crop water use replacement method,” is based on obtaining daily estimates of bean water use and measuring rainfall amounts. Irrigations are scheduled to replace the amount of soil moisture used by the beans minus the amount of rain received since the last irrigation. Estimations of average water use for beans based on maximum daily temperature are shown in Table 20.
During the growing season, better dry bean water use estimates can be obtained from the North Dakota Agricultural Weather Network (NDAWN) website: ndawn.ndsu.nodak.edu/crop-water-use.html. Look under “Applications” on the left-hand menu. These estimates are based on the weather station closest to your field location.
The best choice of tools for irrigation scheduling is a combination of in-field soil moisture measurement and a recorded daily soil water accounting procedure called the “checkbook” method. Three different checkbook tools are available at www.ag.ndsu.edu/irrigation/irrigation-scheduling.
Table 20. Average dry bean water use based on maximum daily air temperature, week after emergence and growth stage (inches/day).
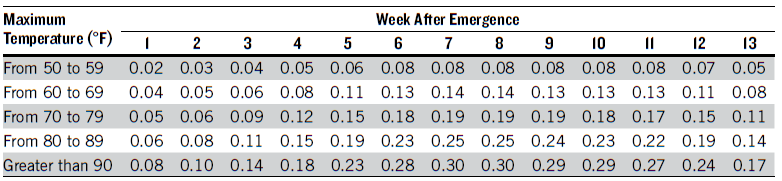
The checkbook method has been used successfully for many years in Minnesota and North Dakota. The checkbook method is based on daily bean water use and the soil water-holding capacity. Along with rainfall measurement, these parameters help predict the time and amount of water needed to replenish the root zone to maintain proper soil moisture levels.
Harvesting Dry Beans
John Nowatzki, NDSU Extension Agricultural Machine Systems Specialist
Estimating Bean Yield
Bean yields can be estimated by knowing the number of seeds per pod, pods per plant and plants per 1/1,000 of an acre. At the time of counting seeds and pods, the maturity status of each should be determined.
If a seed or pods appear not to mature, they shouldn’t be counted. Count the total plants per 1/1,000 acre to complete the data collection. An accurate estimate of plant population per acre can be obtained by counting the number of plants in a length of row equal to 1/1,000 of an acre. Make at least five counts in separate representative areas of the field, calculate the average of these samples and then multiply this number by 1,000.
Table 21. Length of row equal to 1/1,000 of an acre.
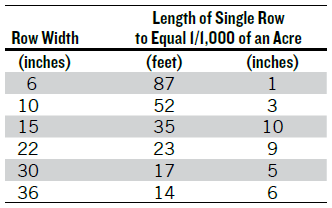
Within a representative and uniform plant stand, randomly select five plants each from at least five randomly selected locations in the field. Keeping all plant data separate, pull and count the pods from each plant and then count the seeds to determine average seeds per pod for all five replications. These data are combined with the average number of plants per 1/1,000 acre.
Seeds per pound can vary 10% to 20% for different cultivars within a bean class. If available, use reported estimates for seed number per pound for your cultivar. The accuracy of yield estimates can be improved by counting seeds and pods from at least 10 plants per replication.
(Average seeds per pod) x (average pods per plant) equals average seeds per plant.
(Average seeds per plant) x (plants per 1/1,000 of an acre) x (1,000) divided by seeds per pound of the cultivar equals yield in pounds per acre. Use data in Table 6 for the range in seed weights by class to arrive at seeds per pound if cultivar seeds per pound are unknown.
Harvesting
Bean harvesting is done by one of two ways: undercutting, windrowing and combining from the windrow or straight combining. Beans should be harvested at the 15% to 18% moisture level to minimize splitting and seedcoat damage.
Harvesting at lower moisture levels may result in an excessive percentage of split beans and checked/cracked seedcoats. Beans with damaged seedcoats may split with further handling.
Harvest beans before a killing frost. Frozen immature beans are difficult to separate in processing, while unfrosted immature bean seeds will shrink during drying and can be separated.
Beans are ready for harvest when some of the pods are dry and when the majority of pods have turned yellow. The nearly mature beans in the yellow pods will continue to ripen after they are cut. Too many dry pods at harvest will result in heavy shattering.
Shattering can be reduced by undercutting and windrowing at night or early in the morning when the plants are damp with dew. All bean classes, but especially whites, require a harvest period relatively free from rain to avoid seed discoloration.
Undercutting and Windrowing
Undercutting and windrowing often are used to harvest Type III and IV (indeterminate) cultivars. Dry beans may be undercut and windrowed in two separate operations or as a single operation.
Blade type undercutters knife the plant root 1 to 2 inches below the soil surface while the bean rod breaks partially cut roots and lifts the plants from the soil. The number of rows to be placed in one windrow will depend on the density of the crop and the size of the combine used. Leave beans in the windrow only long enough for the lower stem and attached plant parts to dry sufficiently for combining.
Direct Harvesting
Bush type beans may be harvested with a straight-cut attachment on a combine. Combines equipped with flexible cutter bars and pickup reels operate much closer to the soil and save more seed, compared with a conventional grain table. Most field losses are caused by pods being cut by the cutter bar or the cutter bar operating at an incorrect speed.
Previous equipment developments include replacing or supplementing the pickup reel with an air reel to help move plants across the cutter bar. Research has shown that field losses with conventional straight-cut type headers can range from 20% to 40% of the yield. Grower experiences with direct-cut headers suggest that the addition of an air reel and supplemental lifter guards to a flexible cutter bar can reduce loss to 5% to 15% of the total yield.
Direct harvest reduces equipment investment, harvest time and operational costs but is associated with reduced seed yield and quality. Direct harvesting is common for navy and black beans, due to their upright architecture. Direct harvest is also used with some pinto and great northern cultivars due to improved upright architecture.
Field surveys at harvest time were conducted across three counties in the Devils Lake region in North Dakota. The average seed loss was higher for direct harvesting than for the conventional method (undercut and windrowed prior to combining) mainly due to a larger seed and pod loss measured in the area between combine harvest swaths, indicating losses occurred at the cutter bar.
The best three conventional harvested fields averaged 24 pounds per acre (lb/acre) of harvest loss, while the three worst fields averaged 219 lb/acre of harvest loss. The best three direct-harvested fields averaged 101 lb/acre of harvest loss, while the three worst fields averaged 347 lb/acre of harvest loss.
These surveys suggest that the loss can be lowered significantly by improving management conditions, especially at harvest (equipment setup and operator care). Experiments were conducted (Carrington Prosper and Hatton, N.D.) to evaluate the effect of seed yield and market class (pinto, navy and black) on the most commonly grown cultivars in North Dakota and Minnesota under conditions of conventional and direct harvest. Harvest method and cultivar were consistently the most important factors contributing to seed yield and yield loss in this study.
As expected, the seed loss was significantly higher under direct harvest. Under conventional harvesting, no difference occurred in seed yield among cultivars within market class. However, under direct harvest, from three tested cultivars per market class, the cultivars Lariat (pinto), T-39 and Eclipse (black) and Vista (navy) showed the lowest yield loss when compared with the other cultivars within the same market class.
This research emphasized the important role of cultivar and environmental conditions at harvest time in determining the seed yield under direct harvest. Cultivar selection should not be based only on yield potential but also on architectural attributes leading to a minimal yield loss if the direct-harvest method is used. Growers need to consider the cultivar to be planted, environmental conditions, moisture content of the beans at harvest, adjustments to the equipment and operator skill when deciding on the harvest method to use.
Combine Operation
Grain combines frequently are used for harvesting beans, but growers with large acreages often use special bean combines. These usually have two cylinders specifically designed for bean threshing and special separating and cleaning units. These special combines do not contain augers and usually move beans with conveyor belts or bucket elevators.
Conventional combines with rasp-bar cylinders work well for beans. Rotary-cylinder combines also work well, causing less damage to seed. Rotary combines should be equipped with special dry bean rotors and the appropriate threshing bar configuration to provide optimum threshing and separation.
Combining should begin when beans reach 18% moisture content. Combine cylinders should be operated initially at a speed as recommended in the operators manual and then adjusted on a regular basis as conditions change. Some machines may need special speed reducers to obtain proper speed.
Cylinder speeds will vary among combines because diameters of cylinders and rotors vary from 17 inches up to 30 inches or more. Setting the cylinder speed as slow as possible and checking to be sure that pods are threshed to allow bean removal usually is best. Excessive cylinder speeds will cause excessive splits and checking.
Reducing the cylinder speed as the day progresses is necessary to compensate for additional drying. Also, as beans dry down, the distance between cylinder or rotor to concave should be increased. Check the operators manual for recommended cylinder speed and concave settings and then adjust accordingly.
Harvesting only during the morning and evening when the pods are tough may be necessary to hold shattering losses to a minimum and reduce the number of split beans and damaged seedcoats. Feed the combine cylinder to near maximum capacity without overloading.
Use a faster travel speed or put more rows in the windrow to maintain feeding of the combine to full capacity. The additional residue going through the threshing mechanism will cushion the beans and reduce damage.
Set the adjustable chaffer at 5/8 inch and the sieve at 7/16 inch. This should allow the threshed beans and some pods to fall through the chaffer, and the cleaning sieve will allow only threshed beans to fall through to the grain auger.
Use a relatively high fan speed and direct the blast toward the forward one-third of the cleaning shoe because crop density is the same as it is for wheat. Check the operators manual for specific recommendations.
Check the tailings return periodically to note the quantity and composition of the material being returned to the cylinder for rethreshing. Threshed beans in the tailing return indicate that the adjustable chaffer is set too tightly. Completely threshed beans returning through the auger for rethreshing generally increases the amount of split beans and checked seedcoats.
Look in the grain tank for dirt and foreign material and for beans that are split or have damaged seedcoats. Excess dirt and chaff generally indicate that the adjustable sieve is adjusted too widely or that the fan blast is inadequate or improperly directed.
Excessive seedcoat checks and splits generally indicate one or more of the following:
• The cylinder speed is too high.
• The cylinder/rotor to concave clearance is too small.
• Too many concave filler bars or grates are being used.
• Too many completely threshed beans are being returned through the tailings system.
Most combine manufacturers have a number of optional accessories available for use on beans. These usually are bean sieves, or screens placed in the grain pan and along elevator tubes. These help remove dirt and foreign material from the beans.
Always handle dry beans gently. Avoid dropping beans from great heights in unloading and handling. Bean seed checks and cracks when dropped, particularly on hard surfaces, when it is dry. Cushion or deflect the fall of beans whenever possible. Keep elevator flight chains snug so that flights do not ride on beans.
Measurement of Harvest Loss
Measuring field loss during harvest is relatively easy. Five simple steps can provide a good harvest loss estimate:
1. Locate three random sites in the field.
2. At each site, outline an area that is 1 foot in the direction of equipment travel and is as wide as the effective width of the implement. For example, if a combine is picking up windrows containing 12 30-inch rows, the width of the measurement area should be 30 feet. Examine the entire width of the implement pass, not just behind the threshing section of the combine, where loss can be concentrated.
3. Search the soil surface and through any soil loosened by harvest implements within the outlined area for seeds and unthreshed pods. Count all bean seeds.
4. Divide the number of seeds found by the number of square feet within the outlined area. This will provide the average number of bean seeds lost per square foot. Take an average of the three areas sampled within the field.
5. Use Table 22 to convert the average number of seeds lost per square foot to pounds of seed lost per acre for specific seed sizes.
For example, if a sampled area over the full effective width of an implement pass averaged one pinto bean seed per square foot, the field loss would be approximately 36 lb/acre, assuming 1,200 seeds/lb (from Table 22). To estimate the seed loss for three seeds/square foot for the same seed size of 1,200 seeds/lb, multiply 3 seeds by 1 by 36 lb/acre = 108 lb/acre field loss.
Table 22. Field loss based on the average number of seeds lost per square foot of soil and seed size of the cultivar harvested.

Another method that is easier but not as accurate is to take a 1-square-foot frame, randomly lay it on the ground and count the seeds inside the frame. If you do this at four or five places in the field, you will get a good estimate of seed loss.
Do some loss counts at places away from directly behind the combine as well as behind the combine. Making all counts directly behind the combine will give an excessively high seed loss count.
Multiply the average number of seeds lost per square foot x 43,560 (square feet per acre) and divide by the number of seeds per pound. Use Table 6 to determine the number of seeds per pound for different market classes.
Drying, Storing and Handling Dry Edible Beans
Ken Hellevang, NDSU Extension Agricultural Engineer
Research has shown pinto beans should be stored at temperatures of 40 F or cooler to maintain color and cooking quality. The Hunter-L values, a measure of the lightness, for beans stored at specific temperatures and moisture contents are shown on Table 23. Lower numbers indicate a darker color.
After 10 months of storage, pinto bean cooking times of 16% and 18% moisture beans stored at 20 F were only 1.2 times longer than before storage and at 40 F were 1.7 times longer, as shown in Table 24. Pin cooking time is the elapsed time from initiation of cooking until the piercing tip of the rod placed in contact with the surface of each bean has penetrated the seeds in the cooker. Faster cooking times are desired.
If beans cannot be kept cool, the moisture content must be low enough to permit storage without deterioration at typical summer temperatures. The recommended moisture content for beans to minimize the growth of mold is about 13% at 70 F. Pinto beans darken rapidly when exposed to light, so they should be stored in a dark environment.
Table 23. Hunter-L values (whiteness) for specified storage conditions of temperature and moisture content.

Table 24. Median pin cooking times for beans stored for 10 months at specified moisture contents and temperatures. Median cooking time before storage was 18.4 minutes. Shorter cooking times are preferred.
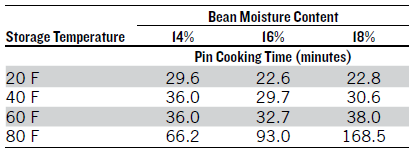
Following good storage management practices, such as measuring the temperature and moisture content of the beans at least every two weeks during fall, spring and summer and monthly during the winter is important. Whenever more than a 10-degree differential occurs between the average outdoor temperature and the bean temperature during the fall, the beans should be cooled with aeration. This should continue until the beans are cooled at least to 40 F for short-term storage and about 25 F for long-term storage.
To minimize the potential for mechanical damage, beans should be handled at moisture contents of about 16% or greater and at warm temperatures. Research shows that the potential for mechanical damage of pinto and navy beans increases at bean moisture contents of about 15% or lower (see Table 25). Research also shows that the potential for mechanical damage of pinto and navy beans increases at lower bean temperatures (see Table 26).
Table 25. Mechanical damage: cracks in the seed coat of pinto and navy beans at selected moisture contents at a temperature of 75 F.
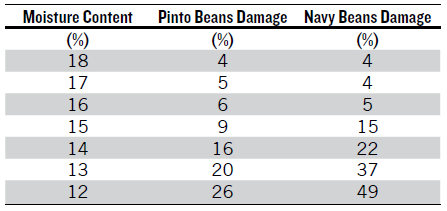
Table 26. Mechanical damage: cracks in the seed coat of pinto and navy beans at 16% moisture content and selected temperatures between 10 and 75 F.
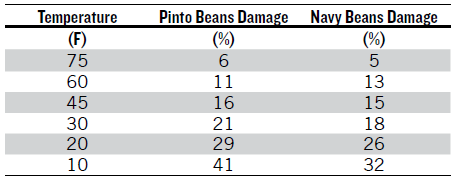
Belt conveyors are preferred due to their gentleness in conveying. A bean ladder should be used inside storage bins to reduce impact damage. The speed of auger rotation should be reduced and augers operated “full” to minimize damage. Elevator legs need to be adapted for handling beans, including reducing the discharge velocity and utilizing a method of gently slowing the beans at the bottom of sprouts.
Natural air drying will work well for drying edible beans during mid-September to mid-October in North Dakota. Based on average climatic conditions, the beans are expected to dry to about 12% to 14% moisture if the fans are operated continuously. Shutting fans off during the warmest and driest part of the day will permit drying the beans to about 15% to 16%, but will lengthen the drying time.
Fans should run during the night with higher humidity to permit drying the beans nearer to the desired final bean moisture content. Refer to equilibrium moisture content tables to estimate the moisture content to which the beans will dry based on air temperature and relative humidity.
Adding supplemental heat reduces the final moisture content of the beans and likely will result in beans dried to a moisture content lower than desired. Shut fans off during foggy or rainy weather, but do not leave the fan off for more than a couple of days to minimize the potential for bean spoilage. Recommended minimum airflow rates for various moisture contents and the corresponding estimated drying times are shown in Table 27.
Table 27. Minimum recommended airflow rates and estimated drying times for dry edible beans using a natural air drying system from mid-September to mid-October in North Dakota.
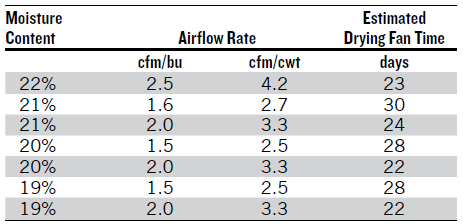
The static pressure associated with moving air through pinto and navy beans is equivalent to that of soybeans. Design the drying system using the data for soybeans.
Beans require special care when drying with a high-temperature column dryer. The relative humidity of the drying air should not be lower than about 30%. Normally, the drying should occur with the air heated less than about 20 degrees above the outdoor air temperature to keep the relative humidity above 30%.
The beans need to be monitored continuously to assure they are not being damaged. The drying process needs to be slow to minimize damage to the beans and will be slow in comparison with drying cereal grain.
Production Contracts
Frayne Olson, NDSU Extension Crops Economist
Production contracts are common in the dry bean industry. This section provides a brief overview of key contract provisions that should be reviewed and understood before entering into a production contract.
Understand what you are signing: Reading and understanding contract provisions always is important because they describe the rights and responsibilities of both parties in the agreement. Considerable differences can occur in contract terms among companies and contract provisions often change through time. Discussing contract provisions with the buyer before signing a contract can prevent misunderstandings and help maintain a strong working relationship.
Production requirements: Most dry bean production contracts specifically require the farmer (seller) to use accepted agronomic production practices and apply only registered crop protection products. Some contracts also include a list of acceptable cultivars or require the seed be purchased from the company (buyer). Because beans are used as human food, the expectation is that food safety standards and testing will become more stringent in the future. Stricter food safety requirements likely will lead to contracts including more detailed production provisions.
Act-of-God clause: Some dry bean contracts contain an Act-of-God clause, which releases the farmer (seller) from the terms of the contract due to an act of God, such as hail, drought, flood or disease. An Act-of-God clause normally only covers the production shortfall below the contracted amount. The farmer (seller) is still expected to deliver the available production from the contracted acres.
The farmer (seller) must notify the company (buyer) as soon as possible when a potential production problem occurs to ensure that this contract provision is enacted. Many contracts require the farmer to provide written notice within 10 days of an event.
Grading and quality standards: The U.S. Department of Agriculture’s Federal Grain Inspection Service standards are the core standards used to trade dry beans. However, some domestic and international end users are beginning to request more detailed grading and quality specifications. Grading and quality specifications should be clearly listed in the contract. If they are not, be sure to ask the buyer for a copy of the grading and quality standards that will be used.
Delivery period: Production contracts typically require delivery at harvest, during a pre-specified delivery period or on a “buyer’s-call” basis. Harvest delivery refers to delivery directly from the field to the agreed-upon delivery point during the normal harvest period. This is the most common type of contract in the dry bean industry. Buyers in other crop sectors commonly offer alternative prices for pre-specified delivery windows, such as the first half of October, to better match deliveries with expected shipments. Buyer’s-call refers to an open-ended delivery schedule in which the company (buyer) will determine the delivery period and schedule deliveries with the farmer (seller) when needed. Buyer’s-call typically requires the farmer to store the contracted production until delivery is requested.
Pricing and payment: Dry bean production contracts typically use a fixed-base price for the contracted production. Price premiums or discounts can be used to adjust for grade and quality differences, but the specific premium or discount rates normally are not known until the time of delivery. Payment generally is made a short time after all of the contracted production has been delivered. However, delayed payment or deferred payment options often are available.
Bean Directory
Plant Diagnostic Labs
NDSU Plant Diagnostic Lab
University of Minnesota Plant Disease Clinic
Seed Testing Labs
Minnesota State Seed Lab
Northarvest Bean Growers Association
Extension Specialists
North Dakota State University
University of Minnesota
Photos
Weeds
Figure 4. Barnyardgrass (NDSU Extension)
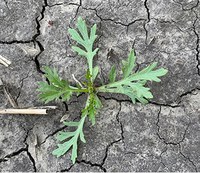
Figure 5. Biennial wormwood, seedling (NDSU Extension)
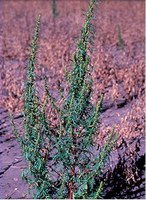
Figure 6. Biennial wormwood, adult (NDSU Extension)
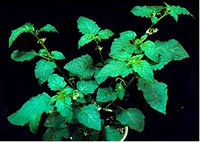
Figure 7. Black nightshade (NDSU Extension)
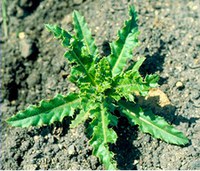
Figure 8. Canada thistle (NDSU Extension)
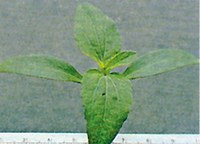
Figure 9. Cocklebur (NDSU Extension)
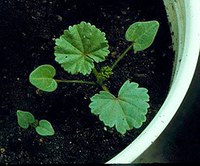
Figure 10. Common mallow (NDSU Extension)
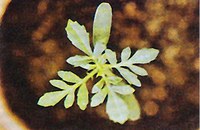
Figure 11. Common ragweed (NDSU Extension)
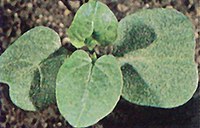
Figure 12. Field bindweed (NDSU Extension)
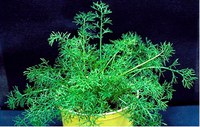
Figure 13. False chamomile, adult (NDSU Extension)
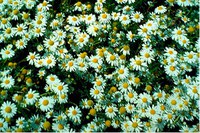
Figure 14. False chamomile, flowers (NDSU Extension)

Figure 15. Field pennycress (NDSU Extension)
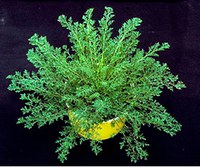
Figure 16. Flixweed (NDSU Extension)
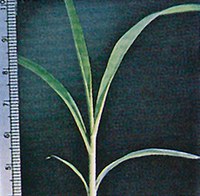
Figure 17. Green foxtail (NDSU Extension)
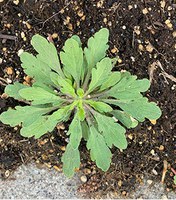
Figure 18. Horseweed, rosette (NDSU Extension)
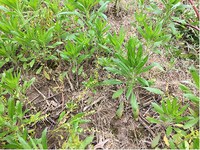
Figure 19. Horseweed, bolting (NDSU Extension)

Figure 20. Kochia (NDSU Extension)
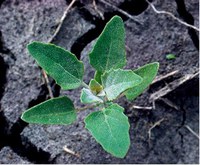
Figure 21. Lambsquarters (NDSU Extension)
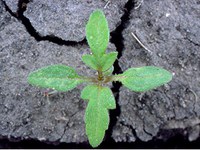
Figure 22. Marshelder (NDSU Extension)
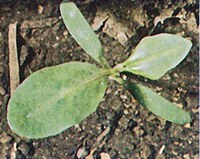
Figure 23. Pennsylvania smartweed (NDSU Extension)
Figure 24. Perennial sowthistle (NDSU Extension)
Figure 25. Redroot pigweed (NDSU Extension)

Figure 26. Waterhemp (NDSU Extension)

Figure 27. Russian thistle (NDSU Extension)
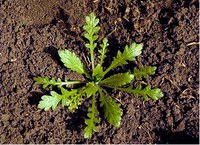
Figure 28. Shepherd’s purse, rosette (NDSU Extension)
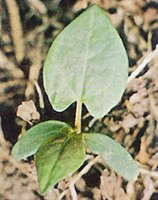
Figure 29. Wild buckwheat (NDSU Extension)
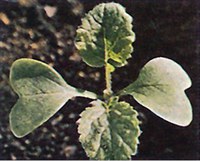
Figure 30. Wild mustard (NDSU Extension)
Figure 31. Wild oat (NDSU Extension)
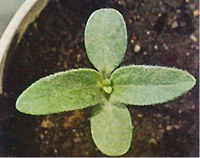
Figure 32. Wild sunflower (NDSU Extension)
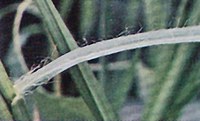
Figure 33. Yellow foxtail (NDSU Extension)
Diseases
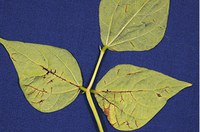
Figure 34. Anthracnose underside of leaf (S. Markell, NDSU)
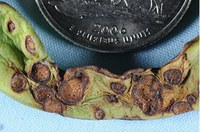
Figure 35. Anthracnose on pod (S. Markell, NDSU)

Figure 36. Anthracnose on bean (S. Markell, NDSU)
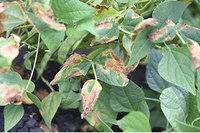
Figure 37. Common bacterial blight (S. Markell, NDSU)
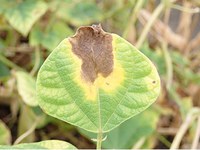
Figure 38. Common bacterial blight (S. Markell, NDSU)
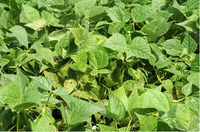
Figure 39. Rust hot spot (S. Markell, NDSU)
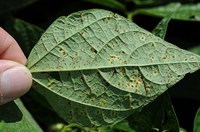
Figure 40. Rust under side of leaf (S. Markell, NDSU)

Figure 41. Rust upper side of leaf (S. Markell, NDSU)
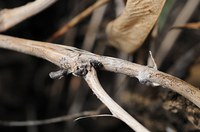
Figure 42. Sclerotia (sclerotinia) on bean stem (S. Markell, NDSU)
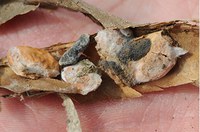
Figure 43. Sclerotia (sclerotinia) in pod (S. Markell, NDSU)
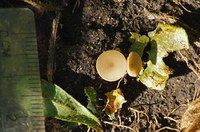
Figure 44. Sclerotinia Apothecia (M. Wunsch, NDSU)

Figure 45. Sclerotinia Apothecia (M. Wunsch, NDSU)
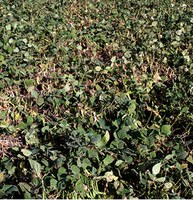
Figure 46. Field with Sclerotinia (M. Wunsch, NDSU)
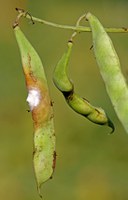
Figure 47. Sclerotinia on pod (M. Wunsch, NDSU)
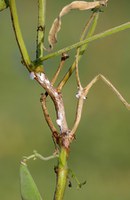
Figure 48. Sclerotinia on stem (M. Wunsch, NDSU)
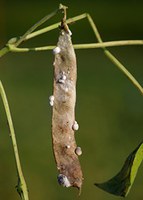
Figure 49. Sclerotinia whole pod infected (M. Wunsch, NDSU)
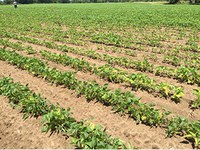
Figure 50. SCN dry bean field (G. Yan, NDSU)
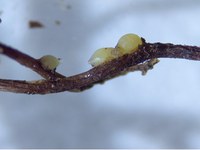
Figure 51. SCN cyst on dry bean root (G. Yan, NDSU)
Insects
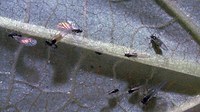
Figure 52. Winged bean aphids (H. Schwartz, Colorado State University, Bugwood.org)
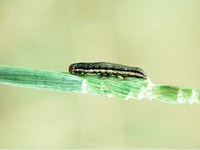
Figure 53. Armyworm larva (R. Smith, Auburn University, Bugwood.org)
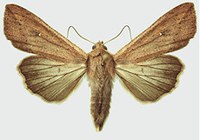
Figure 54. Armyworm adult (G. Fauske, NDSU)
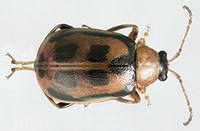
Figure 55. Bean leaf beetle adult (N. Wright, Florida Department of Agriculture & Consumer Services, Bugwood.org)
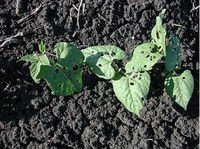
Figure 56. Bean leaf beetle defoliation (J. Knodel, NDSU)
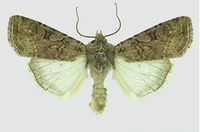
Figure 57. Darksided cutworm adult (G. Fauske, NDSU)
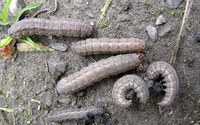
Figure 58. Dingy cutworm larvae (J. Gavloski, Manitoba Agriculture, Food and Rural Initiatives)
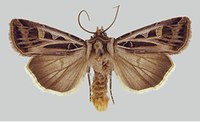
Figure 59. Dingy cutworm moth (G. Fauske, NDSU)
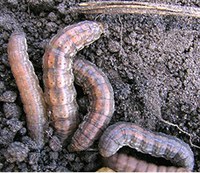
Figure 60. Redbacked cutworm larvae (J. Gavloski, Manitoba Agriculture, Food and Rural Initiatives)

Figure 61. Redbacked cutworm moth (G. Fauske, NDSU)
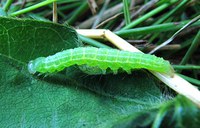
Figure 62. Green cloverworm larva (J. Gavloski, Manitoba Agriculture, Food and Rural Initiatives)
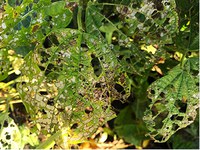
Figure 63. Defoliation caused by green cloverworms; note transparent “windows” on leaves from feeding by young larvae (J. Pasche, NDSU)
Figure 64. Green cloverworm moth (J. Gavloski, Manitoba Agriculture, Food and Rural Initiatives)
Figure 65. Green cloverworm pupae (J. Gavloski, Manitoba Agriculture, Food and Rural Initiatives)
Figure 66. Velvetbean caterpillar (J. Knodel, NDSU)

Figure 67. Painted lady butterfly (W. Ciesla, Forest Health Management International, Bugwood.org)
Figure 68. Thistle caterpillar (J. Knodel, NDSU)

Figure 69. Alfalfa webworm adult (J. Knodel, NDSU)
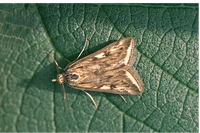
Figure 70. Alfalfa webworm adult (W. Cranshaw, Colorado State University, Bugwood.org)

Figure 71. Red-legged grasshopper adult (J. Knodel, NDSU)
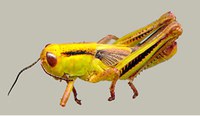
Figure 72. Grasshopper nymph (G. Fauske, NDSU)
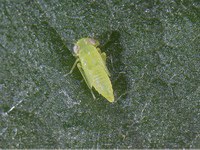
Figure 73. Potato leafhopper nymph (J. Knodel, NDSU)
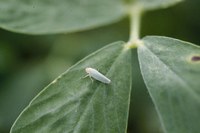
Figure 74. Potato leafhopper adult (S. Brown, University of Georgia, Bugwood.org)
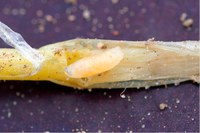
Figure 75. Seedcorn maggot larva (W. Cranshaw, Colorado State University, Bugwood.org)
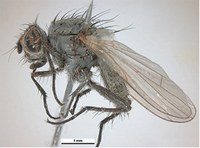
Figure 76. Seedcorn maggot adult (Pest and Diseases Image Library, Bugwood.org)
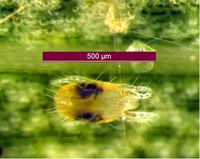
Figure 77. Close-up of two-spotted spider mite (P. Beauzay, NDSU)
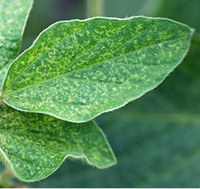
Figure 78. Two-spotted spider mite stippling injury on leaves (J. Knodel, NDSU)
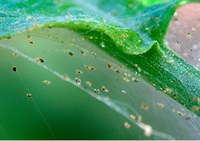
Figure 79. Webbing from two-spotted spider mites (D. Cappaert, Michigan State University, Bugwood.org)

Figure 80. Click beetles (adult wireworm) (S. Brown, University of Georgia, Bugwood.org)
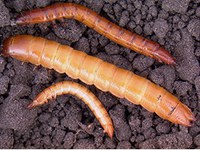
Figure 81. Wireworm (M. Boetel, NDSU)
Cover photo by Greg Endres, NDSU
Back cover photos:
Field ready for harvest by Hans Kandel, NDSU
Emerging pinto by Greg Endres, NDSU
ND Palomino beans by Greg Endres, NDSU
NDSU Extension does not endorse commercial products or companies even though reference may be made to tradenames, trademarks or service names.
NDSU Extension is solely responsible for this content.
NDSU encourages you to use and share this content, but please do so under the conditions of our Creative Commons license. You may copy, distribute, transmit and adapt this work as long as you give full attribution, don’t use the work for commercial purposes and share your resulting work similarly. For more information, visit www.ag.ndsu.edu/agcomm/creative-commons.
For more information on this and other topics, see www.ndsu.edu/extension
